EXOPLANET
OBSERVING
FOR
AMATEURS
Bruce
L. Gary

Author’s amateur
exoplanet light curve of XO-1 made in 2006 (average of two transits) with
a 14-inch telescope and R-band filter at his Hereford Arizona Observatory.
Exoplanet XO-1b moves in front of the star during contact 1 to contact
2, is obscuring ~2.2 % of the star’s disk between contacts 2 and 3, and
is moving off the star during contacts 3 to 4. The smooth variation between
contact 2 and 3 is produced by stellar “limb darkening.”
______________________________________________________________________________________________________________
Reductionist Publications,
d/b/a
5320 E. Calle Manzana
Hereford, AZ 85615
Other
Books by Bruce L. Gary
ESSAYS
FROM ANOTHER PARADIGM, 1992, 1993 (Abridged Edition)
GENETIC
ENSLAVEMENT:
A
CALL TO ARMS FOR INDIVIDUAL LIBERATION, 2004, 2006, 2008
THE
MAKING OF A MISANTHROPE: BOOK 1, AN AUTOBIOGRAPHY, 2005
A
MISANTHROPE’S HOLIDAY:
VIGNETTES AND STORIES, 2007
EXOPLANET
OBSERVING FOR AMATEURS, 2007
QUOTES
FOR MISANTHROPES: MOCKING HOMO HYPOCRITUS, 2007
THE
MAKING OF A MISANTHROPE: BOOK 2, MIDNIGHT
THOUGHTS (2009)
______________________________________________________________________________________________________________
Reductionist Publications,
d/b/a
5320 E. Calle Manzana
Hereford, AZ 85615
USA
Copyright 2007
by Bruce L. Gary
All rights reserved except for brief passages quoted
in a review. No part of this book may be reproduced, stored in a retrieval
system, or transmitted in any form and by any means: electronic, mechanical,
photocopying, recording or otherwise without express prior permission from
the publisher. Requests for usage permission or additional information
should be addressed to:
“Bruce L. Gary” <bgary1@cis-broadband.com>
or
Reductionist Publications, d/b/a
5320 E. Calle Manzana
Hereford, AZ
85615
First edition:
2007 August
Printed by
Mira Digital Publishing, St. Louis, MO
ISBN 978-0-9798446-3-8
______________________________________________________________________________________________________________
Dedicated to the
memory of
Carl
Sagan
A giant among men,
who would have loved the excitement of exoplanet discoveries, that would
have further inspired him to speculate about
life in the universe.
______________________________________________________________________________________________________________
C O N T E N T S
Preface
Introduction
1 Could I Do That?
2 Observatory Tour
3 Exoplanet Choices
4 Planning the Night
5 Flat Fields
6 Dark Frames
7 Exposure Times
8 Focus Drift
9 Autoguiding
10 Photometry
Aperture Size
11 Photometry
Pitfalls
12 Image Processing
13 Spreadsheet
Processing
14 Star Colors
15 Stochastic
SE Budget
16 Anomalies:
Timing and LC Shape
17 Optimum Observatory
Appendix A –
Flat Field Evaluation
Appendix B –
Selecting Target from Candidate List
Appendix C – Air
Mass from JD
Appendix D -
Planet Size Model
Appendix E –
Measuring CCD Linearity
Appendix F –
Measuring CCD Gain
Appendix G –
Plotting Light Curve Data
Glossary
References
______________________________________________________________________________________________________________
─────────────────────────────────
PREFACE
─────────────────────────────────
The search for
planets orbiting other stars is interesting to even my daughters and neighbors.
Why the public fascination with this subject? I think it’s related to the
desire to find out if we humans are “alone in the universe.” This would explain
the heightened interest in exoplanet searchers to find Earth-like
planets. NASA and the NSF are keenly aware of this, and they are currently
formulating a “vision” for future funding that is aimed at Earth-like exoplanet
discoveries.
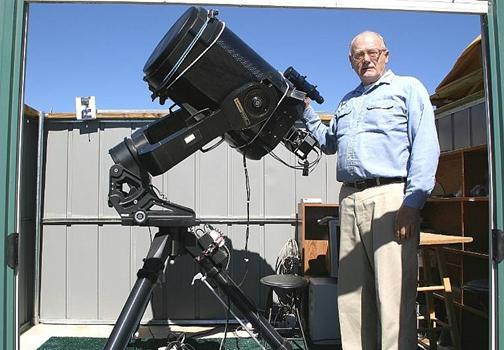
The author’s favorite
telescope, a Meade RCX400 14-inch on an equatorial wedge.
The public’s interest
in planets beyond our solar system may also account for Sky
and Telescope magazine’s interest in publishing an article about the
XO Project, a professional/amateur collaboration that found a transiting
exoplanet XO-1 (since then two more discoveries have been announced by this
project). The above picture, from the Sky and Telescope
article (September, 2006), helps make the point that amateur telescopes
are capable of providing follow-up observations of candidates provided by
professionals using wide-field survey cameras. The XO Project is a model
for future professional/amateur collaborations.
Astronomers, ironically,
have traditionally tried to remain aloof from things that excited the general
public. I recall JPL cafeteria conversations in the 1970s where I defended
Carl Sagan’s right to communicate his enthusiastic love for astronomy to
the public. There was a “pecking order” in astronomy at that time, which
may still exist to some extent, in which the farther out your field of study
the higher your status. Thus, cosmologists garnered the highest regard, and
those who studied objects in our solar system were viewed with the least
regard. My studies were of the moon, but I didn’t care where I was in this
hierarchy. At that time there was only one level lower than mine: those who
speculated about other worlds and the possibilities for intelligent life
on them.
How things change!
We now know that planets are everywhere in the galaxy. Billions upon billions
of planets must exist! This is the message from the tally of 248 extra-solar
planetary systems (as of mid-2007). Among them are 22 exoplanets that transit
in front of their star (15 that are brighter than 13th magnitude),
and the number is growing so fast that by the time this book appears the
number could be two or three dozen.
It is important
to realize that bright transiting exoplanets are far more valuable than
faint or non-transiting ones! The bright transits allow for an accurate
measure of the planet’s size, and therefore density; and spectroscopic investigations
of atmospheric composition are also possible (successful in two cases).
Even studies of the exoplanet’s atmospheric temperature are open for investigation.
When 2007 began, only 9 bright transiting exoplanets were known. Six months
later there were 14!
Few people realize
that part of the explosion of known transiting exoplanets can be attributed
to the role played by amateur astronomers. Three of the 15 bright transiting
exoplanets were discovered by the XO Project, which includes a team of
amateurs. During the past few decades, when professional observatories
have become more sophisticated and plentiful, it is ironic that amateurs
have kept pace, thanks to improvements in technology that’s within amateur
budgets, and we amateurs continue to make useful contributions. The discovery
of exoplanet is one of the most fruitful examples!
Not only are amateurs
capable of helping in the discovery of exoplanets through collaborations
with professionals, but amateurs are well-positioned to contribute to the
discovery of Earth-like exoplanets! This is explained in
Chapter 16.
How can this be?
After all, the professionals have expensive observatories at mountain tops,
and they use very sophisticated and sensitive CCD cameras. But with this
sophistication comes expensive operation on a per minute basis! With telescope
time so expensive, these highly capable facilities can’t be used for lengthy
searches. Moreover, big telescopes have such a small field-of-view (FOV)
that there usually aren’t any nearby bright stars within an image for use
as a “reference.” The optimum size telescope for most ground-based exoplanet
discovery has an aperture between 20 and 40 inches, as explained in Chapter
17. Such telescopes are within the reach of many amateurs. So far, most exoplanet
discovery contributions by amateurs have been with telescope apertures in
the 10 to 14 inches size range. Thousands of these telescopes are in use
by amateurs today.
This book is meant
for amateurs who want to observe exoplanet transits, and who may eventually
want to participate in exoplanet discoveries. There are many ways for amateurs
to have fun with exoplanets; some are “educational,” some could contribute
to a better understanding of exoplanets, and others are aimed at new discoveries.
The various options for exoplanet observing are explained in Chapter 3.
The advanced amateur
may eventually be recruited to become a member of a professional/amateur
team that endeavors to discover exoplanets. This might be the ultimate goal
for some readers of this book. Let’s review how this works. A professional
astronomer’s wide-field survey camera, consisting of a regular telephoto
camera lens attached to an astronomer’s CDD,
monitors a set of star fields for several months before moving on to another
set of star fields. When a star appears to fade by a small amount for a short
time (e.g., <0.030 magnitude for ~3 hours), and when these fading events
occur at regular intervals (~3 days, typically), a larger aperture telescope
with good spatial resolution must be used to determine if the brightest
star in the survey camera’s image faded a small amount or a nearby fainter
star faded by a large amount (e.g., an eclipsing binary). Amateur telescopes
are capable of making this distinction since they can quickly determine
which star fades at the predicted times and how much it fades. As a bonus
the amateur observations can usually characterize the shape of the fading
event, whether it is flat-bottomed or V-shaped. If the star that fades has
a depth of less than ~30 milli-magnitudes (mmag), and if the shape of the
fade is flat-bottomed, there is a good chance that a transiting exoplanet
has been identified. Armed with this information the professionals are justified
in requesting observing time on a large telescope to measure radial velocity
on several dates, and thereby solve for the mass of the secondary. If the
mass is small it must be an exoplanet.
As more wide-field
survey cameras are deployed by the professionals in a search for transiting
candidates there will be a growing need for amateur participation to weed
out the troublesome “blended eclipsing binaries.” This will allow the professionals
to focus on only the good exoplanet candidates for big telescope spectroscopic
radial velocity measurements.
The role amateurs
can play in this exploding field is exciting, but this role will require
that the amateur learn how to produce high-quality transit light curves.
A background in variable star observing would be helpful, but the exoplanet
requirements are more stringent, because the variations are so much smaller,
that a new set of observing skills will have to be mastered by those making
the transition. Image analysis skills will also differ from the variable
star experience. This book explains the new and more rigorous observing and
image analysis skills needed to be a partner with professionals in exoplanet
studies.
The reader is entitled
to know who I am, and my credentials for writing such a book. I retired
from 34 years employment by Caltech and assigned to work at the Jet Propulsion
Laboratory (JPL) for studies in planetary radio astronomy, microwave remote
sensing of the terrestrial atmosphere, and airborne sensing of the atmosphere
for studies of stratospheric ozone depletion. I have about 55 peer-reviewed
publications in various fields, and four patents on aviation safety using
microwave remote sensing concepts and an instrument that I developed. I
retired in 1998, and a year later resumed a childhood hobby of optical astronomy.
I was one of the first amateurs to observe an exoplanet transit (HD209458,
in 2002).
I have been a member
of the XO Project’s extended team (ET) of amateur observers from its inception
in 2004. The XO Project was created by Dr. Peter McCullough, a former amateur,
but now a professional astronomer at the Space Telescope Science Institute,
STScI. The XO project has announced the discovery of three exoplanets,
XO-1b, XO-2b and XO-3b. All members of the XO team are co-authors of the
announcement publications in the Astrophysical Journal.
I have worked with fellow ET members for 2.5 years, and I am familiar with
the issues that amateurs face when changing from variable star observing
to exoplanet transit observing. The XO Project is the only professional/amateur
collaboration for exoplanet discovery. It is my belief that it will soon
become generally recognized that the XO Project model for involving amateurs
is a cost-effective and very productive way to achieve results in the discovery
and study of exoplanets.
I want to thank
Dr. Steve Howell (National Optical Astronomy Observatory, Tucson, AZ) for
writing an article for The Planetary Society (Howell, 2002) after the discovery
of HD209458b, the first transiting exoplanet to be discovered (Charbonneau,
1999). In this article he explained how accessible exoplanet transit observing
is for amateurs, and this led to my first successful observation of an
exoplanet transit.
I also want to
thank Dr. Peter McCullough for inviting me to join the XO ET in December,
2004. In mid-2006 Chris Burke joined the XO Project, and 5 amateurs were
added to the original 4-member ET. Today the ET consists of the following
amateurs (names of the original ET are in bold): Ron Bissinger,
Mike Fleenor, Cindy Foote, Enrique Garcia, Bruce Gary, Paul Howell, Franco Mallia, Gianluca Masi and Tonny
Vanmunster. Thank you all, for this wonderful learning experience and
the fun of being part of a high-achieving team.
I am grateful to
the Society for Astronomical Sciences for permission to use figures in
this book that were presented on my behalf at their 2007 annual meeting
and published in the meeting proceedings. Thanks are also due Cindy Foote
for allowing me to reproduce her amazing light curves of an exoplanet candidate
made with 3 filters on the same night.
Almost all figures
are repeated in the “color center insert.”
─────────────────────────────────
INTRODUCTION
─────────────────────────────────
This book is intended
for use by amateur astronomers, not professional astronomers.
The distinction is not related to the fact that professional astronomers
understand everything in this book; it’s related to the fact that the professionals
don’t need to know most of what’s in this book.
Professionals don’t
need to know how to deal with telescopes with an imperfect polar alignment
(because their telescopes are essentially perfectly aligned). They don’t
have to deal with telescopes that don’t track perfectly (because their tracking
gears are close to perfect). They don’t have to worry about focus changing
during an observing session (because their “tubes” are made of low thermal
expansion materials). They don’t have to worry about CCDs with significant
“dark current” thermal noise (because their CCDs are cooled with liquid
nitrogen). Professionals don’t have to worry about scintillation noise (because
it’s much smaller with large apertures). Professionals can usually count
on sharp images the entire night with insignificant changes in “atmospheric
seeing” (because their observatories are at high altitude sites and the
telescope apertures are situated well above ground level). Professionals
also don’t have to deal with large atmospheric extinction effects (again,
because their observatories are at high altitude sites).
If a professional
astronomer had to use amateur hardware at an amateur site they would have
to learn new ways to overcome the limitations that amateurs deal with every
night. There are so many handicaps unique to the amateur observatory that
we should not look to the professional astronomer for help on these matters.
Therefore, amateurs should look for help from each other for solutions
to these problems. In other words, don’t expect a book on amateur observing
tips to be written by a professional astronomer; only another amateur can
write such a book.
I’ve written this
book with experience as both a professional astronomer and a post-retirement
amateur. Only the first decade of my professional life was in astronomy,
as a radio astronomer. The following three decades were in the atmospheric
sciences, consisting of remote sensing using microwave radiometers. Although
there are differences between radio astronomy and optical astronomy, and
bigger differences between atmospheric remote sensing with microwave radiometers
and optical astronomy, they share two very important requirements: 1) the
need to optimize observing strategy based on an understanding of hardware
strengths and weaknesses, and 2) the need to deal with stochastic noise
and systematic errors during data analysis.
This book was written
for the amateur who may not have the background and observing experience
that I brought to the hobby 8 years ago. How can a reader know if they’re
ready for this book? Here’s a short litmus test question: do you know the
meaning of “differential photometry”? If so, and if you’ve done it, then
you’re ready for this book.
Lessons Learned
One of the benefits
of experience is that there will be many mistakes and “lessons learned,”
and these can lead to a philosophy for the way of doing things. One of my
favorite philosophies is: KNOW THY HARDWARE! It takes time to learn the
idiosyncrasies of an observing system, and no observing system works like
it might be described in a text book. There usually are a myriad of little
things that can ruin the best planned observing session. Only through experience
with one particular observing system can these pitfalls be avoided. I therefore
encourage the serious observer to plan on a long period of floundering
before serious observing is begun. For example, during the floundering phase
try different configurations: prime focus, Cassegrain, use of a focal reducer,
placement of focal reducer, use of an image stabilizer, etc. During this
learning phase try different ways of dealing with finding focus, tracking
focus drift, auto-guiding, pointing calibration, etc. Keep a good observing
log for checking back to see what worked.
One of my neighbors
has a 32-inch telescope in an automated dome, and it’s a really neat facility.
But as he knows, I prefer to use my little 14-inch telescope (whenever
its aperture is adequate for the job) for the simple reason that I understand
most of the idiosyncrasies of my system, whereas I assume there are many
idiosyncrasies of his system that I don’t understand.
At a professional
observatory the responsibility for “know thy hardware” is distributed among
many people. Their staff will include a mechanical engineer, an electrical
engineer, a software control programmer, an optician to perform periodic
optical alignment, someone to perform pointing calibrations and update coefficients
in the control software, a telescope operator, a handy man for maintaining
utilities and ground-keeping and a director to oversee the work of all
these specialists. Therefore, when an astronomer arrives for an observing
session, or when he submits the specifics of an observing request for which
he will not be present, all facets of “know thy hardware” have already
been satisfied.
In contrast, the
amateur observer fills all of the above job responsibilities. He is the
observatory “director,” he does mechanical and electrical calibration and
maintenance, he’s in charge of programming, pointing calibration, scheduling
and he’s the telescope operator – and the amateur is also his own “funding
agency.” Thus, when the amateur starts an observing session he has removed
his mechanical engineer hat, his programmer’s hat, and all the other hats
he wore while preparing the telescope system for observing, and he becomes
the telescope operator carrying out the observing request of the astronomer
whose hat he wore before the observing session began. The admonition to “know
thy hardware” can be met in different ways, as illustrated by the professional
astronomer many-man team and the amateur astronomer one-man team.
I once observed
with the Palomar 200-inch telescope, and believe me when I say that it’s
more fun observing with my backyard 14-inch telescope. At Palomar I handed
the telescope operator a list of target coordinates, motion rates and start
times, and watched him do the observing. I had to take it on faith that
the telescope was operating properly. With my backyard telescope I feel
“in control” of all aspects of the observing session; I know exactly how
the telescope will perform and I feel comfortable that my observing strategy
is a good match to the telescope system’s strengths and weaknesses. Based
on this experience I will allege that amateur observing is
more fun!
Another of my philosophies
is: GOOD DATA ANALYSIS IS JUST AS IMPORTANT AS GETTING GOOD DATA. It is
customary in astronomy, as well as many observing fields, to spend far more
time processing data than taking it. A single observing session may warrant
weeks of analysis. This is especially true when using an expensive observing
facility, but the concept also can apply to observations with amateur hardware.
One last Philosophy
I’ll mention is: WHEN YOU SEE SOMETHING YOU DON’T UNDERSTAND, WHILE OBSERVING
OR DURING DATA ANALYSIS: STOP, DON’T PROCEED UNTIL YOU UNDERSTAND IT. This
one is probably difficult to making a convincing case for unless you’ve
ignored the advice and wasted time with fundamentally flawed data or analysis
procedure. This advice is especially true if you’re writing a computer program
to process data, because program bugs are a part of every programming experience.
A corollary to this advice might be: Never believe anything you come up with,
even if it makes sense, because when there’s a serious flaw in your data
or analysis it may show itself as a subtle anomaly that could easily be ignored.
These are some
of the themes that will be a recurring admonition throughout this book. Some
readers will find that I’m asking them to put too much work into the process.
My advice may seem more appropriate for someone with a professional dedication
to doing things the right way. If this is your response to what I’ve written,
then maybe you’re not ready yet for exoplanet transit observing. Remember,
if it’s not fun, you probably won’t do a good job. If you don’t enjoy floundering
with a telescope, trying to figure out its idiosyncrasies, then you probably
won’t do a good job of learning how to use your telescope properly. This
hobby should be fun, and if a particular project seems like work, then consider
a different project! Astronomy is one of those hobbies with many ways to
have fun, and I dedicate this book to those advanced amateurs who like having
fun with exoplanet transit observing.
─────────────────────────────────
Chapter
1
”Could
I do that?”
─────────────────────────────────
“Could I do that?”
was my reaction 5 years ago to an article claiming that amateurs could
observe exoplanet transits (Howell, 2002).
The article stated
that transits of HD209458 had even been measured with a 4-inch aperture
telescope. Could this be true, or was it hype for selling magazines? The
article appeared in The Planetary Society’s The Planetary Report,
which was a reputable magazine. I had a Meade 10-inch LX200 telescope and
a common CCD camera which I had just begun to use for variable star observing.
“Why not?” I decided,
with nothing to lose for trying.
My First Transit
Observation in 2002
Before the next
transit on the schedule I e-mailed the author of the article, Dr. Steve
Howell, and asked if he had any advice. He suggested using a filter, such
as V-band (green), and “keep the target near the center of the image.”
On the night of
August 11, 2002, I spent about
9 hours taking images of HD209458 with a V-band filter. The next day I
processed the images and was pleasantly surprised to see a small “dip”
in my plot of brightness versus time that occurred “on schedule” (Fig. 1.01).
The depth was also about right, but since my observations were “noisy”
they were really a “detection” instead of a measurement. Nevertheless,
it felt good to join a club of about a half-dozen amateurs who had detected
an exoplanet transit.
By today’s standards
my CCD was unimpressive (slow downloads, not a large format) and my telescope
was average. The only thing advanced was my use of MaxIm DL (version 3.0)
for image processing. Even my spreadsheet was primitive (Quattro Pro 4.0).
Today there must be 1000 amateurs with better hardware than I had 5 years
ago, based on membership numbers of the AAVSO (American Association for
Variable Star Observers).
I recall thinking
“If only there was a book on how to observe exoplanet transits.” There
couldn’t be such a book, of course, since the first amateur observation
of HD209458 had been made less than 2 years earlier by a group in Finland led by Arto Oksanen
(http://www.ursa.fi/sirius/HD209458/HD209458_eng.html). Besides, this was
the only known transiting exoplanet at that time. Moreover, not many amateurs
had a 16-inch telescope like the one used by Oksanen’s team. The idea of
amateurs observing an exoplanet transit was a “novelty.” But that was then,
and this is now!
I now “know what
to do”; to see what a difference that makes look at the next figure.
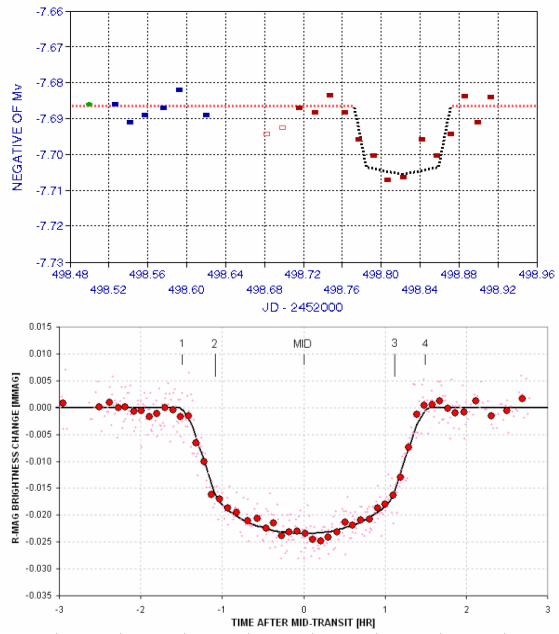
Figure 1.01. Knowing
what to do makes a difference. Upper panel: my first light curve of HD209458,
made 2002 August 12. Lower panel: a recent light curve of XO-1 made in
2006 (average of March 14 and June 1 transits).
During the past
5 years my capability has improved ~70-fold, and most of this is due to
improved technique. Although I now use a 14-inch telescope if I were to
use the same 10-inch that I used 5 years ago for my first exoplanet transit
I could achieve in one minute what took me 15 minutes to do back then. Some
of this improvement is due to use of a slightly improved CCD, and some is
from use of a tip/tilt image stabilizer, but most of the improvement is
due to improved techniques for observing, image processing and spreadsheet
analysis. These are things that can be shared with other amateurs in a book.
That’s the book I wanted 5 years ago. You are now holding such a book. It
is based on 5 years of floundering and learning. It can save you from lots
of time with “trial and error” observing and processing ideas, and give
you a 15-fold advantage that I never had for my first exoplanet transit
observation.
Minimum Requirements
for Exoplanet Transit Observing
You don’t have
to live on a mountain top to observe exoplanet transits. My 2002 transit
observation was made from my backyard in Santa Barbara, CA, located only
200 feet above sea level. Dark skies are also not even a requirement; my
Santa Barbara residence was
within the city, and my skies didn’t even resemble “dark” until after midnight. For pretty picture
imaging, where dark skies matter more, I disassembled my telescope and put
it in my trunk for a drive to the nearby mountains. I now live in Arizona, but my darker
skies are only a bonus, not a requirement.
What about “seeing”?
Good atmospheric seeing is nice, but again it’s not a requirement. I actually
had more moments of good seeing in Santa Barbara than here in Arizona, at a 4660 foot
altitude site. In fact, some of the sharpest images of planets come from
Florida and Singapore, both sea level
sites. Seeing is mostly influenced by winds at ground level, and the height
of the telescope above ground. My median seeing in Arizona is ~3.0 “arc for
typical exposure times (30 to 60 seconds).
Telescope aperture
matters, yes, but an 8-inch aperture is adequate for the brighter transiting
exoplanets (10th magnitude). For most transiting exoplanets
a 12-inch aperture is adequate. Since the cost/performance ratio increases
dramatically for apertures above 14 inches, there are a lot of 14-inch telescopes
in amateur hands. I’ve never owned anything larger, and everything in this
book can be done with this size telescope. My present telescope is a 14-inch
Meade LX200 GPS. You’ll need a “super wedge” for equatorial mounting.
CCD cameras are
so cost-effective these days that almost any astronomical CCD camera now
in use should be adequate for exoplanet observing. If you have an old 8-bit
CCD, that’s not good enough; you’ll have to buy a 16-bit camera. For a bigger
field-of-view, consider spending a little more for a medium-sized chip CCD
camera. My CCD is a Santa Barbara Instrument Group (SBIG) ST-8. You’ll need
a color filter wheel for the CCD camera, and this is usually standard equipment
that comes with the camera.
Although I recommend
use of a tip/tilt image stabilizer it’s definitely not a requirement. Few
people use such a device for removing small, fast movements of the star
field.
Software! Yes,
software is a requirement and your choice can be important. I’ve been using
MaxIm DL/CCD for 6 years, and it’s an impressive program that does everything.
MDL, as I’ll refer to it, controls the telescope, the telescope’s focuser,
the CCD, the color filter wheel and the image stabilizer if you have one.
It also does an excellent job of image processing, and after it performs
a photometry analysis you may use it to create a text file for import to
a spreadsheet. Other exoplanet observers use AIP4WIN, and it also does a
good job. CCDSoft might do the job, but I find it lacking in user-friendliness
and capability.
Spreadsheets are
an important program you’ll need to use. Every computer with a Windows
operating system comes with Excel, and even though Excel seems constructed
to meet the needs of an executive who wants to make a pie chart showing
sales, it also is a powerful spreadsheet for science. I’ve migrated all
my spreadsheet work to Excel. That’s what I assume you’ll be using in Chapter
13.
Previous Experience
Whenever an amateur
astronomer considers doing something new it is natural to ask if previous
experience is adequate, especially if there is no local astronomy club
with experienced members who can help out with difficult issues. Some people
prefer to learn without help, and I’m one of them. The astronomy clubs I’ve
belonged to emphasized the eyepiece “Wow!” version of amateur astronomy,
so help was never available locally. This will probably be the case for
most amateurs considering exoplanet observing. Being self-taught means you
spend a lot of time floundering! Well, I like floundering! I think that’s
the best way to learn. Anyone reading these pages who also likes floundering
should consider setting this book aside, with the intention of referring
to it only when floundering fails. For those who don’t like foundering, then
read on.
The best kind of
amateur astronomy experience that prepares you for producing exoplanet
light curves is variable star observing using a CCD. “Pretty pictures”
experience will help a little, since it involves dark frame and flat frame
calibration. But variable star observing requires familiarity with “photometry,”
and that’s where previous experience is most helpful.
One kind of photometry
of variable stars consists of taking an image of stars that are known to
vary on month or longer time scales, and submitting measurements of their
magnitude to an archive, such as the one maintained by the AAVSO. Another
kind of variable star observing, which requires more skill, is monitoring
variations of a star that changes brightness on time scales of a few minutes.
For example, “cataclysmic variables” are binaries in which one member has
an accretion disk formed by infalling gas from its companion. The stellar
gas does not flow continuously from one star to the other, but episodes
of activity may occur once a decade, approximately. An active period for
gas exchange may last a week or two, during which time the star is ~100
times brighter than normal. The cataclysmic variable rotates with a period
of about 90 minutes, so during a week or more of heightened activity the
bright spot on the accretion disk receiving gas from its companion will
rotate in and out of view, causing brightness to undergo large “superhump”
variations every rotation (90 minutes). The amplitude of these 90-minute
variations is of order 0.2 magnitude. Structure is present that requires
a temporal resolution of a couple minutes.
Any amateur who
has observed cataclysmic variable superhumps will have sufficient experience
for making an easy transition to exoplanet observing. Amateurs who have
experience with the other kind of observing, measuring the brightness of
a few stars a few times a month, for example, will be able to make the transition
to exoplanet observing, but it will require learning new skills. Someone
who has never performed photometry of any stars may want to consider deferring
exoplanet observing until they have some of the more traditional photometry
experience.
I’ll make one exception
to the above required experience level description. Anyone with work experience
making measurements and performing data analysis, regardless of the field,
is likely to have already acquired the skills needed for exoplanet monitoring,
even if they have never used a telescope. For example, before retiring
I spent three decades making measurements and processing data as part of
investigations within the atmospheric sciences. I think that experience
alone would have been sufficient background for the astronomy hobby that
I started 8 years ago. I’ll agree that my amateur astronomy experience
when I was in high school (using film!) was helpful. And I’ll also agree
that my decade of radio astronomy experience 4 decades ago was also helpful,
but the differences between radio astronomy and optical astronomy are considerable.
For anyone who has never used a telescope, yet has experience with measurements
and data analysis, I am willing to suggest that this is adequate for “jumping
in” and starting exoplanet observing without paying your dues to the AAVSO
conducting variable star observations! The concepts are straightforward
for anyone with a background in the physical sciences.
What are the “entry
costs” for someone who doesn’t own a telescope but who has experience with
measurements and data analysis in other fields? Here’s an example of what
I would recommend as a “starter telescope system” for such a person:
Meade 10-inch telescope
monochrome 16-bit CCD with color filters
equatorial wedge for polar mounting
Maxim DL/CCD
Total cost about $5000
Celestron telescopes
are another option, but their large aperture telescopes (>8-inch) are
mounted in a way that requires “meridian flips” and these can ruin the light
curve from a long observing session.
It has been estimated
that tens of thousands of astronomical CCD cameras have been sold during
the past two decades, and most of these were sold to amateur astronomers.
The number of telescopes bought by amateurs is even higher. Many of these
amateur systems are capable of observing exoplanet transits. Amateur astronomy
may not be the cheapest hobby, but there are many more expensive ones. With
the growing affordability of CCD cameras and telescopes, and a consequent
lowering of the $5000 entry level, the number of amateurs who may be tempted
by exoplanet observing in the near future may be in the thousands.
Imagine the value
of an archive of exoplanet transit observations with contributions from
several hundred amateurs. The day may come when every transit of every known
transiting exoplanet will be observed (except for those faint OGLE and very
faint HST ones). Changes of transit shape and timings are possible, and
these can be used to infer the existence of new planets, smaller and more
interesting ones. The job is too large for the small number of professional
observatories, and the cost of using them for this purpose is prohibitive.
If you are considering
a hobby that’s fun and scientifically useful, and if you’re willing to
learn new observing skills and spend time processing a night’s images,
then welcome to the club of amateur exoplanet observers.
─────────────────────────────────
Chapter
2
Observatory
Tour
─────────────────────────────────
Since I will
be using real data to illustrate systematic errors I will describe my observing
systems. Note the use of the word "systems" in the plural form. Even with
one telescope it will matter whether you are configured Cassegrain or prime
focus, and whether a dew shield is used, or whether a focal reducer lens
is used, and where it's inserted. Every change of configuration will change
the relative importance of the various systematic error sources. During
the past year I have had three different telescopes, so I am aware of issues
related to telescope design differences - such as the problems produced
by meridian flips (i.e., Celestrons). All of these telescopes have had 14-inch
apertures with catadioptic optics: Celestron CGE-1400, Meade RCX400 and
Meade LX200GPS. Most of my illustrations will be with the last one.
These are typical telescopes now in use by advanced amateurs for exoplanet
transit observations.
I use a sliding
roof observatory located in Southern Arizona, at an altitude of 4660 feet. Atmospheric extinction
values for B, V, R and I bands are typically 0.25, 0.16, 0.13 and 0.08
magnitude per air mass.
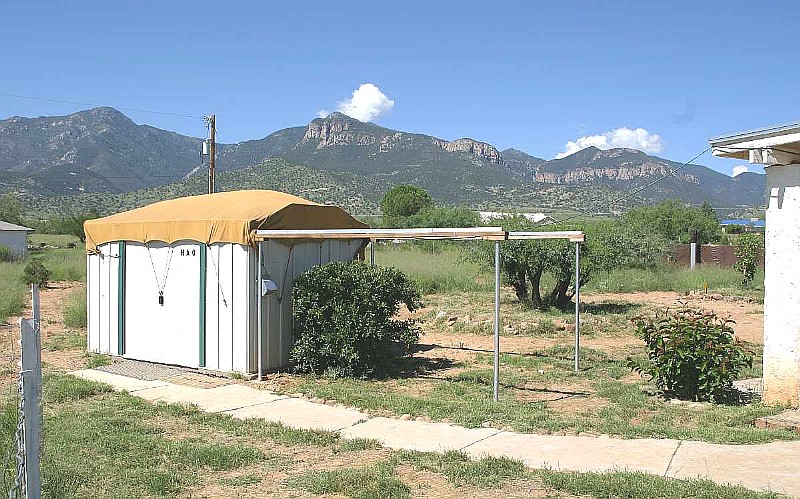
Figure 2.01 “Hereford Arizona Observatory” with a canvas-covered
sliding roof. The Minor Planet Center has assigned it a site code of
G95.
All control
functions are performed by a computer in my house, using 100-foot cables
in buried conduit (the control room is shown as Fig.s 2.03 and 2.04). For
all Cassegrain configurations I use an SBIG AO-7 tip/tilt image stabilizer.
It can usually be run at ~5 Hz. My favorite configuration is Cassegrain
(next figure) that has back-end optics consisting of the AO-7, a focal reducer,
and a CFW attached to a SBIG ST-8XE CCD. This configuration provides a “plate
scale” of 0.67 ”arc per pixel (without binning). Since my “atmospheric seeing”
FWHM is usually 2.5 to 3.5 ”arc for typical exposure times (30 to 60 seconds)
there are ~ 4 to 5 pixels per FWHM, which is above the 3 pixel per FWHM requirement
for precision photometry. The FOV for this configuration is 17 x 11 ’arc.
The Meade
LX200GPS comes with a micro-focuser but I removed it in order to have sufficient
clearance of the optical backend with the mounting base to be able to observe
high declination targets. This configuration also allows me to reach the
north celestial pole which is needed for pointing alignment calibration.
Without the micro-focuser I need a way to make fine focus adjustments during
an observing session (even while continuing to observe a target). This has
been achieved by a wireless focuser (sold by Starizona) with the remote unit
physically attached to the mirror adjustment focusing knob and the local
unit connected to my computer.
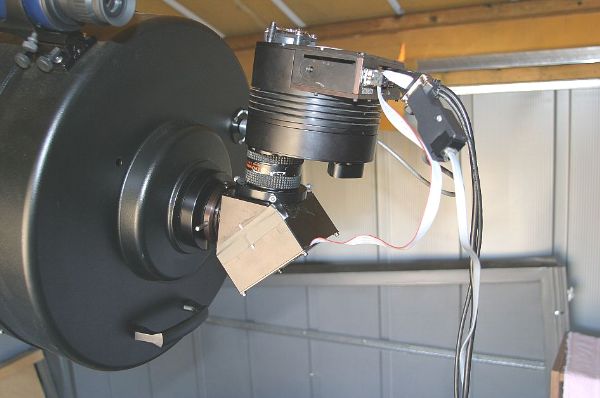
Figure 2.02. My favorite configuration: AO-7, focal
reducer, CFW/CCD (SBIG ST-8XE). The telescope is a Meade LX200GPS 14-inch
aperture, f/10 (without a focal reduce.).
I also have
a wireless weather station, with the sensors at the top of a 10-foot pole
located near the sliding roof observatory (shown in Fig. 5.01). The pole
is wood and the communications are wireless because lightning is common
during our summer “monsoon season” (July/August). The weather station is
a Davis Vantage Pro 2, supplemented by their Weather Link program for computer
downloads from a data logger. This program produces graphical displays
of all measured parameters: outside air temperature, dew point, barometric
pressure, rain accumulation, and wind maximum and average (for user-specified
intervals, which I’ve chosen to be 5 minutes). I find the graphs of wind
and temperature to be very useful during an observing session.

Figure 2.03. The
author is shown manning the control room at the beginning of an observing
session (making flat fields). Equipment is described in the text.
What used to be
a “master bedroom” is just the right size for everything needed in an observatory
control room. The main computer is connected to the telescope via 100-foot
underground cables in buried conduit. This computer has a video card supporting
two monitors, one for MaxIm DL and the other for TheSky/Six and other supporting
programs (labeled “Monitor #2” in the above figure).
Another computer
is dedicated to running the Davis Weather System program that downloads
readings from the data logger and displays then as graphs on its own monitor.
The Davis Weather System also has a real-time display panel; I find this
useful for quick readings of wind speed, wind direction, temperature and
dew point temperature when recording outside conditions in the observing
log.
A radio controlled
UT clock is synchronized with WWVB radio time signals every night. When
accurate time-tagging of images is important I visually compare the radio
controlled clock with the main computer’s clock, which is synchronized using
internet queries by a program (AtomTimePro) at 3 hour intervals.
Above Monitor #1
is a flat bed scanner with a small blanket. This is where the cat sleeps,
and occasionally wakes, stretches, and reminds me about observing strategies.
On the desk (behind
my chair) is another monitor for display of a wireless video sensor in
the observatory. It shows a view of the telescope when a light is turned
on by a switch (right side of desk). It also has an audio signal that allows
me to hear the telescope drive motors, the sound of the wind as well as
barking coyotes. (My two dogs observe with me, on the floor, and they get
excited whenever coyote sounds come over the speaker.)
Below the wireless
video display monitor is something found in practically every observatory:
a “hi fi” for observing music. Since my area is remote, with no FM radio
signals, I have a satellite radio (Sirius) receiver with an antenna on the
roof and channel selector next to the wireless monitor.
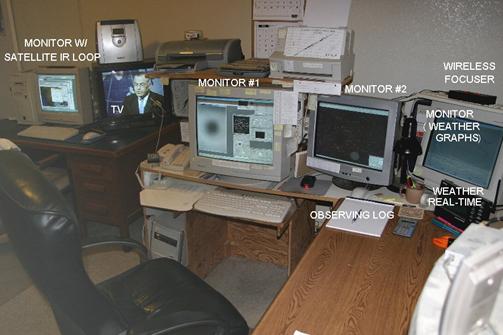
Figure 2.04. Another
view of control room.
Sometimes I have
to take flat frames while a favorite program is on TV (e.g., “60 Minutes”
seems to be the usual one), so I have a second TV on a desk to my left
(Fig. 2.04). The remote control for it sits on a headphone switch box (next
to the phone). It displays a satellite TV signal that comes from a receiver
in the living room.
At the left end
of the table in Fig. 2.04 is a secondary computer used to display IR satellite
image loops that show when clouds are present. It also offloads computing
tasks from the main computer (such as e-mail notices of GRB detections)
to minimize the main computer’s competition for resources. This assures
that the AO-7 tip/tilt image stabilizer is running as fast as possible.
The secondary computer has a LAN connection with the primary computer, which
allows downloading images from the main computer for off-line image analysis
without interfering with the main computer’s resources.
On top of the main
computer (below table, to left) is an AB switch for sending the main monitor’s
video signal to another monitor in my living room. This allows me to “keep
track of tracking” from my living room chair, while reading or watching
TV. The remote monitor in the living room is on a swivel that allows me
to keep track of it from my outdoor patio chair. Comfort is important when
a lot of hours are spent with this all-consuming hobby.
Charts are taped
to every useful area. On one printer is a graph for converting J-K to B-V
star colors. On the side of the main monitor is a list of currently interesting
exoplanet candidates, with current information from other XO Project observers.
Charts are readily visible for estimating limiting magnitude, simplified
magnitude equation constants, and a quick way to predict maximum transit
length from an exoplanet’s star color and period (same as Fig. B.01). Post-its
are used to remind me of handy magnitude equations, site coordinates, local
to UT time conversion and nominal zenith extinction values.
─────────────────────────────────
Chapter
3
Exoplanet
Choices
─────────────────────────────────
Exoplanets can
be thought of as belonging to three categories:
1) bright transiting exoplanets, BTEs (15 known, as of July, 2007)
2) faint transiting exoplanets, FTEs (8 known, as of July, 2007)
3) exoplanets not known to undergo transits, NTEs (225 known)
Those in the first
category are by far the most important. This is because transits of “bright
transiting exoplanets” (BTEs) allow investigations to be made of the exoplanet’s
atmospheric composition and temperature. Atmospheric composition is investigated
using large, professional telescopes with sensitive spectrographs. Atmospheric
temperature is inferred from thermal infrared brightness changes as the
exoplanet is occulted by the star. These investigations can only be done
with bright (nearby) exoplanets. In addition to permitting atmospheric studies,
the BTEs permit a determination to be made of their size. Since the exoplanet’s
mass is known from radial velocity measurements (with professional telescopes)
the plant’s average density can be derived. The size and average density
allow theoreticians to construct models for the planet’s density versus
radius, which lead to speculations about the presence of a rocky core.
All of these measurements and models can be used to speculate on the formation
and evolution of other solar systems. This, in turn, can influence speculation
on the question of “life in the universe.” The rate of discovery of BTEs,
shown on the next page, is growing exponentially. Therefore, projects for
BTEs that are described in this chapter can be done on a fast-growing list
of objects.
The “faint transiting
exoplanets” (FTEs) can’t be studied for atmospheric composition and temperature,
but they do allow for the determination of exoplanet size and density since
transit depth can be measured. Most FTEs are near the galactic plane, near
the center, and this makes them especially difficult to observe with amateur
telescopes. Although hardware capability improves with time, for both amateurs
and professionals, I have adopted the somewhat arbitrary definition of
V-mag = 13 for the FTE/BTE boundary. At the present time most amateurs
are incapable of measuring transit properties when V-mag > 13.
The many “non-transiting
exoplanets” (NTEs) should really be described as not being known to exhibit
transits. Of the 225 on the list a statistical argument can be made that
probably 10 to 15 of them actually are transiting but observations of them
are too sparse to have seen the transits. As more amateurs observe NTEs
the BTEs among them will hopefully be identified. This is what happened
to GJ 436, which languished on the TransitSearch.org web site list for years
before it was observed at the right time and found to undergo 6 milli-magnitude
deep transits by a team of amateur observers (Gillon et al, 2007). This underscores
the potential value of NTEs for the amateur observer.
For those NTEs
that are truly NTE, which is probably 95% of them, since we do not know the
inclination of the exoplanet’s orbit we have only lower-limit constraints
on its mass. Since transits have not been observed the exoplanet’s size is
unknown, which means nothing is known about the planet’s density. Atmospheric
composition and temperature can’t be determined since transits don’t occur.
Some NTEs may eventually be discovered to undergo transit, and will switch
categories.
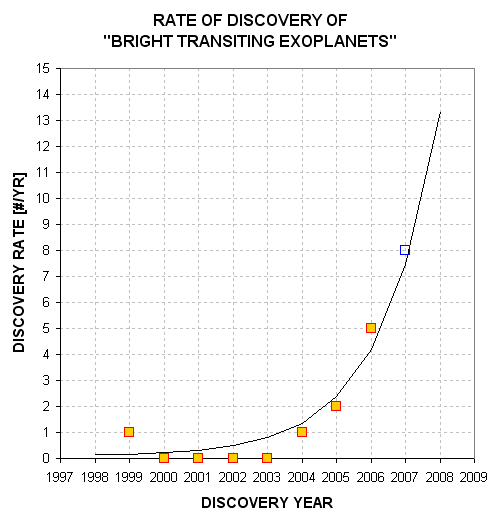
Figure 3.01. Rate
of discovery of BTEs. The curve is an exponential fit with a doubling time
of ~1.2 years. The open blue square symbol for 2007 is 8 because 4 BTEs
were announced during the first 6 months of the year.
Observing Project Types
All categories
of exoplanets are worth considering for a night’s observing session. It’s
understandable that the beginning observer will want to start by observing
a few “easy” transits of BTEs. Once the excitement of this has worn off,
however, there may be an interest in other observing projects related to
exoplanet transits.
One of my favorite
projects is to monitor known BTEs “out-of-transit” (OOT).
If no other exoplanets are present in the BTE’s solar system then the observed
light curve will be a very uninteresting plot with constant brightness
for the entire observing session. However, if another exoplanet exists
in the BTE’s solar system its orbit is likely to be in the same plane as
the known BTE, and it may produce its own transits on a different schedule
from the BTE. Since the known BTE was based on a data base of wide field
survey camera observations the transits produced by the BTE will be the
easiest to detect. Therefore, an observer searching for a second exoplanet
in a BTE solar system should be prepared for a more difficult to detect
transit. The second exoplanet’s transit depth will probably be much shallower,
and it could either last longer or be shorter, and it will come at times
that differ from the BTE transit.
Before selecting
an exoplanet to observe extensively in the OOT mode, check its “impact
parameter.” This is the ratio “transit chord’s closeness to star center”
divided by star radius. If the impact parameter is close to one then it’s
a close to grazing transit; this means that any outer planets in that system
would not transit. An impact parameter of zero corresponds to a transit
that goes through the star’s center; this means that all other planets in
the system are likely to transit. As you may have guessed, BTEs have impact
parameter values ~0.4, typically. This means that exoplanets in orbits twice
the size of the known exoplaent are likely to produce transits. Given that
a planetary system exhibits orbital periods that are proportional to orbital
radius raised to the 1.5 power, a second exoplanet in an orbit that is twice
the size of a hot Jupiter will have a period of 2.8 times that of the hot
Jupiter.
There’s a variant
of the OOT observing project type, which could be called “looking
for Trojans.” This project is based on the presence of Trojan asteroids
in our solar system. Jupiter is accompanied by swarms of asteroids in approximately
the same orbit as Jupiter but preceding and following by 60 degrees of
orbital position. These locations are gravitationally stable and are called
Lagrangian points, L4 and L5. There are about 1100 Trojans and none of
them are large (exceeding 370 km). If they were lumped together in one
object it would have a diameter ~1% that of Jupiter. In solar systems with
a Jupiter-sized planet orbiting close to its star, the so-called “hot Jupiter”
that most BTEs resemble, the BTE would have to be accompanied by a much larger
Trojan companion to produce observable transits. These larger Trojan companions
cannot be ruled-out by present theories for solar system formation and evolution,
so they are worth an amateur’s attention as a special project. The search
strategy is straight-forward: simply observe at times that are 1/6 of a BTE
period before and after the BTE’s scheduled transit. In this chapter I’ll
show you how to create your own schedule for Trojan transit times.
Another exoplanet
project type could be called “mid-transit timings.” The
goal is to detect anomalies in mid-transit times caused by the gravitational
influence of another planet in a resonant orbit, as described in more detail
in Chapter 16. Although this is something one person could do alone it is
more appropriate to combine mid-transit timings by many observers in a search
for anomalies. The magnitude of the anomalies can be as much as 2 or 3 minutes
and the time scale for sign reversals is on the order of a year. Only BTE
objects are suitable for this project.
A somewhat more
challenging observing project is to refine “transit depth versus
wavelength.” Again, this can only be done with BTEs. As the name implies,
it consists of observing a BTE at known transit times with different filters
for each event. If you have a large aperture (20 inches or larger) you could
alternate between two filters throughout an event. The goal is to further
refine the solution for the planet’s path across the star and simultaneously
refine the star’s limb darkening function. As explained later, an exoplanet
whose path passes through star center will have a deeper depth at shorter
wavelengths whereas if the path is a chord that crosses farther than about
73% of the way to the edge at closest approach the opposite depth versus
color relationship will be found. Constraining the path’s geometry and star
limb darkening will lead to an improved estimate for planet size and this
is useful for theoreticians studying planetary system formation and evolution.
Every amateur should
consider observing nominally NTE exoplanets at times they’re
predicted to have possible transits in order to determine whether or not
they really are an NTE instead of a BTE that is “waiting” to be discovered.
As stated above, GJ 436 is one example of an exoplanet that was nominally
identified as an NTE which in fact was discovered to exhibit transits by
an amateur group that changed it to a BTE. The nominally NTE list can be
found at TransitSearch.org, which is maintained by Greg Laughlin. Times favorable
for transits, if they occur, are given on this web site, as well as likely
transit depth.
Finally, some exoplanet
observers who exhibit advanced observing skills will be invited to join
a group of amateurs supporting professionals conducting wide field camera
surveys that are designed to find exoplanet transits. So far only the XO
Project makes use of amateurs this way, in a systematic way, but other wide
field survey groups may recruit a similar team of advanced amateurs for follow-up
observations. The main task of these observers is to observe a star field
on a list of interesting candidates, at specific times, to identify which
star is varying at the times when the survey cameras detect small fades
from a group of stars in the camera’s low-resolution photometry aperture.
If a star is found that varies less than ~30 mmag it may be an exoplanet,
and additional observations would then be required. If the amateur light
curves are compatible with the exoplanet hypothesis a professional telescope
will be used to measure radial velocity on a few dates for the purpose of
measuring the mass of the object orbiting in front of the bright star. A
low mass for the secondary almost assures that it is an exoplanet, although
careful additional observations and model fitting will be done by the professionals
to confirm this. If you’re on the team of amateur observers contributing
to follow-up observations that lead to an exoplanet discovery, you will be
smiling for days with a secret that can’t be shared until the official announcement
is made. Appendix B is included for amateurs on a team charged with wide
field camera follow-up observations.
Whenever the night
sky promises to be clear and calm the amateur observer will have many observing
choices. I suspect that amateur exoplanet observers will eventually form
specialty groups, with some specializing in each of the following possible
areas:
OOT searches for
new exoplanets
Trojan transit
searches
BTE timing anomalies
produced by another exoplanet in resonant orbit
Transit depth versus
filter band
Search for transits
by nominal NTEs
Wide field camera
candidate follow-up
Calculating Ephemerides
for BTEs
Many of the exoplanet
observing projects listed above involve the BTEs. This section describes
how to calculate when their transits occur.
The following list
of known transiting exoplanet systems (brighter than 13th magnitude)
is complete as of mid-2007. It is presented as an example of the kind of
list that each transit observer will want to maintain, until such time as
it is maintained by an organization dedicated to serving the amateur exoplanet
observer (cf. Chapter 17’s description of my idea for an Exoplanet Transit
Archive). At the present time http://exoplanet.eu/catalog-transit.php is
an excellent web site listing transiting exoplanets (maintained by Jean Schneider).
Since it does not list transit depth, transit length, object coordinates
or other information useful for planning an observing session I maintain
a spreadsheet of transiting exoplanets brighter than 13th magnitude
(BTE_list.xls). Go to http://brucegary.net/book_EOA/xls.htm for a free download
of it. Here’s a screen capture of part of it.
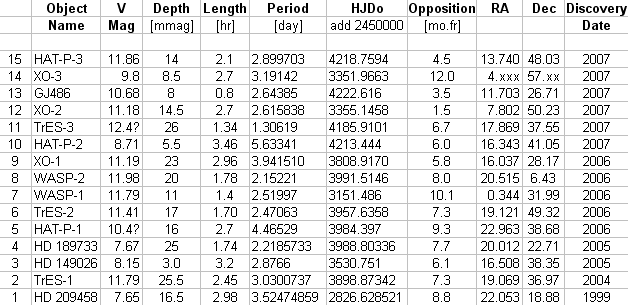
Figure 3.02. List
of bright transiting exoplanets (V-mag < 13). The “Opposition” date
is the time of year when the object transits at local midnight.
One thing to notice
about this table is that all 15 BTEs are in the northern celestial hemisphere.
This is due to a selection effect since all wide field search cameras are
in the northern hemisphere. If there had always been as many cameras in
the southern hemisphere it is fair to expect that we would now have a list
of ~30 BTEs. Based on the explosive growth rate shown in Fig. 3.01 the list
of BTEs could be in the hundreds in a few years.
Another thing to
notice about this table is that 9 of the 15 BTEs are best observed in the
summer, June through September. Maybe more BTEs have been discovered in
the summer sky because that’s when there are more stars in the night sky
(that’s when the Milky Way transits at midnight). It is unfortunate
that the northern hemisphere summer is also the time when nights are shortest,
and is therefore the least favorable time for observing a complete transit.
(Ironically, for my location in Southern Arizona the monsoon season
is from July to September, and most of these nights are overcast with a
residual of the afternoon’s thunderstorms.)
What’s the table
in Fig. 3.02 good for when planning an observing session for an upcoming
clear night? You may use this table by first noting which objects are “in
season.” The season begins approximately 3 months before “opposition” and
ends 3 months afterwards. On those dates the object transits at 6 AM and 6 PM, respectively.
An object may be observed “outside” the season, but observing intervals
will be limited (the amount will depend on site latitude and object declination).
You’ll want to
calculate when transits can be observed. This can be done using a spreadsheet
available at: http://brucegary.net/book_EOA/xls.htm. It has input areas for
the object’s HJDo, period, transit length, RA and Dec. Another input area
is for the observing site’s longitude and latitude. A range of rows with
user specified N values (number of periods since HJDo) is used to calculate
specific JD values for transits. The JD values are converted to date format
for convenience (add 34981.5 and specify your
favorite date format). The spreadsheet includes an approximate conversion
of HJD to JD (accurate to ~1/2 minute). Columns show UT times for ingress,
mid-transit and egress when the object is at an elevation higher than a
user-specified value, such as 20 degrees. One page is devoted to each of
the 15 known BTEs. The following figure shows part of the display for the
XO-1 page.
In this figure
cells C2:C6 contain BTE-specific information, such as HJDo, period, length
of transit and RA/Dec coordinates. Site coordinates are at F2:F3. The user
enters the year at G2 and the UT range that you’re willing to observe in
cells G3:G4. Cell H6 is a minimum elevation angle used as a criterion for
display of columns E-G. A 4-digit version current JD is entered in cell C7;
this is used to suggest to the user a number of periods (elapsed since HJDo)
to enter in cell B10. Cells below B10 are integer periods since HJDo that
lead to column C’s HJD transit times. Column D converts these values to UT
date. Columns H through AB (not shown) are used to calculate elevation angle
at the observer’s site (column H). Pages similar in format to this one are
present for the other BTEs, so by simply flipping through the spreadsheet
pages it is possible to determine whether any of the BTEs are observable
on a given night. The user may screen capture each page and print them for
later transfer to a monthly observing calendar. As a convenience I mark my
calendar a month ahead for all observable BTE transits.
Trojan searches can be scheduled by creating two additional spreadsheets.
One of them will require subtracting 1/6 of a BTE’s period from HJDo and
the other will have 1/6 period added to HJDo.
A fuller description
of the use of this and other spreadsheets that support this book is available
at the web site http://brucegary.net/book_EOA/xls.htm.
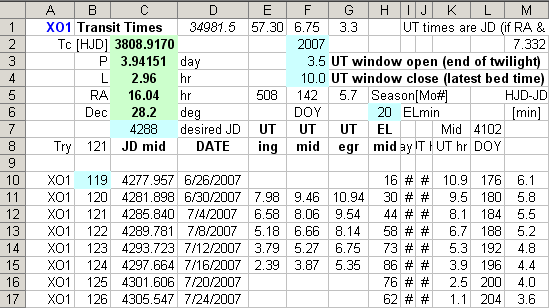
Figure 3.03. Sample
Excel spreadsheet showing XO-1b transit events and their “visibility” (from
my site). Columns E, F and G show UT times for transits that are above
20 degree elevation and between 3.5 and 10.0 UT. Other details are explained
in the text.
SpectraShift
Before leaving
the topic of exoplanet projects that are within the reach of amateurs I
want to describe an amateur-led project, called SpectraShift, that is designed
to detect exoplanets spectroscopically. Radial velocity requirements are
demanding since a hot Jupiter orbiting a solar mass star will impart radial
velocity excursions of only ±200 m/s if it’s in a 4-day orbit. An
amateur group led by Tom Kaye is assembling a system that is expected to
achieve 100 m/s resolution using a 44-inch aperture telescope for the brighter
BTEs. This group used a 16-inch telescope in 2000 and 2004 to observe Tau
Boo and they are credited with being the first amateurs to detect an exoplanet
using spectroscopic measurements of radial velocity.
When a wide
field survey camera directs an amateur team to candidates for follow-up
light curve observations, and when the amateur light curves indicate that
the suspect star is indeed fading by small amounts with a flat-bottomed
shape, the professionals are often faced with long lead times for obtaining
observing time on a large telescope for spectroscopic radial velocity observations
that would confirm the secondary as being an exoplanet. When SpectraShift
becomes operational, probably in 2008 or 2009, there will be an opportunity
for them to collaborate with professional/amateur associations to obtain
the required radial velocity observations with short lead times.
Closing Thoughts for the Chapter
There are
many ways amateurs can collaborate with professionals in discovering and
studying exoplanets. Once basic skills have been “mastered” the simplest
project is to choose a BTE and observe it every clear night regardless of
when it is expected to undergo transit (OOT observing). This will provide
a wealth of data for assessing systematic errors affecting light curve behavior
with air mass and hour angle. It may also turn up an unexpected secondary
transit produced by a second exoplanet in the far off solar system. This
observing strategy could also produce the discovery of a Trojan exoplanet.
I recommend OOT observing for anyone who has the required patience and interest
in understanding their telescope system.
A slightly
more demanding project would be measuring BTE mid-transit times and adding
them to a data base of similar observations by others. Eventually a new
exoplanet in a resonant orbit will be found this way.
Measurements
of transit depth versus filter band can be useful for newly discovered
exoplanets since this information will help professionals obtain a better
solution for planet size.
Monitoring
the NTEs at favorable times will advance the goal of identifying that dozen
or so exoplanets that are providing transits that no one has detected yet.
Each person
has favored observing styles, and trying out the ones described here is
a way to find which one is your favorite. Enjoy!
─────────────────────────────────
Chapter
4
Planning
the Night
─────────────────────────────────
This chapter may
seem “tedious” to someone new to exoplanet observing. However, keep in
mind that the requirements for observing exoplanets, with 0.002 magnitude
precision, is significantly more challenging than observing variable stars,
with precision requirements that are more relaxed by a factor of 10 or
20. Any amateur who masters exoplanet observing is working at a level somewhere
between amateur and professional. Naturally more planning will be involved
for such a task.
Probably all amateurs
go through a phase of wanting to observe many objects each night. Eventually,
however, the emphasis shifts to wanting to do as good a job as possible
with just one object for an entire night’s observing. Exoplanets should
be thought of this way.
This chapter describes
ways to prepare for a night’s observing session. The specifics of what
I present are less important than the concepts of what should be thought
about ahead of time. Observers who are unafraid of floundering are invited
to begin with a total disregard of the suggestions in this chapter since
floundering “on one’s own” is a great learning experience. I encourage floundering;
that’s how I’ve learned almost everything I know. You might actually conclude
that what you learn first-hand agrees with my suggestions.
If you don’t like
floundering, then for the rest of this chapter imagine that you’re visiting
me in Southern Arizona for an instructive
observing session. Together, we’ll plan observations that illustrate decisions
that have to be made for a typical exoplanet transit. Let’s assume that
it’s 2007 May 5 and you’ve asked me to show you how to observe an exoplanet
transit, not yet chosen.
In the afternoon
we begin an “observing log.” This is an essential part of any observing
session, and starting it is the first step for planning a night’s observations.
We begin the log by noting the time for sunset. A table of sunset and sunrise
times for any observing site is maintained by the the U. S. Naval Observatory;
it can be found at: http://aa.usno.navy.mil/data/docs/RS_OneYear.html.
Moonrise and set times are also available at this site. CCD observing can
begin about 55 minutes after sunset. Sky flats are to be started at about
sunset, the exact time for taking flats depends on the filters that are
to be used, the telescope’s f-ratio, binning choice and whether a diffuser
is placed over the aperture (treated in the next chapter). Filter and binning
choices can’t be made until the target is chosen. That’s what we’ll do
next.
Choosing a Target
Since we’re going
to spend 6 or 8 hours observing, it is reasonable to spend a few minutes
evaluating the merits of various exoplanet candidates. I will assume that
you are not privy to one of those secret lists of possible exoplanet candidates
maintained by professional astronomers using wide field survey cameras.
(If you are such a member, then Appendix C was written for you.)
We want to observe
a known transiting exoplanet
system, which means we’ll be checking the “bright transiting exoplanet”
(BTE) list. If none are transiting tonight then we’ll have to settle for
an exoplanet system where transits might
be occurring. This “might” category includes exoplanets currently on the
NTE list (TransitSearch.org), BTE Trojan searches and undiscovered second
exoplanets in resonant orbits that produce shallow transits at unknown times.
These categories are described in the previous chapter. Since you’ve asked
to observe a transit we’ll be consulting a spreadsheet that I maintain for
my site that includes a spreadsheet page for each of the 15 known BTE objects.
Each page has a list of transit times with about a month’s worth of transits;
as I flip through them we look for transit times for May, 2007. If there
aren’t any transits by the BTEs then a “might” category observation will
have been considered. We’re fortunate, though, since we note that XO-1 is
scheduled to transit tonight. Ingress is at 8:37 PM and egress is
at 11:34 PM. At mid-transit
XO-1 will be at an elevation of 48 degrees. The sky is clear, the wind
is calm, and one of the easiest exoplanets is transiting tonight. Life
is good!
Choosing a Filter
XO-1’s brightness
is V-mag = 11.2 and the transit depth is ~23 mmag. From past experience
using my 14-inch telescope I know that the star’s brightness and the transit’s
large depth will make this an easy observation. SNR won’t be a problem,
so we aren’t restricted to the use of filters that allow lots of photons
to come through, such as clear or a blue-blocking filter (BB-filter). All
filter choices are possible.
As an aside, what
would our options be if the exoplanet had a shallow depth, or its star
was faint? A clear filter would deliver the most light and produce the
highest SNR. However, a BB-filter might be better since it excludes blue
light (~7%), which means it would reduce the size of one of the most troublesome
light curve systematic errors: baseline “curvature” that’s symmetric about
transit, caused by reference stars with a different color than the exoplanet
star (more details in Chapter 14, “Star Colors”). For small depths this
curvature can be troublesome. Observers with 10-inch (or smaller) telescopes
should consider using the BB-filter often. Observers with 20-inch (or larger)
apertures should rarely have to use the BB-filter. It’s the 12- and 16-inch
telescope observers who may have difficult choices for typical exoplanet
candidates with depths in the 15 to 25 mmag region.
Since the XO-1
transit is an easy one we are free to review other filter choice considerations,
such as “science needs.” If there are no B-band observations for a known
exoplanet, then a B-band observation could be valuable. There are occasions
when C-filter (clear filter) observing is acceptable. XO-2 is a good example
since it has a binary companion 31 ”arc away that has the same color and
brightness as XO-2. Because the two stars have the same color there is almost
no penalty for observing unfiltered; I’m referring to the “star color extinction
effect” that causes baselines to be curved symmetrically about transit. This
is explained in Chapter 14, so for now just accept my assertion that the
presence of reference stars having the same color as the target star (exoplanet
star) is a consideration in choosing a filter. When high air mass observing
is required I-band is a good choice (all other things being equal).
The presence of
moonlight should influence filter choice. Even though you can’t see it,
when there’s moonlight the night sky is blue. A moonlit night sky will be
just as blue as a sunlit day sky, and for the same reason (Rayleigh scattering).
If the moon will be up during a transit avoid using a B-band filter or
a clear filter. I-band observations are affected the least by moonlight.
R-band is almost as good, and it passes more light, so if SNR is going to
be important consider using an R-band filter on moonlit nights. If SNR
is likely to be very important then consider
using a BB-band filter, which at least filters out the bright sky B-band
photons. The moonless night sky is not blue, but extinction is still greatest
at B-band and smallest at I-band, so for dark skies air mass is more important
than sky color when choosing a filter. On May 5 at my site the moon rises
at 10:35 PM. I recommend using
an I-band filter for the XO-1 observations. This is tentative, however,
since other considerations are important.
Next, we run TheSky/Six
(a “planetarium program” from Software Bisque) to find out the elevation
of XO-1 during the night, and specifically during the predicted transit.
Acceptable elevations depend on filter; B-band observing will require high
elevations (e.g., EL>30 degrees) whereas I-band observing can be done
at much lower elevations (e.g., EL>15 degrees). We need to allow for acceptable
elevations for the entire transit, from ~1.5 hours before first contact to
~1.5 hours after last contact. Transits of “hot Jupiters” (large exoplanets
orbiting close to their star) have transit lengths similar to XO-1, ~3 hours.
The best observing situation is for mid-transit to occur at midnight, but this rarely
happens. We need to study XO-1’s elevation versus time for the 7 hours centered
on mid-transit in order to be sure of our filter choice.
Sunset occurs at
7:03 PM, so quality observing
could start at ~7:58 PM (lower quality
observations could start at ~7:45 PM). When quality
observing can begin XO-1 will be at 20 degrees elevation, and rising. If
observing began at 7:58 PM, ~40 minutes of
data could be obtained before ingress. That’s pretty short, since we want
1 to 1.5 hours, but it’s just enough for establishing an “out-of-transit”
baseline level. After egress there will be lots of data since XO-1 will
still be rising and it will be dark. Observations should extend to at least
an hour after egress, so let’s plan on observing 2 hours after egress to
be safe. Observations of XO-1 will therefore end at ~1:30 AM.
It is worth noting
that because observations will start at a low 20 degrees elevation (air
mass = ~2.9), B-band observations would be unwise, as would V-band, since
both would have high atmospheric extinction values. For similar reasons
use of a C-filter would be unwise, since C-band (essentially equivalent
to “unfiltered”) includes B-band. Our tentative choice to use I-band is
supported by the high air mass situation at the beginning of planned observations.
In my experience R-band would be acceptable at ~20 degrees elevation.
For small or moderate
aperture telescopes (i.e., 8 - 14 inches) it is wise to observe the target
with the same filter the entire night. Large apertures usually provide
sufficient SNR to observe with two (or possibly three) filters, in alternation,
throughout an observing session.
At this point in
the planning process we have chosen a target and filter, but the filter
choice is still only tentative. Reference star options have to be considered.
This is the subject of the next section.
Deciding on FOV
Placement
Even if the observations
were to be near zenith there’s a situation that can influence filter choice.
It has to do with what stars are near the target star. To be more specific,
it has to do with the feasibility of positioning the CCD’s main chip FOV
so that a bright star is present in the autoguider chip’s FOV; it also has
to do with the desire to have same-color bright reference stars present
in the main chip’s FOV. This is where TheSky/Six is very helpful, as the
next figure illustrates.
Figure 4.01. XO-1
at center of main chip FOV. Autoguider chip’s FOV is on left.
This figure is
a screen capture (inverted) of TheSky/Six with my main chip’s FOV centered
on XO-1. There are no bright stars in the autoguider’s FOV, so this positioning
is unacceptable. By moving slightly to the right a sufficiently bright
star can be used for autoguiding (V-mag = 11.3 according to TheSky). This
improved positioning is shown in Fig. 4.02.
The next consideration
is “what stars can serve as reference for XO-1?” There’s a bright star
in the upper-left corner; but is it the same color as XO-1? Using TheSky,
a click of the mouse on XO-1, then a click on the star in the upper left,
leads to the answer: XO-1’s J-K = 0.412 and the bright star’s J-K = 0.218.
The bright star is bluer than XO-1 by delta J-K = 0.194. The bright star
is also 1.38 magnitude brighter than XO-1. Since the brighter star has ~3.6
times the flux of XO-1 we would not be able to use an exposure time that
kept XO-1 slightly below saturation. That’s a “down side” to using the bright
star for reference. What about the two stars that appear to be about the
same brightness as XO-1, and are closer? Figure 4.02 has been annotated with
star color for the FOV position that includes the two “same brightness stars”
in the main chip’s FOV.
Figure 4.02. Colors
(J-K) of XO-1 and possible reference stars.
Note that the two
stars similar in brightness to XO-1 are both redder than XO-1; the average
difference is 0.12 (using J-K colors). This is half the color difference
compared to using the bright blue star in the upper-left, and since longer
exposures can be used to place all three stars just below saturation this
positioning of the FOVs is a better choice. (An alternative would be to
position the main chip’s FOV so that the bright blue star (J-K = 0.22) and
the star with J-K = 0.56 are both within the FOV, since the average of their
J-K colors differ from XO-1’s J-K by only 0.01 magnitude.)
When there’s a
choice between using two reference stars versus using one, it is better to
use two. Why? Because of something called “scintillation” that is described
in Chapter 15. The average of two stars will have root-2 smaller fluctuations
than any single star, regardless of its brightness. Using 4 stars for reference
is even better, as their average flux will exhibit ½ the scintillation
noise of a single star.
We are fortunate
that suitable reference stars are close to XO-1. If only stars with greatly
different colors were within the FOV what options would we have for minimizing
“star color” extinction effects? V-band and R-band become attractive alternatives
to B-band, I-band and BB-band because of their narrower bandpasses. The
narrower the bandpass, the smaller “star color extinction” effects are.
Since XO-1 is in a “friendly” star field we don’t have to change to R-band
or V-band. Our filter choice for the night is now final!
At this stage in
formulating a plan for the night we have decided on a target (exoplanet),
we’ve decided on an exact placement of the CCD FOV on the star field, and
we have settled on I-band. We need to save the exact FOV placement so that
it is easily found when observing begins. This is done in TheSky/Six by
creating a new object in the “User Defined Data” list and entering RA/Dec
coordinates. Planning is almost finished.
Binning
At this point in
planning we know an air mass range, so an inference can be made about the
sharpest “atmospheric seeing” during the observing session. We consult
ClearSkyClock at http://www.cleardarksky.com/ to learn that “average seeing”
is expected for the night. In order to know if it is safe to observe with
2x2 binning (instead of 1x1) we need to calculate the sharpest seeing expected
during the observing session. At my site FWHM is typically 3.0 ”arc at
zenith. Our smallest air mass for the night will be 1.5. Since FWHM is proportional
to AirMass1/3 (cf. Chapter 7) we can plan on FWHM > 3.4 ”arc.
A plate scale of 1.7 ”arc or smaller could be used without serious degradation
to photometry precision. Since my 1x1 plate scale is 0.67 ”arc we could
bin 2x2 and the plate scale of 1.34 ”arc would be acceptable. Based on this,
we note in the observing log that we plan on 2x2 binning.
Why observe 2x2
instead of 1x1? There are two reasons. Modern CCD chips perform “on-chip”
binning, and they have less “read noise” for 2x2 versus 1x1 binning. The
component of “readout” noise is reduced by a factor two for 2x2 binning
(since there is only one readout for a 2x2 reading versus 4 readouts for
reading the same 4 individual pixels, and noise grows as the square-root
of the number of readouts). The second benefit for 2x2 binning is that download
times are 4 times faster (e.g., 2 seconds instead of 8 seconds), and this
improves the percentage of time spent collecting photons during an observing
session (cf. Chapter 7). Knowing whether binning is going to be used affects
when flat frame exposures of the twilight sky can begin. If 2x2 binning is
chosen for the night’s observing, scheduling of flat frames will have to
be made later than shown in Fig. 5.02, as explained in the next chapter.
Finalized Plan
In the observing
log we note that the goal for the night is an XO-1 transit and we include
the ingress and egress times. We note that an I-band filter will be used,
and 2x2 binning will be employed. We don’t know when to start flat fields
yet, but we know it will be close to sunset. No configuration changes were
made since the previous observing session, and none are planned for the
new observing session, so that’s noted.
Since we’ll complete
observing at 1:30 AM there’s no need
for a nap. We have time before observing begins, so how about joining me
for dinner at Delio’s Pizza, a few miles from my place. Besides, every observing
session can benefit from pizza snacks, a dark beer and observing music!
There’s only one
more thing to do before we can go to dinner, however: scheduling flat field
observations. That’s the subject of the next chapter.
─────────────────────────────────
Chapter
5
Flat
Fields
─────────────────────────────────
It would be nice
if CCDs responded to a uniformly bright source, such as the daylight sky,
by producing the same output counts for all pixels. This does not happen
for two reasons: pixels differ slightly in their efficiency at converting
photons to electrons (and converting electrons to counts during readout),
and a uniformly bright sky does not deliver the same flux of photons to
all CCD pixels due to such optical effects as vignetting and shadowing by
dust particles on optical surfaces close to the CCD (i.e., “dust donuts”).
For amateur telescopes
the shape of the vignette function will differ with filter band. The amount
of these differences will depend on f-ratio and the presence of a focal
reducer (and its placement).
Flat field corrections
are supposed to correct for all these things. Alas, in practice flat fields
correct for only most of them.
Sometimes I think
the art of making quality flat fields could be a hobby, all by itself!
It could take so much time that there would be no time left over for using
the knowledge gained. There must be a dozen procedures in use for making
a master flat, and it’s possible that none of them are as good as the user
imagines them to be.
Some observers
use “light boxes” placed over the front aperture. Provided the light source
is “white” this can produce good flats for all filters. However, it is difficult
to attain uniform illumination of the surface facing the telescope aperture
– which is where my attempts have always failed.
Another method
is to use a white light source to illuminate a white board, which in turn
illuminates a second white board that is viewed by the telescope. The use
of two white boards reduces specular reflections, which can be troublesome
for shiny white boards. The trick with this method is to provide a uniform
illumination of the white board viewed by the telescope, and within the confines
of a small sliding roof observatory this can be difficult. Wind can also
blow over the white boards unless they’re secured. I’ve always obtained good
results from this method, but it’s too cumbersome for me to use routinely.
Sometimes master
flats are produced by median combining a large number of images of different
star fields. For pretty picture work at least a dozen images are needed.
For exoplanet observing you would need hundreds of images for median combining
in order to reduce residual star effects to the required smoothness needed
for mmag precision.
The twilight sky
overhead is a convenient way to produce flat fields. For most telescopes
these images can be taken when the sky is bright and exposure times are
short enough that stars do not appear in any of the images. The telescope
can either be stationary or tracking. Master flats produced this way are
acceptable for most uses, but for precision exoplanet monitoring the presence
of even faint stars in the master flat are unacceptable. A diffuser placed
over the aperture can eliminate stars in the flat field images. That’s the
method I’ve adopted, which I’ll describe after a detour discussion of stray
light.
All flat field
procedures can be degraded by “stray light.” For example, an open tube telescope
that does not have sufficient baffling in front of the CCD camera may register
light from the ground or other locations not within the CCD’s FOV. For
another example, I once noticed that my AO-7 image stabilizer was allowing
light to leak through the joint formed by the two outer mounting cases.
This leak was blocked by simply applying black electrician’s tape around
the joint. Light leaks from all “back end” components can be reduced by
wrapping a dark cloth around them while exposing flat frames.
Stray light that
occurs during an observing session is unimportant for exoplanet monitoring.
For example, if there’s a bright star near the exoplanet it may reflect
off internal structures and produce rings of light at the same location
on all images where the FOV is offset the same amount from the bright star.
The nearby moon can produce large brightness gradients in images. Don’t worry
about these stray light artifacts. They would ruin pretty picture taking,
but photometry is usually unfazed by stray light in the photometry images.
It’s worth noting
that flat field corrections wouldn’t be necessary for exoplanet observing
if the star field could be positioned at the exact same pixel location
for an entire observing session. If that could be accomplished the only
errors for neglecting to correct for flat field effects would be limited
to star brightness biases, and since these biases would be the same for
all images they would not alter the shape or depth of an exoplanet transit
light curve.
Keeping the star
field fixed with respect to pixels requires not only that the autoguider
work perfectly, it also requires that the polar axis be aligned perfectly.
Consider observing a source at 60 degrees declination with a polar axis
alignment error of only 0.1 degree. During a 6-hour observing session the
image would rotate as much as 0.2 degree. The effect is greater for higher
declinations. If the autoguider is located 20 ’arc from the center of the
main chip, for example, then stars in the middle of the FOV will move 7
”arc during the observing session, and stars near the corners farthest from
the autoguider will move more. If a good quality flat field correction were
not made this amount of movement could be ruinous if a target or reference
star moved across a “dust donut.” The vignette response function is usually
“steep” near the edges, so this is where small inaccuracies in the flat field
can produce errors with systematic trends. If a 2 ’arc polar alignment error
is present then these effects would probably be too small to correct for,
but perfect autoguiding would still be required. Although it’s a worthy goal
for amateurs to achieve a perfect polar alignment, and to achieve perfect
autoguiding, flat field corrections are a prudent safeguard and must be performed.
I’ll use my telescope
system to illustrate how the scheduling of flat frames can be done at about
sunset. I point the telescope at zenith well before sunset and place a
“double T-shirt” diffuser over the aperture, illustrated in the next figure.
The two white T-shirts diffuse sky light, and by using it I never see star
trails in my flats. Since the T-shirts let only a fraction of the incident
light enter the telescope the sky flat exposures have to begin sooner than
if the T-shirt diffuser were not used. Use of the double T-shirt diffuser
affords the unexpected bonus of allowing for a more relaxed flat frame
observing session. This is due to the fact that the diffuser’s reduction
of light entering the telescope requires that flat field exposures begin
sooner, when sky brightness changes more slowly.
Figure 5.01. Double
T-shirt diffuser is being placed on top of the telescope aperture for obtaining
flat fields. (The Davis
Weather Station is in the background.)
As mentioned in
the previous chapter the time to start exposing flat fields depends on
the filter (and binning choice). A photometric B-band filter passes much
less light than any of the other filters, so it requires longer exposures
for the same sky brightness. A common practice is to keep exposure times
within the 1 to 10 second range (explained below). If flat fields are needed
for all filters the sequence for exposing flats should start with B-band,
and be followed by V-band, I-band, R-band, BB-band and finally clear.
Exposure times
shorter than ~1 second can produce slightly unequal actual exposure times
at different locations on the CCD. For example, consider a shutter that opens
and closes like the old style cameras. As the shutter opened it would begin
exposing the CCD center first, and as it closed the center would be the last
to have incoming light shut off. This would produce a non-uniform pattern
of center-to-edge actual exposure time. The shorter the exposure time the
greater the percentage disparity between the center and edge. Rotating shutters
are better, but they too have a greater likelihood of producing different
actual exposure times at different locations on the CCD for short exposures.
CCD camera shutters differ, but exposures longer than ~1 second are generally
considered to be unaffected by this problem.
Exposures that
are too long are simply inconvenient, and they interfere with making flat
field exposures with other filters. Hence, the goal is to schedule the flat
field exposures so that they all are within the range of 1 to 10 seconds.
Figure 5.02. Exposure
time versus time after sunset for various filters for an f/8 telescope
system (binned 1x1) and use of a “double T-shirt” diffuser.
This figure shows
that for the B-band filter I can start flat field exposures ~20 minutes
before sunset but no later than about 5 minutes afterwards (assuming my
binning is 1x1). At 10 minutes before sunset I can start the V-band flat
frames. Next are the I-band, R-band and finally the clear filter flat fields.
Since the clear filter flats can be made as late as 20 minutes after sunset
the entire flat frame series can take 40 minutes, assuming all filters are
to be used on that night’s observing session.
Figure 5.02 assumes
that no binning will be used (i.e., 1x1 “binning,” or “full-resolution”).
If 2x2 binning is planned then flat fields will have to be made later than
the times in this graph. Since the CCD’s analog-to-digital converter will
be dealing with 4 times the voltage for a specific sky brightness (produced
by 4 times as many electrons) we can estimate a time to observe from Fig.
5.02 by choosing the 4-second to 40-second exposure time region; at these
times the actual exposures required for the desired counts will be within
the range 1 second to 10 seconds.
My sliding roof
observatory is usually opened about a half hour before sunset. I immediately
start cooling the CCD to something close to 0 C. The flats can be taken
at any temperature; according to SBIG they don’t have to be taken at the
same temperature as the light frames later in the night. The reason for
achieving some amount of cooling is to reduce dark current “thermal” noise.
In making flats
it is sometimes stated that dark frame subtractions are optional. This
is not true for precision photometry. I strongly recommend the use of dark
frame subtraction for all flats. When exposing flats of the sky near zenith
after sunset, exposure times have to be increased every few minutes to assure
that the maximum count is within a range of values that is slightly below
values where non-linearity and other versions of saturation occur. For 16-bit
CCDs “A/D converter saturation” occurs at 65,535 counts (“counts” and “ADU”
are the same thing). The “conventional wisdom” is to keep the maximum flat
field counts within the range 30,000 to 35,000, the latter value being where
many observers believe non-linear effects can be expected. Images with maximum
counts lower than 30,000 can be used, but the noise component for these
images is a greater percentage of the signal component and they may reduce
the quality of the combined flat images (the “master flat”). Every time
the exposure time is changed a new dark frame has to be taken for use with
that flat and those following with the same exposure. This can slow things
down, but that’s a fair price to pay for the assurance of minimizing the
effects of bad pixels later.
My CCD is linear
up to 59,000 counts, and I suspect that the “common wisdom” of avoiding
exposures that produce counts above ~35,000 is out of date for modern CCDs.
Each observer will want to measure their CCD’s linearity range in order
to know how to be guided on setting flat field exposure times, as well as
for setting exposure time for stars to be used photometrically. Measuring
linearity is described in Appendix E.
When I first started
using a CCD I would combine several flat field images and then smooth the
resultant image to reduce “noise.” Don’t do this! Every pixel has a slightly
different behavior (QE, bias, gain) from its neighbors and this behavior
must be preserved in the master flat field image.
I also used to
produce a master flat by median combining individual flats (specifying use
of the background level for “normalize”). I’ve had a few bad experiences
with improper results using the “normalize” setting, which I attribute to
the use of flats with too much variation in average level. Because sky brightness is changing fast near sunset
it’s difficult to adjust exposure times to produce similar levels for counts
in all images. I now favor the averaging of individual flat frames. The only
reason to median combine is to remove cosmic ray defects. I rarely see this,
but nevertheless it is wise to do a cursory eyeball inspection of the flats
before averaging them to make a master flat.
The longer I try
to improve flat fields the more I’ve come to believe that perfect flat
fields are fundamentally impossible. Even the meaning of a flat field,
or the task it is to perform, seems more vague and impossible the more
I think about it. I now believe that even the idea of a perfect flat field
is theoretically impossible unless it is for an extremely narrow filter.
Instead of trying to achieve the perfect flat field it might be better
to spend more effort learning to live with imperfect ones.
Consider flats
taken near zenith after the sun has set. Since the sky is blue the flats
we’re getting this way are meant for use with blue stars. Moreover, since
the sky becomes slightly bluer as the sun sinks below the horizon, flats
taken shortly after sunset will differ from flats taken late after sunset.
In essence, the early and late flats are meant for stars of different blueness.
Red stars deserve flats taken with a red sky, but this is not easily achieved.
Using a red filter with a blue sky just means the effective wavelength is
weighted to the blue side of the filter’s bandpass. In theory we should use
a different flat for each star, depending on its color. This, of course,
is not practical, even if we knew the color of all the stars in the image.
The narrower the filter the less these troublesome effects will be. Unfiltered
flats correcting unfiltered images of a star field can therefore be expected
to exhibit the worst systematic errors.
An upper limit
for the size of these subtle effects can be estimated from all-sky measurements
of Landolt star fields using all-sky photometry procedures. When I evaluate
telescope constants for all-sky equations for a specific telescope configuration
I always have larger residuals for converting unfiltered star fluxes to
CV and CR magnitudes than for the observations using a filter (converting
B-filter fluxes to B-magnitudes, V-filter fluxes to V-magnitudes, etc).
If SNR was the only source of scatter then the opposite should occur. Star
color is an independent variable for this analysis so in theory the residuals
could be the same for unfiltered and filtered images. I believe the greater
scatter for the CV and CR residuals is due to the fact that an unfiltered
flat was used with unfiltered images, and the redder or bluer the star the
worse the flat field correction. Since the all-sky solution procedure is
designed to minimize RMS scatter the final coefficients are a compromise
for all star colors in the Landolt set. Typically, I achieve RMS scatter
of 0.025 magnitude for the B, V, Rc and Ic data, but only 0.035 magnitude
for CV and CR. From this I estimate that the level of systematic effects
that can be expected for transit monitoring should be <20 mmag when using
a filter and <30 mmag when observing unfiltered. These levels would only
be encountered if the target and reference stars were far apart and their
pixel locations varied by large amounts during the observing session. When
the flat field pattern varies significantly from filter to filter I would
expect greater systematic errors from a drift of the star field over the
pixel field during an observing session.
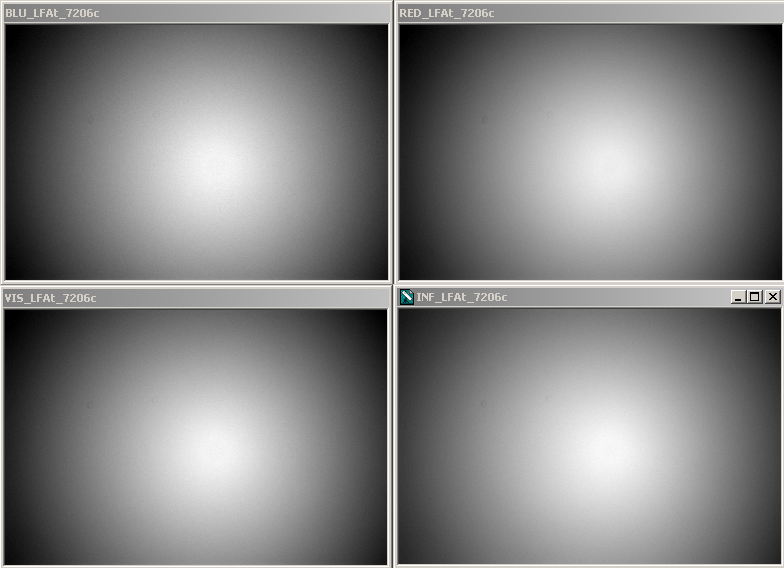
Figure 5.03 Flats
for B, V, Rc and Ic filters for a configuration with a focal reducer lens
placed far from the CCD chip The edge responses are ~63% of the center.
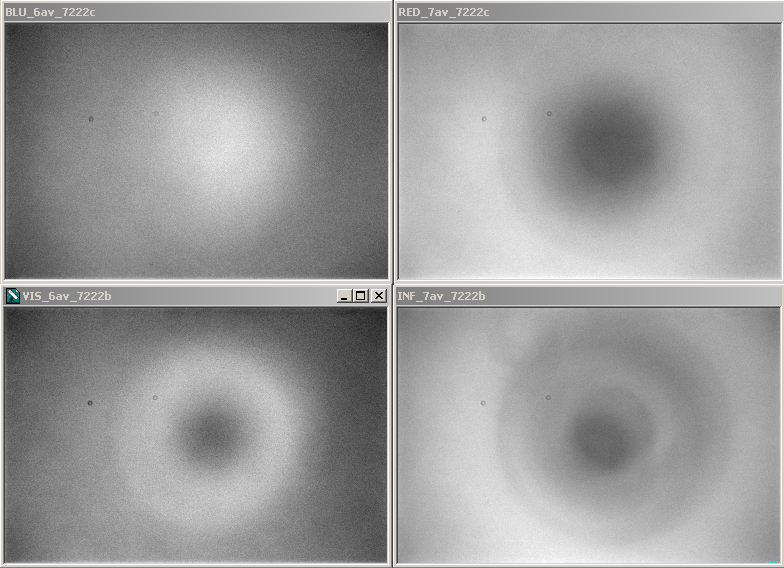
Figure 5.04 Flats
using the same filters but with a configuration with the same focal reducer
close to the CCD chip. The response range, smallest response to maximum,
are 88, 90, 89 and 89% for the B, V, Rc and Ic filters.
These figures shows
how flat fields can change with filter band. Figure 5.03 was made with
a focal reducer lens far from the CCD (in front of an AO-7 image stabilizer).
Figure 5.04 was made with the focal reducer lens between the AO-7 image
stabilizer and the CFW/CCD assembly. What a difference location makes!
Also, what a difference filter band makes! For the second set of flats it
is easy to imagine that stars of different colors will require flats that
are intermediate between the measured blue sky flats, and the reddest stars
will have requirements that depart the most from the measured ones.
Appendix A contains
methods for evaluating the quality of your master flat field. The procedures
described in that appendix are time-consuming, and they are meant for consideration
by advanced users.
The entire situation
of how to make good quality flat fields and how to use them properly is
so confusing to me that I propose the following simple solution. Keep the
star field fixed with respect to the pixel field during the entire observing
session! If this could be accomplished then the expected small movements
of the star field can be counted on to produce only small changes in flat
field error for each star, regardless of its color.
The solution I
propose to minimize the effects of imperfect flat fields is to achieve an
accurate polar axis alignment (< 2 ’arc) and use some form of autoguiding
to keep the star field fixed with respect to the main chip’s pixels. With
this solution all the fundamental flaws in flat field correcting will be
reduced to second-order effects.
─────────────────────────────────
Chapter
6
Dark
Frames
─────────────────────────────────
Creating a master
dark frame is straightforward compared with creating a master flat frame.
Whereas a master flat frame can be used with light frames taken when the
CCD is at a different temperature, and flat frames for one filter cannot
be used with light frames made with a different filter, the opposite is true
for dark frames. The same master dark can be used with light images using
any filter, but the best result is obtained when the light frames are taken
with the same exposure time and CCD temperature as the master dark. You
may object to this last requirement by noting that astronomy CCD image processing
programs have the option of specifying “Auto Scale” and “Auto Optimize”
– which are supposed to compensate for differences in exposure times and
CCD temperatures. These options may work for “pretty pictures,” but I don’t
trust them for precision exoplanet transit observing.
It is common practice
to set the CCD cooling to as cold as can be stabilized with a duty cycle
of ~90% just prior to the time target observations are to begin. When I
finish taking flat frames there’s usually a half hour before target observations
can begin, so during that time my thermoelectric cooler is working at full
duty cycle to get the CCD as cold as possible. After acquiring the target,
and synchronizing the mount’s pointing, I back-off on the cooler setting
to about a degree C warmer than what had been achieved at that time.
Before starting
observations of the target I’ll perform a set of focus images at about
the same area in the sky as the target. The FWHM at the best focus setting
will be used for determining exposure time (explained in the next chapter).
During the time it takes to determine focus the CCD cooling has stabilized.
If there’s time I’ll take dark frames before starting to observe the target.
The best quality dark frames, however, will be made at the end of the target
observations.
A total of at least
10 dark frames should be taken with the same exposure time and CCD temperature.
These images will be median combined, not averaged. Median combining will
remove the effect of cosmic ray defects that are usually present in most
of the dark frames, especially if their exposure times are as long as 60
seconds. Dark current “thermal” noise averages down approximately as the
square-root of the number of images that are median combined. Whereas averaging
causes a “square-root of N” reduction in noise, median combining is about
15% less effective. Thus, when 10 images are median combined the master dark
produced this way will have a noise level that is ~0.36 times the thermal
noise level of the individual images. When this master dark is subtracted
from a single light frame during calibration the calibrated image will have
a slightly greater thermal noise level than the uncalibrated image. The increase
will be only 6%: SQR (1.002 + 0.362) = 1.06.
Bias frames aren’t
needed if the dark frames are taken with the same exposure time as the
light images.
Some observers
claim that they can use the same master dark frame for several observing
sessions. This is not a good practice, because every CCD camera ages, and
if a pixel changes between observing sessions you’ll want to use dark frames
taken with the current pixel’s performance.
─────────────────────────────────
Chapter
7
Exposure
Times
─────────────────────────────────
The factors influencing
the choice of exposure time can be thought of as belonging to one of two
categories: saturation and information rate.
Avoiding Non-Linearity
and Saturation
Images are not
useful for photometry if any of the stars to be used in the analysis are
saturated (i.e., when the maximum count is at the greatest value that can
be registered, such as 65,535, called “A/D converter saturation”). Images
are also not useful when a star to be used has a maximum count value that
exceeds a linearity limit (“linearity saturation”). Not many amateurs measure
where their CCD begins to become non-linear, but “conventional wisdom” holds
that anything greater than mid-range is unsafe. In other words, whenever
the maximum counts, Cmax, exceeds ~35,000 a perfect CCD would produce a slightly
higher count.
If you measure
your CCD’s linearity limit you may be pleasantly surprised. When I measured
mine I discovered that it was linear over a much greater range than represented
by “conventional wisdom.” It was linear all the way to 59,000 counts! This
measurement can be done using several methods, described in Appendix E.
Knowing this has allowed me to use longer exposure times, and longer exposures
are desirable for a couple reasons: 1) scintillation and Poisson noise (cf.
Chapter 15) are reduced slightly because a greater fraction of an observing
session is spent collecting photons (instead of downloading images), 2)
read noise is reduced since exposure times can be longer and there are fewer
readings per observing session, and 3) a smaller fraction of an observing
session is “wasted” with image downloads which means more time is spent collecting
photons. I highly recommend that each exoplanet observer measure their CCD’s
linearity in order to have the same benefits. For the remainder of this
chapter I’ll assume that this measurement has not been made, and you will
want to be cautious by using exposure times assuring that all stars to be
used have Cmax < 35,000.
You might think
that when observations are started it’s OK to just set an exposure that
keeps the brightest star from producing a count greater than ~35,000. That’s
OK when the star field is already setting, when you can count on images
becoming less sharp for the remainder of the observing session. But for
rising star fields images are likely to become sharper as they approach
transit, and since the same number of total counts from each star will be
concentrated on a smaller number of pixels Cmax will increase. Furthermore,
atmospheric extinction is lower at transit so each star’s flux, and hence
Cmax, should increase as transit is approached.
I recommend taking
test exposures for determining exposure time as soon as the target star
field has been acquired and focus has been established. Based on previous
observing sessions you’ll know whether the sharpness of these images is
typical for your site. In making this assessment air mass has to be taken
into account. That’s worth an aside.
Image sharpness
is described by the “full-width at half-maximum” (FWHM) of the “point spread
function” (PSF) of an unsaturated star near the middle of the image. For
example, at my site I can expect FWHM ~2.5 ”arc for short exposures (<5
seconds) near zenith and ~3.0 ”arc for exposure times of 30 to 60 seconds.
I have determined that at my site short-exposure FWHM varies with air mass
(AirMass) in accordance with the following empirical equation:
FWHM [”arc] = 2.5
× AirMass1/3
This is a useful
equation for estimating how sharp an image will be later in an observing
session. Suppose the test images at the start of a session show FWHM = 4.0
”arc when the air mass is 3 (elevation ~ 20 degrees). If “atmospheric seeing”
conditions don’t change for the duration of the observing session, and if
the region of interest will pass overhead, we should expect that near zenith
FWHM ~ 2.8 ”arc.
We can make use
of the fact that a star’s Cmax increase as 1/FWHM2 for as long as
its flux is constant. When FWHM changes from 4.0 to 2.8 ”arc we can expect
Cmax to increase by the factor 2.1. Another way of calculating Cmax is
to note that Cmax is proportional to 1/AirMass2/3. In our example,
AirMass goes from 3 to 1, so Cmax will increase by a factor (3/1)2/3 ~ 2.1. This means
that we want our test images to show the brightest star’s Cmax = 16,700
(35,000 / 2.1). A more useful version of the previous equation is therefore:
Cmax at AirMassi
/ Cmax at AirMass0 = (AirMassi
/ AirMass0 ) -2/3
This equation assumes
star flux doesn’t change with air mass. Therefore we must account for changing
flux with air mass caused by atmospheric extinction. The biggest effect
will be for the B-band filter. Using our example of the test images being
made at AirMass = 3, what can we expect for Cmax when AirMass = 1? For my
observing site (at 4660 feet above sea level) the B-band zenith extinction
is typically 0.25 [magnitude / AirMass]. Changing AirMass from 3 to 1 can
therefore be expected to change a star’s measured brightness by 0.50 magnitude.
This corresponds to a flux ratio of 1.6 (i.e., 2.512 0.5). We
therefore must reduce our desired Cmax for test images to 10,400 counts
(16,700 / 1.6). At lower altitude observing sites the correction would be
greater. See Fig. 14.04 for a graph that can be used to estimate zenith extinction
for other observing site altitudes for each filter band.
Imagine the frustration
of choosing an exposure time that produces Cmax ~35,000 counts at the beginning
of a long observing session, and discovering the next day when the images
are being reduced that the brightest stars, and maybe the target star,
were saturated in most images! This is a case where a small effort at the
beginning of observations can lead to big payoffs for the entire observing
session.
Information Rate
When all stars
of interest in the FOV are faint the previous considerations may not be important.
In this case different criteria should be used to choose exposure time.
Starting with a trivial example, if transit length is expected to be 3 hours
it would be foolish to take exposures as long as an hour, even though at
least one of them would be completely within the transit phase. At the other
extreme we don’t want exposures to be significantly shorter than the time
required for downloading each image because that would be very inefficient.
Let’s approach
this by adopting 60 seconds as a default exposure time, and then ask “what
are the merits of either increasing or decreasing exposure time?”
A typical transit
will last 3 hours and the ingress and egress portions of this will be ~20
minutes. Referring to the figure on the cover, ingress is from contact
1 to contact 2, and egress is from 3 to 4. For such a transit it is desirable
to obtain information about the shape of ingress and egress in order to
constrain model fitting (the size of the exoplanet in relation to the star,
and also the star center miss distance). Therefore, exposure times should
be less than about 4 minutes on account of this consideration. Another reason
to have ingress and egress shapes well-established is to be able to assign
an accurate mid-transit time. A transit timing archive can be used to establish
the presence of “timing anomalies,” and these can be used to infer the existence
of another exoplanet in the same star system. I think 4 minutes is the longest
exposure time that should be considered for any exoplanet transit observing
situation.
What about shorter
exposure times? We now must consider a concept called “information rate.”
Information rate can be described as inversely proportional to the observing
time required to achieve a specified SNR for a specific star using a specified
filter. Long image download times reduce information rate. My CCD requires
8 seconds to download (full resolution, or unbinned, or 1x1). If I used
an exposure time of 8 seconds half of an observing session would be spent
downloading images. Another way of saying this is that such an observing
schedule has a 50% duty cycle. Consider the absurd example of exposing for
2 seconds when downloading requires 8 seconds. This corresponds to a duty
cycle of 20%, which means 80% of an observing session would be spent simply
downloading images. The higher the duty cycle, the greater the information
rate. The longest possible exposures will produce the greatest possible information
rate.
So why not increase
the exposure time from our starting value of 60 seconds, and make it 120
seconds – assuming saturation issues are not a problem at this longer exposure
time? To answer this we must consider “risk.” Suppose a satellite, or airplane,
passes though the FOV and ruins an exposure? The more exposures you have
in an observing session, the smaller is the percentage loss when one image
is ruined. There are a myriad of things that can ruin an image. For me,
winds vibrate my telescope and when they exceed about 5 mph the stars begin
to take on oval shapes. This not only lowers the signal-to-noise ratio (SNR)
but it introduces the possibility of systematic errors. Cosmic ray defects
are present in most exposures, especially the long ones, and if they appear
on top of a star’s image there’s no way for simple aperture photometry to
correct for it. If such a cosmic ray defect is within the signal aperture
of the target star, or any of the reference stars, the affected image will
produce a brightness for the exoplanet that has to be rejected as an outlier.
The fewer images that have to be rejected because they appear to be outliers,
the better. This is an argument for short exposures.
Consider the information
rate for 60-second exposures versus 120-second exposures when download
time is 8 seconds: the two duty cycles (proportional to information rate)
are 88% and 94%. That’s a gain of only 7% for the longer exposure time,
but a doubling of “risk” related to ruined images.
Scintillation noise
is a possible consideration when choosing exposure time. Scintillation
noise is a fractional fluctuation of all stars in a FOV, uncorrelated with
each other, caused by wave front interference effects produced by small-scale
temperature inhomogeneities at the tropopause (11 - 16 km at zenith). Scintillation
fluctuations of a star’s intensity decrease with exposure time as 1/g1/2 (where g is exposure
time). Thus, 4-minute exposures will exhibit half the scintillation of
1-minute exposures. However, the average of four 1-minute exposures will
also exhibit half the scintillation of a single 1-minute exposure. The
only improvement in reducing scintillation by using longer exposures comes
from the fact that a 4-minute exposure can be obtained more quickly than
four 1-minute exposures (due to the difference in number of image downloads).
Using the previous example, in which a 4-minute exposure has a 7% advantage
in duty cycle compared to 1-minute exposures, we can calculate that a sequence
of 4-minute exposures will have a 3.4% lower scintillation per unit of observing
time than the sequence consisting of 1-minute exposures (sqrt(1.07) = 1.034).
The same argument
can be applied to Poisson noise (described in Chapter 15). The fractional
uncertainty of a flux measurement due to Poisson noise is proportional
to 1/flux1/2 and since flux
is proportional to exposure time the same 1/g1/2 relationship exists
between Poisson noise and exposure time.
I don’t know of
an objective way to assess all these factors, but they will be different
for each observatory. It is my subjective opinion that 60-second default
exposure time is a good compromise when saturation considerations permit
it.
─────────────────────────────────
Chapter
8
Focus
Drift
─────────────────────────────────
I once neglected
to "lock the mirror" after establishing a good focus, and went to sleep
while observing a transit candidate. I'm glad this happened; the focus drifted
and caused an effect that was too obvious to ignore, and this led me to
investigate causes. The problem showed itself as an apparent "brightening"
of the target (relative to several reference stars) near the end of the
observing session.
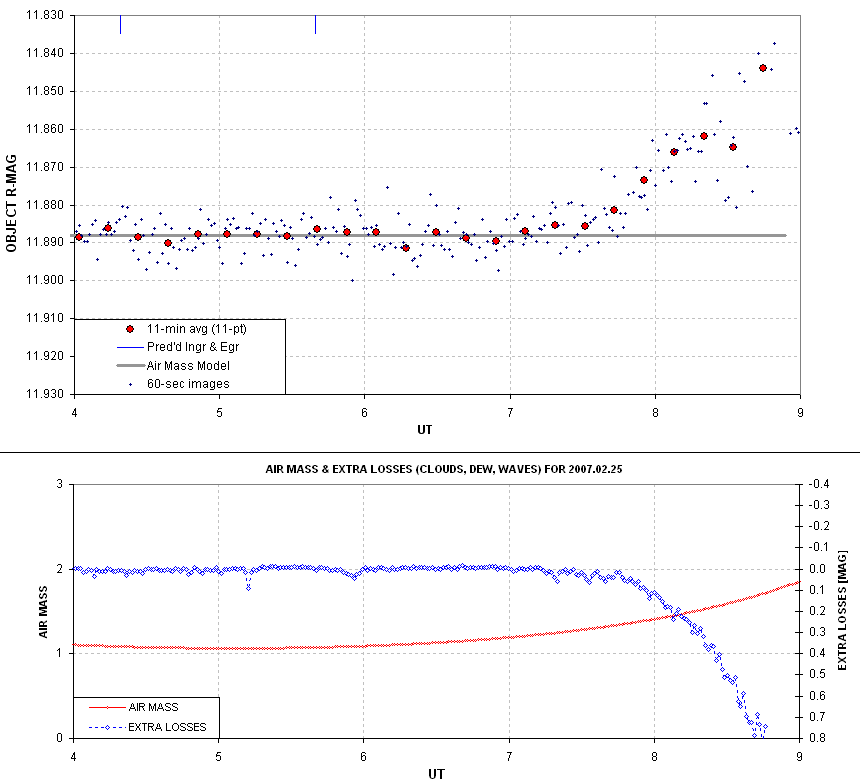
Figure 8.01. Light curve
showing effect of focus drift starting at ~7.2 UT. The lower blue trace
shows that the “sum of fluxes for all reference stars” decreased starting
at the same time.
I recall upon awakening, and looking at the image on the monitor, that
the focus was bad and I immediately suspected that this was caused by focus
drift, but I didn't know what effect it would have on the light curve (LC).
After processing the images and seeing the LC, I knew right away that focus
drift had affected it. Here's a plot of FWHM (and “aspect ratio”) for the
images used in the above figure.
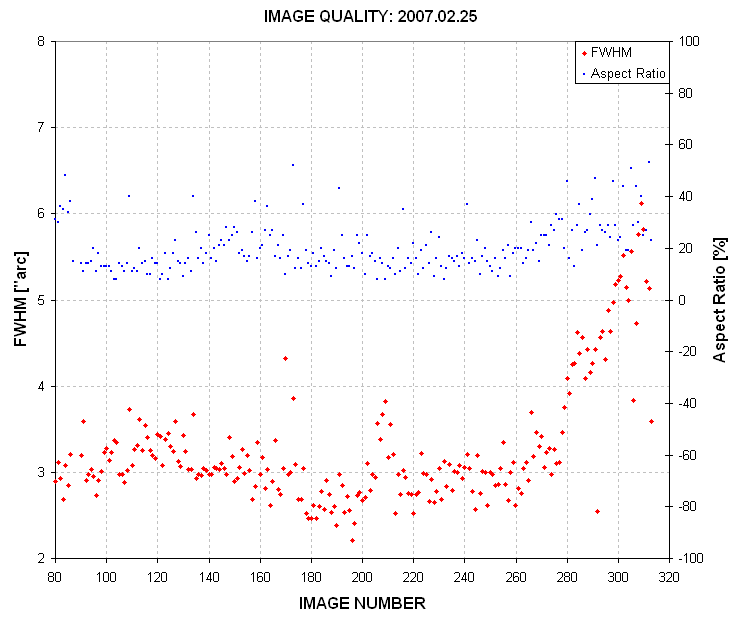
Figure 8.02. Plot of FWHM ["arc] and "aspect ratio %" (ratio of
largest PSF dimension to smallest, expressed as a percentage) for the images
used to produce the light curve. Image numbers near 260 correspond to 7.0
UT. (Produced using the automatic analysis program CCDInspector, by Paul
Kanevsky.)
There's clearly a good correlation between focus degrading and the apparent
brightening of the target star (~7.0 UT). But how can an unfocused image
affect the ratio of star fluxes? To determine this, consider how MaxIm
DL (and probably other programs as well) establish magnitude differences
from a set of images. I'll use two images from the above set to illustrate
this.
An image in good focus was chosen from ~7.0 UT and another from ~8.5
UT. They were treated as a 2-image set using the MaxIm DL photometry tool.
The next figure shows the sharp focus image after a few stars were chosen
for differential ensemble photometry.
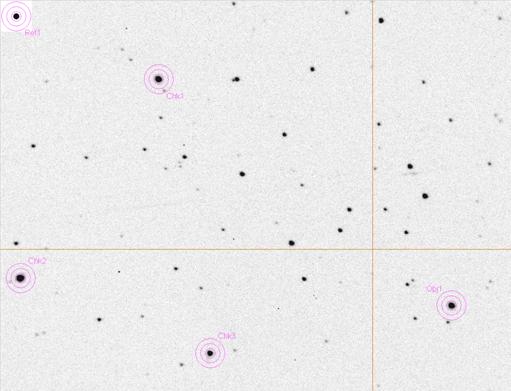
Figure 8.03. Location of
photometry apertures after using this image to select an object (the “target”
or exoplanet candidate), check stars and a reference star (upper-left corner,
my artificial star). (These notations are slightly misleading, as explained
in the text.)
The measured star
fluxes are recorded to a CSV-file (comma-separated-variable in ASCII format)
which can be imported to a spreadsheet, where the user can select from
among the “check stars” to serve as reference. The artificial star is not
used for reference; instead it serves to determine “extra losses” that might
be produced by clouds, dew on the corrector plate, or image quality degradations
due to poor tracking, wind shaking the telescope or poor focus (causing
the PSFs to spill outside the photometry aperture). These details are not
relevant to this chapter’s message, and they’ll be treated at length in
Chapters 12 and 13.
Note that in this image essentially all of each star's flux is contained
within the signal aperture. The next figure is a screen capture of the
photometry circle locations on the defocused image.

Figure 8.04. Same photometry
apertures (at the same x,y locations as in the previous image) for the
defocused image.
In this defocused image some stars have PSFs that are spread out in
the famous “comet shape” coma pattern, with the comet tails directed away
from the optical center (indicated by the cross hair). The length of the
coma tail is greater the farther the star is from the center. Thus, stars
near the edges have a smaller fraction of their total flux within the aperture
than stars near the center. The ratio of fluxes, and hence magnitude differences,
will therefore be affected. The object's measured brightness can have either
sign, depending on whether the target star (the exoplanet candidate, labeled
“Obj1” in the figure) is closer to the center, or farther from it, compared
with the reference stars (labeled “Chk” in the figure). For this image
we can expect the reference stars to suffer greater losses than the target,
leading to an apparent “brightening” of the target. The magnitude of this
effect will be greater for smaller photometry apertures. Larger apertures
would reduce this effect. However, the best solution is to never have to
use poorly focused images.
Referring back to Fig. 8.01, and noting the blue trace labeled "Extra
Losses [mag]", an increase in losses is usually produced by cirrus clouds.
However, in this case it was produced by a spreading out of the PSF beyond
the signal aperture circle as focus degraded.
The lesson of this
chapter is “keep all images in good focus” (an exception is treated at
the end of this chapter). If that doesn’t work, for whatever reason, then
when processing the images use a large photometry aperture to assure that
most of the flux is measured for all stars (“most” means ~99%). If you’re
not sure that the aperture size was sufficiently large, then if you use
an artificial star for setting the differential magnitudes check to see
if the magnitude for any of the stars, or the magnitude corresponding to
total flux for all the non-target stars, drops when the target appears
to change values. Any correlation between target brightness and fading
of reference stars should be viewed as a “red flag” for focus drift problems.
Observing Log Entries
I like to record
in the observing log FWHM measurements of a chosen star at regular intervals,
such as every half hour. This helps in identifying the need for a focus
adjustment; it also will show the presence of atmospheric seeing trends.
Since my focus setting depends on elevation as well as temperature, I also
record these values.
Whenever I record
a FWHM in the observing log I also record the magnitude that MaxIm DL displays
when the photometry circles are over the star that I’ve chosen for that
purpose. It doesn’t matter that the magnitude scale is uncalibrated (i.e.,
having an offset error) because the only thing I’m monitoring is constancy
of the chosen star’s brightness. This is a good way to detect the presence
of cirrus clouds. It also can alert for the presence of dew accumulation
on the corrector plate. You can’t do anything about cirrus clouds, but dew
accumulation will require use of a hair dryer. By choosing a bright (unsaturated)
star for this purpose the magnitudes should be constant at a level of <0.01
mag (assuming SNR > 100). Changes from one image to the next that exceed
this usually indicate the presence of clouds. Slow changes will of course
occur due to changing air mass, but these changes are small and easily identified
as air mass related. For example, R-band observing will increase the star’s
magnitude by ~0.13 magnitude per air mass, and if the observing log includes
elevation notations it is easy to verify that trends are compatible with
an atmospheric extinction explanation. I also like to record outside air
temperature, dew point, wind max (during the past 5 minutes) and wind direction.
Whenever focus is adjusted I note this as well.
Intentional Defocusing
Sometimes an observing
session is designed for intentionally defocused imaging. This is done when
bright stars are within the FOV and Cmax must be kept below saturation
for long exposures. The desire for long exposures can be motivated to reduce
the fraction of time lost to image downloading or to reduce scintillation
(cf. Chapter 15). There are situations when this can be done safely. One
requirement is a good alignment of the telescope optics; otherwise, defocused
images won’t have circularly symmetric point-spread-functions. Another requirement
is that the telescope tube does not contract as the night air cools, which
would require that adjustments be made to maintain the same defocus. Defocused
observing should not be attempted when there are stars near the target
or reference stars that could be included in the signal photometry aperture.
This is more often a problem for objects at low galactic latitudes. Finally,
this should only be done at sites where sky background level is not high,
since a defocused image will require the use of a larger photometry aperture
and large photometry apertures increase the component of sky background
noise to the final measurement precision. This translates to not using an
intentionally defocused observing strategy during full moon (unless an I-band
filter is used). Some of the reasons for these precautions will be better
understood after reading the following chapters.
Precaution when
Focusing the Mirror
Focusing is accomplished
in one of two ways: moving the primary mirror or moving the CCD camera
assembly. The latter is preferable. However, because I removed the “microfocuser”
from my Meade LX200GPS telescope (in order to clear the base for reaching
the north celestial pole as part of the pointing calibration), my focusing
is accomplished by moving the primary mirror. This is a crude way to focus,
and it causes problems for exoplanet observing. The remainder of this section
should serve as a warning about focusing with the primary mirror.
The primary mirror
is moved in or out using a rod attached to reducing gears attached to the
focusing knob. When making an adjustment in a direction opposite to the
previous one the mirror will not move until a hysteresis range of movement
is overcome. For my telescope this is approximately a half turn of the focus
knob (or 5 turns when using a 10:1 gear reducer). Since my focusing is accomplished
using a wireless MicroTouch focusing unit (sold by Starizona) the hysteresis
for reversing direction amounts to ~650 steps (of a stepper motor attached
to the focus knob’s 10:1 reducer shaft). I try to avoid reversing direction
for two reasons: 1) the mirror changes tilt enough to cause image shift,
and 2) the hysteresis amount is not exactly the same for each reversal of
direction so I can never achieve an accurate adjustment with one command
when a reversal of direction is involved.
Before explaining
the strategy I’ve adopted for this problem I should describe results of
my measurements of desired focus setting (in absolute position readout counts)
versus temperature and elevation angle. It is believed that the most important
cause for needing to make a focus change is the telescope’s change in temperature.
As a telescope cools the tube shrinks, and this requires that either the
CCD assembly must be moved out or the mirror must be moved “in.” For my
telescope there is an additional factor contributing to the need for focus
adjustment: elevation angle. I’ve produced a plot of desired focus setting
versus elevation angle for a selection of temperatures. For a typical observing
session the elevation angle effect is more important than temperature effects.
Moreover, due to hysteresis there is a different set of desired focus setting
traces for “inward” versus “outward” adjustments, and they are offset by
the hysteresis amount (the 650 steps mentioned above).
“Inward” focus
adjustments are required when temperature cools with time during an observing
session. After transit the changing elevation angle also requires “inward”
focus adjustments. Thus, after transit I can count on all adjustments to
be in the same direction, “inward” (unless I’ve over-corrected and have to
back-up). Observations before transit may require focus adjustments in either
direction, depending on the relative importance of elevation changes versus
temperature changes. Usually, elevation changes dominate, and this requires
“outward” focus adjustments. Because I can anticipate the direction of focus
adjustments during an observing session (based on whether the object will
be rising or setting) I begin an observing session with a focus setting that
was achieved going in the same direction as I anticipate will be required
by subsequent adjustments. This precaution assures that I am unlikely to
encounter a large hysteresis adjustment (until transit).
The problems associated
with having to adjust focus using the mirror, instead of a microfocuser
that moves the CCD assembly, are so troublesome that I question the wisdom
of removing the microfocuser. The principal reason that prompted me to do
this was the need for providing sufficient clearance of the “optical backend”
in relation to the mounting base that I could point to the north celestial
pole in order to calibrate pointing. The LX200GPS “loses” pointing calibration
so often that this became an over-riding consideration. Perhaps Meade will
some day improve their firmware quality control, so that pointing calibration
will not be “lost” between observing sessions. When this happens I would
recommend the use of Meade’s microfocuser and forsake the ability to observe
north of ~75 degrees declination.
I’ve “belabored”
this focusing problem partly to serve as a warning to any observer who
is considering focus adjustments using the primary mirror. I also hope
I have illustrated the merits of buying a telescope having a tube made
with low thermal expansion material.
The focusing problems
just described in excessive detail would not be tolerated in a professional
telescope. We amateurs, with limited budgets, must spend extra effort on
such matters. When using amateur hardware in an attempt to perform professional
quality observations, whatever is saved in hardware investment cost is
paid for with an extra workload.
─────────────────────────────────
Chapter
9
Autoguiding
─────────────────────────────────
Some CCD cameras
have two chips, a large main one for imaging and a small one beside it
for autoguiding. CCDs with just one chip can be autoguided if a separate
CCD camera is attached to a piggy-backed guide telescope. If you have neither
of these ways to autoguide, may I suggest that you consider a hardware upgrade.
My CCD camera is
a Santa Barbara Instruments Group (SBIG) ST-8XE. The X and E at the end
just signify that I’ve upgraded a ST-8 to have a larger autoguider chip
(SBIG’s TC237) and USB communication.
There are a couple
ways to automatically autoguide for an entire observing session. One is
to use the autoguider chip to nudge the telescope drive motors. This can
be done whether the autoguider chip is in the same CCD camera as the main
chip or on a separate CCD camera attached to a piggy-back guide telescope.
The main drawback for this method is that the telescope drive motors have
hysteresis, especially the declination drive, and this produces uneven autoguiding.
This method at least keeps the star field approximately fixed with respect
to the pixel field (assuming a good polar alignment), but it won’t sharpen
images.
Image Stabilizer
The second method
for autoguiding is to use a tip/tilt mirror image stabilizer. I have an
SBIG AO-7 tip/tilt image stabilizer. For large CCD format cameras SBIG sells
an AO-L image stabilizer. As far as I know SBIG is the only company selling
an image stabilizer that’s priced for amateurs. The AO-7 allows me to use
the autoguider image to adjust a tip/tilt mirror at the rate of up to ~10
Hz, depending on how bright a star I have in the autoguider’s FOV. When
the required mirror movement exceeds a user-specified threshold (such as
40% of the range of mirror motion) the telescope is nudged in the appropriate
direction for a user-specified preset time (such as 0.1 second). I use MaxIm
DL for both telescope control and CCD control, and I assume other control
programs have the same capability.
In the planning
chapter I described choosing a sky coordinate location for the main chip
that assures the autoguider’s FOV includes a star bright enough for autoguiding.
Using a 14-inch telescope a star with V-mag ~ 11 is acceptable for 5 Hz
autoguiding when using an R-band filter. If the brightest star that can
be placed in the autoguider’s FOV is fainter, it may be wise to consider
observing with either a clear filter or a blue-blocking filter (described
in Chapter 14). My CCD with a photometric B-band filter produces star fluxes
that are only 16% of flux values produced by an R-band filter (by a typical
star), so a star would have to be 2 magnitudes brighter to be useable for
B-band autoguiding.
With an SBIG tip/tilt
image stabilizer it is usually possible to produce long-exposure images
that are as sharp as those in the average short-exposure, unstabilized images.
Tracking is possible for the entire night provided cirrus clouds don’t
cause the autoguide star to fade significantly.
Image Rotation
and Autoguiding
As pointed out
earlier, whereas a successful autoguide observing session that lasts many
hours will keep the autoguider star fixed to a pixel location on the autoguider
chip, if the telescope mount’s polar axis is imperfectly aligned the main
chip’s projected location on the sky will rotate about the autoguide star
during an autoguided observing session. This will be seen in the main chip
images as a star field rotation about an imaginary location corresponding
to the autoguider star. Each star will move though an arc whose length will
be greater for stars farthest from the autoguider’s guide star. The main
chip’s FOV will change during the observing session, and any reference stars
near the FOV edge are at risk of being “lost.” An important goal of exoplanet
transit observing is to keep the star field viewed by the main chip fixed
with respect to the main chip’s pixels. Therefore, autoguiding will be most
successful if the mount’s polar axis is aligned accurately.
Observer Involvement
with Monitoring
Amateurs have different
philosophies about how much attention must be given to observing during
an observing session. Some prefer to start the entire process with a script
that controls the various control programs. I prefer a greater presence
in the control room throughout the observing session. After the flats have
been made, and an observing sequence has been started, it may be theoretically
possible to go to bed with an alarm set for the end of the session. I like
to spot check such things as auto-guiding, focus setting, seeing, extra
losses, CCD cooler setting, and record items in an observing log at regular
intervals. After all, if a passing cirrus cloud causes the autoguider to
lose track, the following observations will be useless until the observer
reacquires the autoguider star. Autoguiding needs are the main reason I
stay involved with observing for the entirety of an observing session. As
you may have gathered from my “observatory tour” (chapter 2) my observing
control room is comfortable. This is primarily in response to the requirements
of autoguiding, which requires that I check-in on the telescope’s tracking
and record things on the observing log at frequent intervals.
─────────────────────────────────
Chapter
10
Photometry
Aperture Size
─────────────────────────────────
Before describing
how images can be processed to produce light curves it is necessary to
have an understanding of some basic concepts related to photometry aperture
size.
The following descriptions
will be based on my use of MaxIm DL, or MDL as I will refer to the program.
I’ve never used other image analysis programs that are supposed to be comparable,
but I’ll assume that they’re capable of performing similar operations.
It will be up to the user of another program, such as AIP4WIN or CCDSoft,
to figure out the equivalent procedure. I don’t want this paragraph to
seem like an advertisement for MDL, but I do want to say that I’ve never
encountered anything related to image manipulation that I needed to do
for photometry that wasn’t performed easily with MDL.
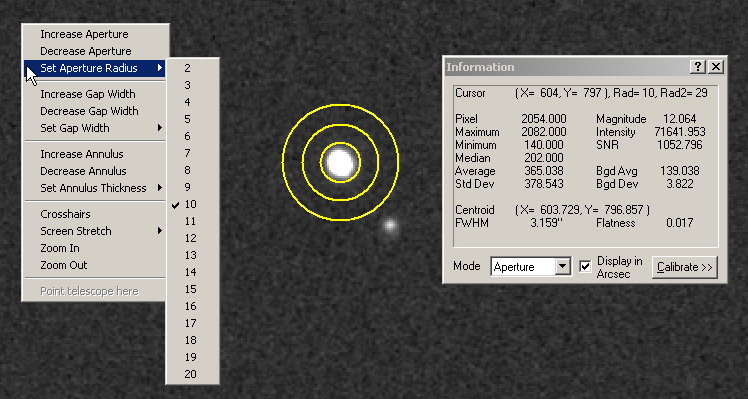
Figure 10.01. Three
aperture circles with user-set radii of 10, 9 and 10 pixels. The Information
window gives the cursor location, the radius of the signal circle (10 pixels)
as well as the radius of the sky background annulus outer circle 29 pixels).
The Information window shows many other things, such as magnitude, star
flux (labeled “Intensity”), SNR and FWHM.
MDL uses a set
of three circles for performing aperture photometry measurements. Figure
10.01 shows photometry aperture circles centered on a star. Notice that in
this image the central circle, which I shall refer to as the “signal aperture,”
appears to enclose the entire pixel area where the star’s light was registered.
Note also that the outer sky background annulus (the area between the outer
two circles) is free of other stars. When these two conditions are met
the star flux reading displayed in the Information window (labeled “Intensity”)
will be valid. If the signal aperture is too small the flux reading will
be too small, and if the signal aperture is too large the flux may be correct
but it will have a larger component of noise due to the many pixels involved.
With a too large signal aperture the pixels near the outer edge will contain
no information about star flux, but they will contribute noise to the flux
reading. This can be easily seen by changing the signal aperture size and
noting the way SNR changes, as shown in the next figure.
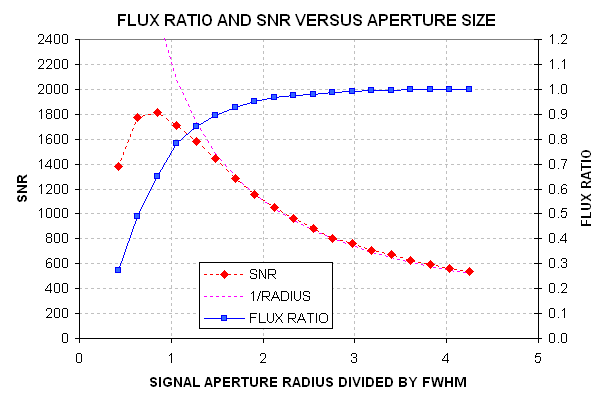
Figure 10.02. SNR
and flux ratio (“aperture capture fraction”) versus signal aperture radius
(normalized to FWHM) for the star in the previous figure. The purple dotted
trace is “1 / radius.”
This figure shows
a maximum SNR when the aperture radius is about ¾ of the FWHM. This
agrees with theoretical calculations for a Gaussian shaped PSF. There are
good reasons for not choosing a signal aperture radius where SNR is maximum,
at least for exoplanet light curve work. Notice that when the maximum SNR
size is chosen the photometry aperture circle captures only ~ 65% of the
total flux from the star. This is easily understood by considering that as
the radius is increased more pixels are used to establish the star’s flux,
but these new pixels are adding parts of the star’s PSF that are less bright
than the central portion. Although the new pixels are adding to the total
flux, they are also adding to the noise level of the total flux. This happens
because each pixel’s count value is compared with the average count value
within the sky background annulus, and a difference is added to the total
flux. But each pixel is “noisy” (due to thermal jostling of electrons in
the CCD elements and electronics, read noise and sky brightness contributions
to the counts from each pixel). For example, in this image the RMS noise
for each pixel is 3.5 counts. The noise level of the total flux increases
with the square-root of the number of pixels added, and since the number
of pixels increases as the square of the radius the noise on total flux readings
should be proportional to the signal aperture radius. Beyond a radius of
~1.4 × FWHM, where total flux has essentially reached an asymptote,
the SNR decrease as 1/radius.
For some observing
projects small signal apertures are appropriate, such as detecting and
tracking faint asteroids. For the asteroid situation SNR could be 2 to
3 and brightness precision isn’t important. But consider some of the problems
that might occur with bright stars where brightness precision is
paramount. In Chapter 8, describing focus drift, it was shown that when
PSF changes during an observing session “aperture capture fraction” may
differ across the image.
This is a situation
in which the user faces competing goals: the desire for small stochastic
noise levels versus small systematic errors. If we adopt an aperture radius
of twice FWHM the aperture capture fraction rises to 96% but SNR is reduced
to ~60% of its peak value. Even this may be too risky. Consider the implications
of one part of an image having a PSF for which this aperture captures 95%
of the total flux versus 96% at the center. This 1% difference corresponds
to 10 mmag, and if our goal is to eliminate systematic errors above the
2 mmag level, for example, then we cannot tolerate 1% changes in the aperture
capture fraction for the target star, or any of the reference stars, during
the entirety of the observing session. By choosing a radius that is 3 times
FWHM, ~99% of the total flux is captured. I feel comfortable with this
choice, but there’s no clear way of arguing for a best aperture size since
each observing session is different and one might be absolutely OK using
a small aperture while another would be riddled with intolerable systematic
errors.
My subjective solution
to this problem of not knowing how small a signal aperture is acceptable
is to process the images using 2 or 3 aperture sizes. As Chapter 12 describes,
MDL can easily produce ASCII files of flux measurements with different
aperture sizes, so this is one option to consider – especially in those
cases where image sharpness varies greatly from image to image or from
image center to the edges.
There’s more to
choosing photometry apertures than the concern about aperture capture fraction.
The same image in Fig. 10.01 has a bright star (not shown in this figure)
that would be useful to use as a reference star, but a fainter star is
located 9 ”arc (12 pixels) away. The next figure’s left panel shows these
stars with a photometry pattern for which the signal aperture radius is
3 × FWHM. This aperture choice is unacceptable because some of the
nearby star’s flux is within the signal aperture. The right panel shows that
the nearby star can be excluded from the signal aperture by reducing the
aperture radius from 12 pixels to 10 pixels, corresponding to 2.4 ×
FWHM. Before choosing a signal aperture radius it is important to check
all bright stars to see if a radius adjustment like this one should be made.
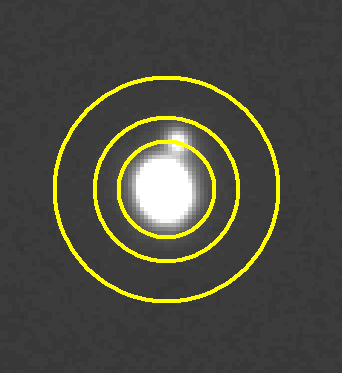
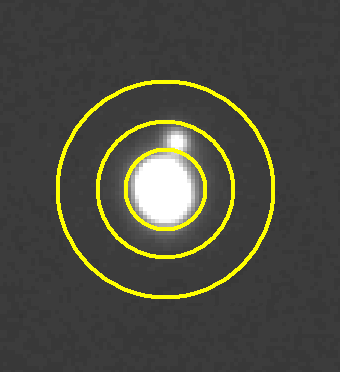
Figure 10.03. Left panel: Candidate reference star showing photometry aperture circles with
the signal aperture radius = 3 × FWHM. Right
panel: Same star with signal aperture radius = 2.4 × FWHM.
What about stars
in the sky background annulus, as shown in the next figure?
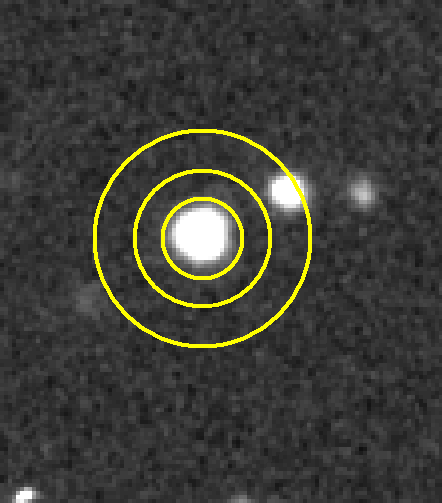
Figure 10.04. Example
of a star with a nearby star that’s within the sky background annulus.
Actually, this
is not a problem because MDL’s photometry tool uses a sophisticated algorithm
for eliminating outlier counts in this annulus. AIP4WIN does the same using
a different algorithm. (Note: The current version of MDL’s “on the fly”
photometry doesn’t use the sophisticated algorithm for rejecting sky background
counts from such stars, so be careful when using the MDL Information Window’s
“Intensity” readings.)
In conclusion,
the most important aperture size to choose carefully is the signal aperture
radius. Whenever there’s concern about what aperture size to choose it is
very easy (in MDL) to process the images with several choices. The files
produced with different aperture sizes can be imported to different spreadsheets,
as described in Chapter 13, and systematic behaviors of each star can be
performed to determine which aperture size to accept.
This chapter’s
message is to start with a default signal aperture radius = 3 × FWHM,
and adjust in response to the presence of interfering stars. Consider using
2.5 × FWHM and 3.5 x FWHM. Only the “brave” or “foolhardy” will use
2 × FWHM for precision photometry.
─────────────────────────────────
Chapter
11
Photometry
Pitfalls
─────────────────────────────────
This chapter is
meant to prepare you for the next two chapters, which are a daunting description
of my way of overcoming pitfalls of the standard ways of producing light
curves that may be acceptable for variable stars but inadequate for exoplanet
transits.
Most variable star
light curves (LCs) require precisions of 0.05 to 0.01 magnitude, whereas
exoplanet LCs should be about 10 times better, i.e., 2 to 5 mmag precision
per minute.
Perfection can
indeed be the enemy of good enough, because achieving perfection takes so
much more effort. It should not be surprising that producing exoplanet LCs
should require more than twice the effort of a typical variable star LC.
Sometimes I’ll spend more than half a day with just one LC.
The amount of effort
needed for producing good exoplanet LCs will depend on the shortcomings
of your telescope system. The closer to “professional” your system, the
less effort required. If your telescope tube is made with materials that
don’t expand and contract with changing ambient temperature, then one category
of concern is removed. If your observing site is high, and remote from city
lights, other categories of concern are reduced. If your aperture is large
and collimation is good, SNR and blending issues are less important.
The next two chapters
are presented for observers with “moderate” apertures (8 to 14 inches),
at poor to moderate sites (sea level to 5000 feet), with telescope tubes
that require focusing adjustments as temperature changes and with equatorial
mounts that may have polar alignment errors of ~ 0.1 degree or greater.
These shortcomings probably apply to most exoplanet observers.
Let’s review some
of the LC shortcomings that may be acceptable for variable star observing
but which are not acceptable for exoplanet observing. Some of these have
been mentioned in the preceding chapters, but others have not.
An imperfect polar
alignment will cause image rotation, which causes the star field to drift
with respect to the pixel field during a long observing session. This causes
temporal drifts, and possibly variations, whenever the flat field is imperfect,
and no flat field is perfect.
The size and shape
of star images will vary with air mass, as approximately the 1/3 power
of air mass. When aperture photometry is employed with the same aperture
size for all images, the photometry aperture capture fraction will vary
in a systematic way with air mass, and this leads to an incorrect derivation
of atmospheric extinction. There’s a way of overcoming this (use larger
apertures is one), but the price paid is lower SNR and more blending. This
will be described later.
Ensemble differential
photometry increases the chances that one of the stars is variable, which
would produce drifts, or sinusoidal variations, in the exoplanet LC. To
avoid this it is necessary to evaluate the constancy of all stars used for
reference. The importance of this precaution will be appreciated after the
capability for doing it has been accomplished. I am continually surprised
by how many stars are variable at the mmag level. In the past year I have
discovered two Delta Scuti type pulsating variable stars plus several stars
with longer period variations. All of them were candidates for use as reference
stars, and I’m glad my procedures identified them for rejection.
Star color matters
when choosing reference stars. For example, if the exoplanet candidate
star is red and all nearby stars are blue, be prepared for an air mass
correlated curvature of the LC baseline level. To minimize these effects
extra work will be required to select suitable stars using their J and K
magnitudes for deriving star color.
Other subtle systematic
effects are present at the mmag level but this review should suffice to
convince the reader to be prepared for extra work if you want to produce
good quality LCs. Most of the extra work will involve spreadsheets. I hope
you like using spreadsheets, because anyone who hates them won’t do a good
job using them.
The next two chapters
should be viewed as a guide to the concepts that matter. My specific implementation
of the precautions that should be taken is just one implementation out
of many that must exist. Every month I improve my spreadsheets. I also
change some image analysis procedures, though less often. A year from now
I would probably be embarrassed by the shortcomings of what is presented
in the next two chapters. I therefore recommend that you read these chapters
for “concepts” instead of specific implementations.
As patent attorneys
like to write into every first paragraph: “The following description is
merely one embodiment of the invention and it is meant to include all other
embodiments.”
─────────────────────────────────
Chapter
12
Image
Processing
─────────────────────────────────
The morning after
a long observing session may require as little as an hour to perform a
good quality analysis resulting in a light curve, or it may take much longer.
Many factors dictate how much effort is required to perform the tasks described
in this and the next chapter.
The task of converting
images to a light curve consists of two parts: 1) processing images to
acquire star fluxes for several stars from many images, and 2) converting
these star fluxes to a light curve using a spreadsheet. This chapter deals
with the first part, processing images and creating files of star fluxes
that can be imported to a spreadsheet for performing the second analysis
part. Please view the specific instructions as merely one way to deal with
issues that you will want to deal with using whatever tools you feel comfortable
using. My examples will be for the MaxIm DL (MDL) user, so if you use another
image processing program you’ll want to just glean concepts from my explanations.
Imagine that we
have 450 raw images from a night’s observations. This could be from a 6.5-hour
observing session consisting of 60-second exposures. Given that my RAM
is limited to 1 GB there are limits to how many images I can load without
having to use virtual RAM (which really slows things down). By setting
MDL to disable the “undo” feature it is possible to work with twice as
many images in working memory. My CCD has pixel dimensions of 1530 x 1020,
and a 1x1 (unbinned) image uses 1.1 Mb of memory (compressed). I can easily
load 150 raw images into working memory without involving virtual RAM. This
is 1/3 of the 450 images to be processed, so what I’ll describe in the next
few paragraphs will be done three times. Each user will have a different
limit for the maximum number that can be loaded into working memory, so
if you want to use MDL and the following processing procedure you will simply
have to determine how to replace my use of “150 images” with whatever applies
to your computer’s capabilities.
The first step
is to calibrate the 150 images using the master dark and master flat frames.
For the rest of this chapter I’ll present a detailed version of how to
do something using MDL in smaller font. So the next paragraph describes
in more detail how I prefer to calibrate the images in working memory using
MDL.
[Specify the master flat and master
dark files in MDL’s Set Calibration window. Select “None” for “Dark Frame
Scaling” (since the dark frame is at the same temperature and has the same
exposure as the light frames to be calibrated). Check the Calibrate Dark
and Calibrate Flat boxes. Don’t check “bias.” Exit the calibration set-up
and calibrate all 150 raw images (~10 seconds).]
The second step
is to “star align” all 150 images. This will consist of x and y offset
adjustments, as well as image rotations if necessary.
[Invoke MDL’s Align command and
select Add All images. The Align Images window appears; select “Auto – star
matching” and click “OK” to align all images. The result (after ~1.5 minutes)
will be a set of images in working memory that have been shifted in x and
y, and rotated if necessary, to achieve alignment of the star field, using
the first image in the list as a template. This set of images might be worth
saving to a directory, but that’s optional (to do this with MDL, select File/BatchSave&Convert,
etc).]
The third step
is to add an artificial star in the upper-left corner of all images. This
is done using a free plug-in written by Ajai Sehgal. You can get a 32x32
pixel version from the MDL web site; the 64x64 version was written at my
request and you may either ask Ajai or me for it to be sent by return e-mail
as an attachment, or download it from the web site http://brucegary.net/book_EOA/xls.htm.
I prefer to use the 64x64 version since it allows the use of large photometry
apertures. The artificial star will be Gaussian shaped with the brightest
pixel equal to 65,535 and a FWHM = 3.77 pixels.
[With MDL, the artificial star is
added to all images by opening the Plug-In menu and clicking “Add 64x64
reference star.”]
As an aside, consider
what we have in working memory now: 150 images, all stars are at the same
pixel locations, including an artificial star with a fixed star flux in
all images. If we compare the flux of a star with that of the artificial
star, and convert that to a magnitude difference, we have a way of keeping
track of the star’s brightness in all images that has the added feature
of retaining more information than simple “differential photometry.” With
differential photometry the user specifies a reference star (or stars, for
ensemble differential photometry), and all object stars and check stars
have their fluxes compared to the reference star (or the average of the
reference stars when doing ensemble). The flux ratios are converted to magnitude
differences, and a file is created that contains these magnitude differences.
For some users the appeal of this set of magnitude differences is that changes
in extinction, or changes in cirrus cloud losses, are removed - to first
order. Or, to put it another way, information about extinction and cirrus
losses are “lost” when recording a standard differential photometry file.
There’s a serious disadvantage in processing images this way; it may not
be important for variable star work but it’s often important for exoplanet
LCs: if any of the stars used for reference are variable you could remain
clueless about it, and if you somehow suspected that the reference star was
not constant you would have to repeat the image processing with a different
star designated for use as the reference. The value of using the artificial
star for reference is that extinction and cirrus losses are retained in the
recorded file, while also retaining magnitude differences between stars!
When the magnitude differences file is imported to a spreadsheet the user
will have full control over which stars to choose for use as reference.
The user can view all stars that were measured and evaluate their constancy,
and be guided by this analysis in choosing which stars to use as a final
ensemble reference set. This requires extra work for the user, but with the
extra effort comes a significant increase in “analysis power” – as the next
chapter will illustrate.
The next step is
to invoke the image analysis program’s “photometry tool” in order to create
a file containing star magnitudes (relative to the artificial star) for
the 150 images. Before proceeding with this you will need to carefully choose
photometry circle sizes, as described in Chapter 10. If you are unsure
about the best signal aperture radius, create files for each of several
plausible signal aperture sizes.
[Using MDL, invoke the photometry
tool (Analyze/Photometry). All images in working memory are
selected by default in the “Image List” and the highlighted image in this
list is displayed in the work area. Check the boxes labeled “Act on all
images” and “Snap to centroid.” Open the drop down menu “Mouse click tags
as:” and select “New Object.” Navigate around the highlighted image and
find the exoplanet star; left-click it. The aperture circles appear and
are snap-centered on the star; the “Obj1” label is displayed (it can be
dragged to an “out of the way” location nearby if the label overwrites stars
to be measured). You may not notice it, but all images have the same photometry
circles centered on the same star (you can check this by highlighting an
image in the “Image List” to see that image highlighted in the work area).
Next open the drop down menu “Mouse click tags as:” and select “New Reference
Star.” Navigate to the artificial star in the highlighted image and left-click
its approximate location; the set of photometry circles appear snap-centered
over the artificial star with the label “Ref1”. All images automatically
have their reference star identified with the same aperture circles and
“Ref1” label. Next, open the drop down menu “Mouse click tags as:” and select
“New Check Star”. Navigate the highlighted image to the first star chosen
earlier to be the first in the series of “check stars” – to be considered
for use as reference stars during the spreadsheet phase of analysis. Left-click
this star, and proceed to do the same for the rest of the check star list.
Finally, click the “View Plot…” button. The “Photometry” graph appears.
It can be resized to exaggerate the magnitude scale if you want to see if
any of the stars are variable or noisy. This encompasses a large magnitude
range, so small variations won’t be visible, but it’s worth a cursory look.
The real purpose for displaying this graph is that it has a “Save Data…”
button. Click it and navigate the directory structure to where you want
to record the magnitude differences CSV-file. Enter a file name, such as
“1_r” (where r is the signal aperture radius), and click “Save”. If other
signal aperture sizes are of interest, right-click on an image and a drop-down
menu will appear that allows you to change the radius. The photometry for
all images is immediately recalculated; click the graph’s “Save” button
and save the CSV-file with another descriptive name, such as 1_r, where
the value for r is different. When finished creating CSV-files for all the
signal apertures of interest, click “Close” and you’re back to MDL’s main
work area. All files in working memory may be deleted (alt-F, E).]
Perform the above
analysis with the other two groups of 150 raw images. Use different CSV-filenames,
of course, such as “2_r” and “3_r” – where the “r” stands for the signal
aperture radius. If more than one signal aperture is used the CSV-file names
could look like the following: 1_10, 2_10, 3_10 for the 10-pixel radius
photometry, and 1_12, 2_12, 3_12 for the 12-pixel radius photometry, etc.
This completes
the image processing phase of analysis.
─────────────────────────────────
Chapter
13
Spreadsheet
Processing
─────────────────────────────────
I hope you’re somewhat
familiar with spreadsheets. I use Excel, which I think can be found on
every computer using a Microsoft operating system. If you use a different
spreadsheet then you’ll have to translate my instructions to whatever is
needed by your spreadsheet.
Let’s assume that
after doing the image processing described in the last chapter we have
3 CSV-files. They’re in ASCII (i.e., text) format, and the data lines will
look something like the following:
"T (JD)","Obj1","Ref1","Chk1","Chk2","Chk3","Chk4","Chk5"
2454223.6114930557,2.013,0.000,4.197,2.956,2.132,3.993,2.441
2454223.6122800927,2.012,0.000,4.238,2.943,2.124,3.966,2.423
2454223.6130555556,2.002,0.000,4.192,2.941,2.114,3.983,2.418
2454223.6138310186,2.008,0.000,4.203,2.934,2.110,3.967,2.426
2454223.6146064815,2.007,0.000,4.186,2.955,2.118,3.961,2.427
2454223.6153935185,2.002,0.000,4.191,2.937,2.110,3.969,2.423
Each row corresponds
to an image. The first image has a JD time tag corresponding to mid-exposure
time. The next value (2.013 for the first image) is the magnitude difference
between the “object” (the exoplanet) and the artificial star. The next
value is zero because this is the magnitude of the artificial star referred
to itself. Then there are 5 magnitude differences for the so-called “check”
stars used in this example.
The next step is
to import the CSV-file to a spreadsheet.
Figure 13.01. Screen
capture of a spreadsheet that calculates air mass after importing the CSV-file
when the cursor is at cell B7. Columns B through I contain CSV-file magnitude
difference data. Columns Z through AG calculate AirMass, displayed in column
Y.
Since this screen
shot is barely readable the next figure is presented showing only the left-most
columns, where data is imported.
Figure 13.02. Screen
capture of the part of the spreadsheet where the CSV-file has been imported.
The user must enter site coordinates in cells C4:C5 and object RA/Dec in
cells H4:J5.
Air mass (AirMass)
is calculated using JD, site coordinates and the target’s RA and declination.
The next figure shows the right-most section, where air mass is calculated.
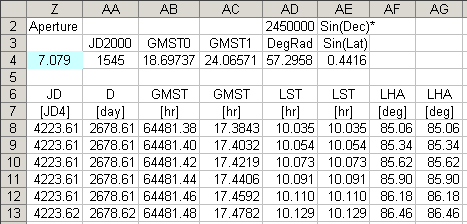
Figure 13.03. Screen
capture of the part of the spreadsheet where air mass is calculated from
the JD in column B, and site coordinates and object RA/Dec.
Appendix C contains
a description of the algorithm that is used to calculate air mass. An easier
way to have this capability is to download a sample spreadsheet from http://brucegary.net/book_EOA/xls.htm.
The user then imports
the other two CSV-files to the spreadsheet, below the previous one (and
deletes title lines). A better procedure is to concatenate the three CSV-files
to one CSV-file (using Windows Notepad), then import this one CSV-file to
the spreadsheet.
The next spreadsheet
page is devoted to plotting an extinction curve. It copies contents from
the first page, converts JD to UT and does other things. Here’s a screen
shot of the left half of this page.
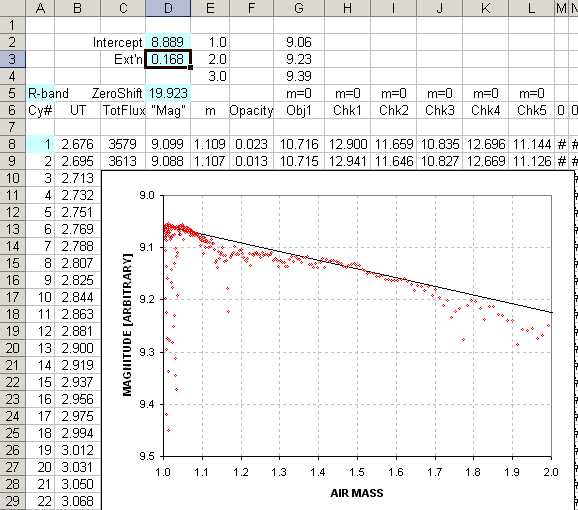
Figure 13.04. Left
side of the second spreadsheet page. The columns and graph are explained
in the text.
Column B is UT
(based on the first page’s JD). Column C is total flux (based on the first
page’s check star magnitudes, converted to flux, and added together). Column
D is a magnitude corresponding to total flux. Column E is air mass (copied
from the previous page). The graph plots columns D versus E. The fitted slope
is based on user entered values for zenith extinction (0.168 in this example)
and zero air mass intercept (8.889). Column F is “unaccounted for extra
opacity” based on the difference between total magnitude and the extinction
model (the next figure shows the right side of this page, which includes
a plot of opacity versus time). Columns G through L are extinction-corrected
magnitudes for the exoplanet and check stars.
Figure 13.05 (next
page) shows the right side of this spreadsheet page. The graph is for “extra”
opacity (unaccounted for by the simple extinction model) versus UT and
air mass versus UT. Columns AC through AG are image magnitude corrections
based on each star’s measured magnitude versus its extinction-corrected
magnitude. If there were no clouds, or dew losses, or bad seeing losses
(either atmospheric or related to the wind shaking the telescope), these
columns would be zero (plus stochastic noise). Column AV is a median combine
of columns AC through AG (the check stars). The user is free to choose
from any of the check star columns for creating column AV. This column
is a refinement of the “extra losses” column, and will be used on the next
spreadsheet page to adjust the “object” (exoplanet) column of magnitudes.
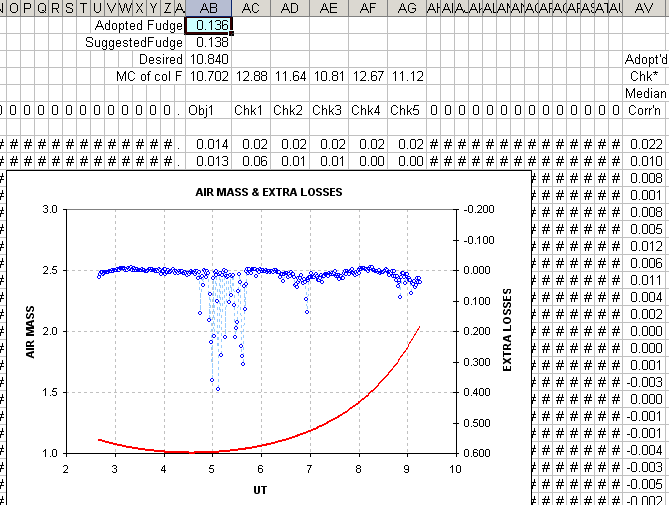
Figure 13.05. Right
side of second page. The column explanations are in the text.
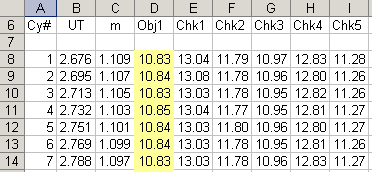
Figure 13.06. Left
side of third spreadsheet page, explained in the text.
In Fig. 13.06 the
D column is the “object’s” magnitude corrected for extinction (using the
model for extinction and air mass) and also corrected for “extra losses”
(column AV on the previous page). Columns E through I are the corresponding
versions for the check stars. In a perfect world the values in each row of
a column would the same. Here’s a plot of the corrected magnitudes.
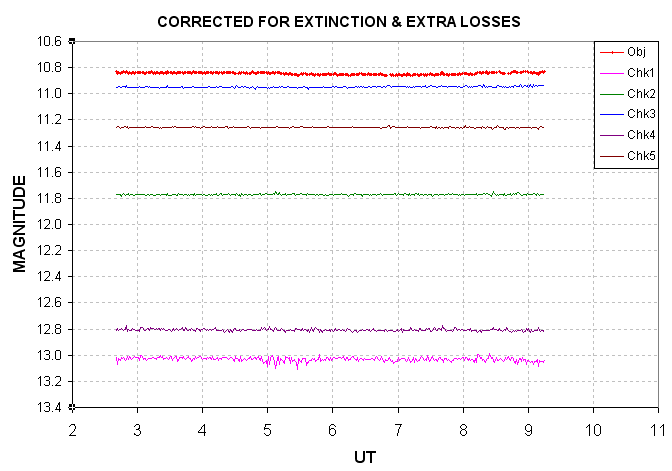
Figure 13.07. Plot
of magnitudes corrected for extinction and “extra losses.”
In viewing this
plot (stretched vertically) it is often possible to identify check stars
that are “poorly behaved.” Poor behavior could be variability on a time
scale shorter than the observing session length (yes, you do encounter such
stars). Poor behavior could also be noisiness (due to poor SNR), or occasional
spikes (due to cosmic rays). Another form of bad behavior would be trends
related to image rotation (more common for stars located near a corner where
rotation effects are larger). From this figure we learn that the only star
to be avoided is the faintest one, “Chk1.” After noticing this, the user
should revise the cells in the previous page’s AV column to omit the Chk1
column, thus using for “ensemble reference” the stars Chk2, Chk3, Chk4 and
Chk5.
The ability of
the user to choose which stars to use for reference, based on a graph of
their behavior, is the best reason for using this analysis procedure.
Another important
feature of this analysis procedure is that it provides an objective and
automatic way for removing data associated with high “extra losses.” The
threshold for acceptable “extra losses” can be set by the user. For example,
I typically accept “extra losses” smaller than 0.1 magnitude.
Outlier data can
also be removed using the same concept of a user-specified threshold. The
threshold should depend on SNR, since faint objects will have greater internal
scatter. For identifying outlier data I use the difference between a value
and the 4 nearest neighbors. A histogram of these “neighbor differences”
will have a Gaussian shape, and it is easy to adjust two parameters to fit
the main part of the Gaussian, as illustrated in the next figure. Outliers
will show themselves in the histogram as unlikely events far out in the
wings. This is one way to establish an outlier rejection criterion.
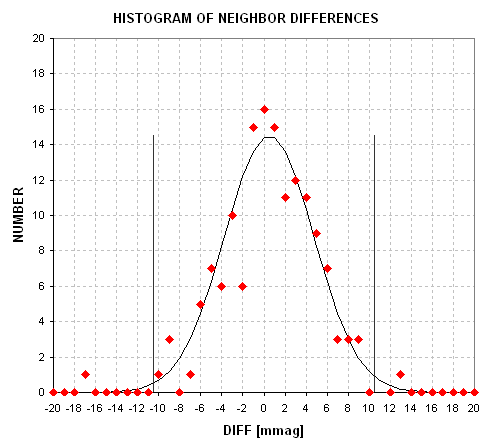
Figure 13.08. Histogram
of “neighbor outlier” data with a Gaussian fit. The two vertical lines
are the user-specified rejection criteria.
For stars with
R-mag ~11, which is the case treated in this chapter, I would typically reject
data that exceeds 11 mmag (shown in the above figure). For this “case study”
the extra losses criterion led to the automatic removal of 5% of the data,
and the “outlier” criterion led to the removal of an additional 3%.
Figure 13.09 is
the final light curve. In this figure the small red dots are from individual
60-second images that passed the acceptance criteria for both “extra losses”
and outlier rejection. The large red circular symbols are 9-point, non-overlapping,
median combines of the accepted data (red dots). At the top of the panel
are two vertical lines indicating the predicted times for ingress and egress.
In the lower-right corner is a notation of which reference stars were used.
The upper-left note states that a 13 pixel aperture radius was used for
measuring star fluxes and this led to an RMS for 1-minute data of 4.1 mmag,
which corresponds to RMS for 5-minute averages of 1.85 mmag.
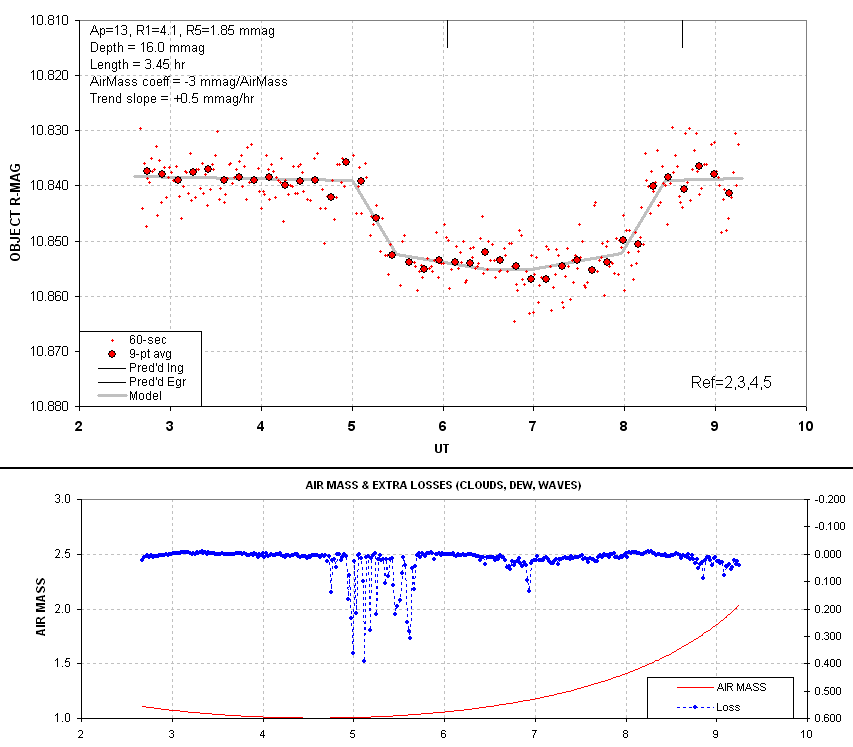
Figure 13.09. Light
curve of a 11th magnitude exoplanet candidate using an R-band
filter. The explanation of this figure is in the text.
The model lines
are for a general-purpose transit. The transit model consists of 5 parameters,
which are adjusted by the user: ingress UT, egress UT, depth at mid-transit,
fraction of time spent during ingress (or egress) in relation to the time
from ingress to mid-transit, and ratio of depth at completion of ingress
(or start of egress) to the mid-transit depth. Note that the parameter for
the fraction of time spent during ingress is a good approximation to the
ratio of the exoplanet’s radius to the star’s radius (assuming a close to
central transit chord).
An important additional
feature of the transit model is that it provides a way to accommodate curvature
due to a temporal trend and a correlation with air mass. The temporal trend
term is a simple coefficient times UT, which in this case is +0.5 mmag
times UT (hinged at UT = 6). The trend is most likely produced by image
rotation (imperfect polar alignment) that causes stars to move across pixel
space during the entire observing session. If the master flat frame was
perfect there shouldn’t be such a term, but no flat field is perfect.
The air mass term
is a coefficient times “air mass minus one.” For this case I chose an air
mass coefficient of -3 mmag/airmass. This term is required when stars are
used for reference that are not exactly the same color as the object (as
explained in the next chapter). The trend and air mass terms are adjusted
using the “out of transit” (OOT) portions of the light curve.
For this light
curve the time spent by the secondary body to complete an ingress (contact
1 to contact 2, also the same as the time to complete an egress, contact
3 to contact 4) is 17% of the time spent for the center of the secondary
body to traverse the chord for its path across the primary star. Thus, the
secondary has a radius that is 17% the radius of the star. That’s interesting!
If the secondary is an exoplanet, and has a radius 0.17 times the star’s
radius, it should block 2.9% of the star’s light, producing a 29 mmag deep
transit. Yet, we see only 16 mmag. This must mean that another star is within
the signal aperture, adding almost as much R-band light as the star undergoing
transit. Appendix D has a more extensive discussion of ways to interpret
light curves.
The next chapter
treats the important matter of light curve baseline curvature produced
by the use of reference stars having a different color than the transited
star.
─────────────────────────────────
Chapter
14
Star
Colors
─────────────────────────────────
For LC analyses
of variable stars, where the goal is to measure changes with precisions
of ~ 10 to 50 mmag, it is common practice to use as many reference stars
as possible in an ensemble mode. For eclipsing binaries, which have deep
transits, this is also an acceptable practice. But when the transit depth
is less than ~ 25 mmag, as any exoplanet transit will be, it matters which
stars are used for reference. The problem arises when the target and reference
stars have different colors. This is because a red star exhibits a smaller
atmospheric extinction compared to a blue star, regardless of the filter
used.
Atmospheric Extinction
Tutorial
We need to review
some basic atmospheric extinction theory in order to better understand
why star color matters. The atmosphere has three principal extinction components
(in the visible region): 1) Rayleigh scattering by molecules, 2) Mie scattering
by aerosols (dust), and 3) resonant molecular absorption (by oxygen, ozone
and water vapor). The first two components are more important than the
third. The Rayleigh scattering component is shown in the next figure.
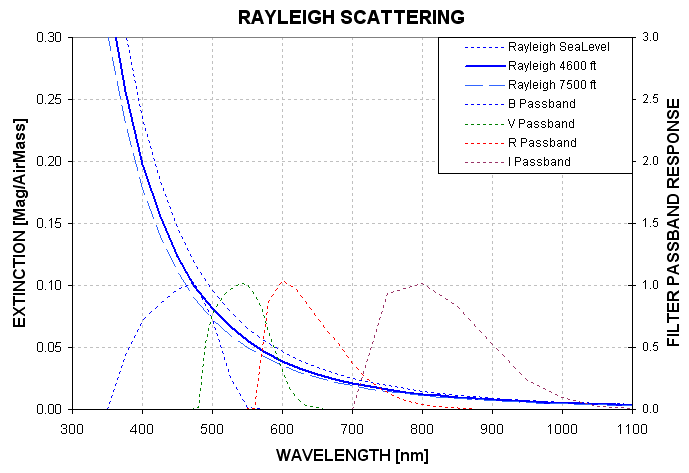
Figure 14.01. Atmospheric
Rayleigh scattering at wavelengths where CCD chips are sensitive for three
observing site altitudes. Filter spectral response shapes are shown for
B, V, R and I (Custom Scientific BVRcIc filters and KAF1602E CCD chip, normalized
to 1). The Rayleigh scattering model is based on an equation in Allen’s
Astrophysical Quantities, 2000.
Notice how much
Rayleigh scattering varies throughout the B-filter response region; the
greatest scattering (at 350 nm) is 5 times the smallest (at 550 nm)!
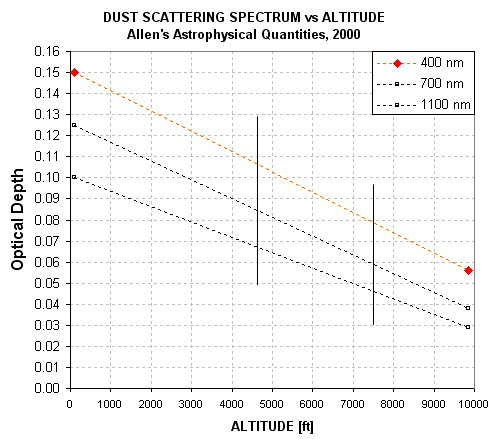
Figure 14.02. Atmospheric
aerosol (dust) Mie scattering versus observing site altitude for three
wavelengths (based on a global model by Toon and Pollack, 1976, cited in
Allen’s Astrophysical Quantities, 2000).
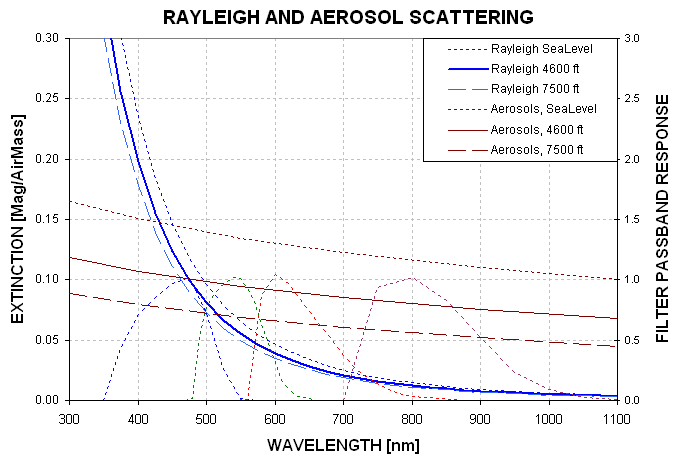
Figure 14.03. Atmospheric
Rayleigh and aerosol Mie scattering versus wavelength.
Figure 14.02 shows
aerosol Mie scattering (it is customary for “Mie scattering” to refer to
the situation of the particle circumference being much greater than wavelength).
It’s a plot of aerosol scattering versus altitude for 3 wavelengths. A
model fit to this data allows for the conversion to scattering versus wavelength
for specific altitudes. This is shown in Fig. 14.03. This figure also includes
the Rayleigh scattering component, and it should be noted that for B-band
both scattering components are about the same. For I-band the only scattering
component that’s important is aerosol Mie scattering.
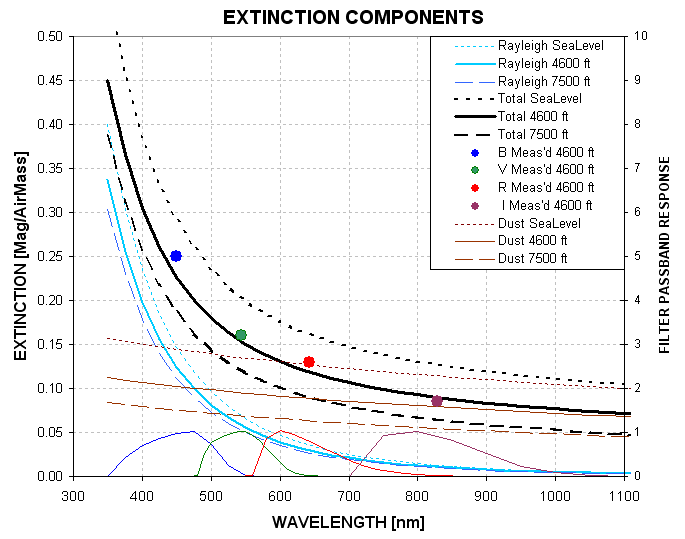
Figure 14.04. Atmospheric
total extinction components (Rayleigh scattering and aerosol scattering).
Typical measured extinction coefficients for my site at 4660 feet are shown
as large filled circles (seasonal average).
At my observing
site (4660 ft) the yearly-average measured extinction values (large colored
dots in Fig. 14.04) agree with the model (thick black trace). It should
be remarked that the Rayleigh component at a given site will vary by only
small amounts (related to barometric pressure) whereas the aerosol scattering
component can vary by large amounts. The seasonal variation of extinction
is therefore related to aerosol changes. Volcanic ash lofted to the stratosphere,
where it will reside for many months, can produce large temporary aerosol
scattering events. Using this graph it should be possible to use I-band
extinction to infer extinction at the shorter bands. The opposite is less
true; it’s difficult to infer I-band extinction from a B-band extinction
measurement (since B-band extinction is dominated by Rayleigh scattering).
My purpose in presenting
this atmospheric extinction tutorial is to sensitize you to the slopes
of extinction within a filter band pass.
So what? How can
the extinction slope within a given filter band possibly affect differential
photometry measurements? We now need to review some stellar blackbody spectrum
theory.
Blackbody Spectrae
and Filter
Band
Passes
Hot stars shine
mostly in the blue, whereas cools stars shine mostly in the red, as the
following graph shows.
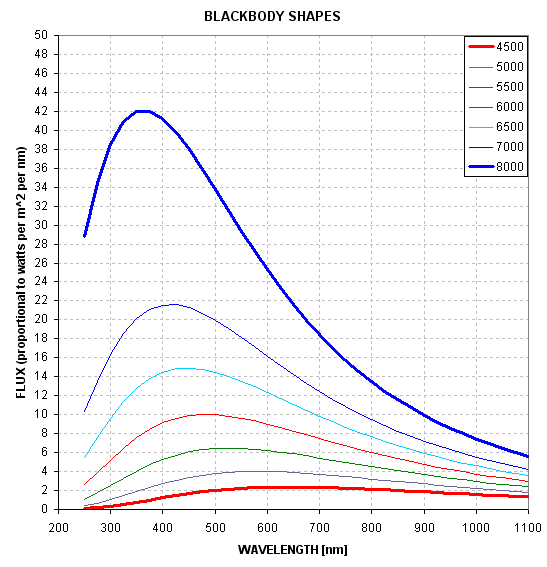
Figure 14.05. Blackbody
spectral shape versus temperature (4500 K to 8000 K). T = 4500 K corresponds
to spectral class K3 and 8000 K corresponds to A2.
Notice that not
only do hot stars radiate more photons at every wavelength region, but
the difference is greatest at short wavelengths.
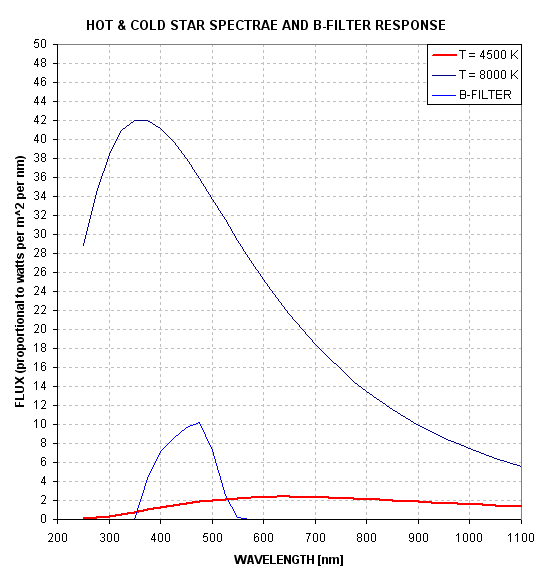
Figure 14.06. B-filter
response and spectral shapes of hot and cold stars.
Notice in Fig.
14.06 that within the B-band response a cool star radiates less and less
going to shorter wavelengths, whereas it is the reverse for the hot star.
The effective wavelength for a cool star is 467 nm whereas for a hot star
it is 445 nm. The more interesting parameter for light curve systematics
is the equivalent zenith extinction coefficient for the two stars. For the
cool one it’s 0.228 mag/airmass whereas for the hot star it’s 0.244 mag/airmass
(I use the term “airmass”, “AirMass” and “air mass” interchangeably). In
other words, a cool star’s brightness will vary less with airmass than a
hot star, the difference being ~0.016 mag/airmass.
Effect on Light
Curves of Reference Star Color
Consider an observing
session with a B-band filter that undergoes a range of airmass values from
1.0 to 3.0. Consider further that within the FOV are two stars that are
bright, but not saturated; one is a cool star and the other is hot. The
magnitude difference between the two stars will change during the course
of the observing session by an impressive 32 mmag! This is shown in the
next figure.
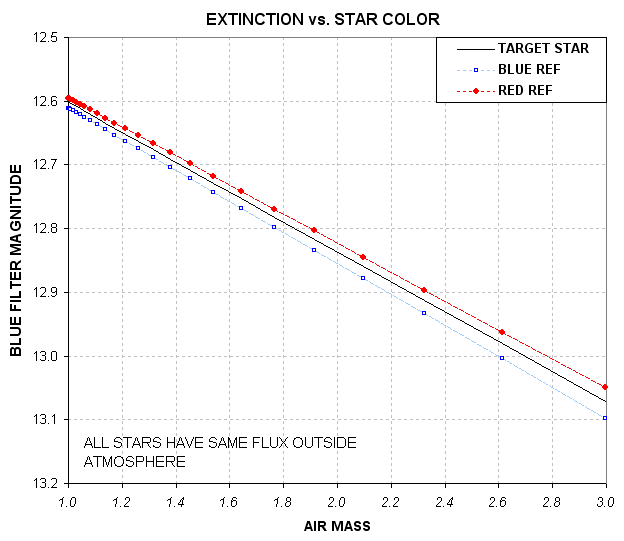
Figure 14.07. Extinction
plot for red and blue stars (based on model).
If the target star
is cool then the cool reference star should be used. If instead the hot
star is used for reference there will be a 32 mmag distortion of the LC
that is correlated with airmass. The shape of the LC will be a downward
bulge in the middle (at the lowest airmass), as shown in the next figure.
We’ve just shown
that when using a B-band filter hot and cool stars can distort LC shapes
by the amount ~16 mmag per airmass in opposite directions, producing opposite
LC curvatures. What about the other filters? For R-band the two zenith
extinctions are 0.120 and 0.123 mag/airmass (for cool and hot stars). The
difference is only 3 mmag/airmass, which is much less than for B-band. Nevertheless,
a LC bulge of 3 mmag/airmass is important for depths as shallow as 10 to
20 mmag.
Unfiltered observations
are more dangerous than filtered ones when choosing reference stars on
the basis of color. A cool star has an effective zenith extinction coefficient
of 0.132 mag/airmass, unfiltered, versus 0.191 mag/airmass for a hot star.
That’s a whopping 59 mmag/airmass! Clearly, attention to star color is
more important when observing unfiltered. A much less serious warning applies
to observations with a blue-blocking filter (described in greater detail
later).
All of the above-cited
zenith extinction coefficient dependencies on star color are for a site
at 4660 feet. Lower altitude sites will experience greater effects.
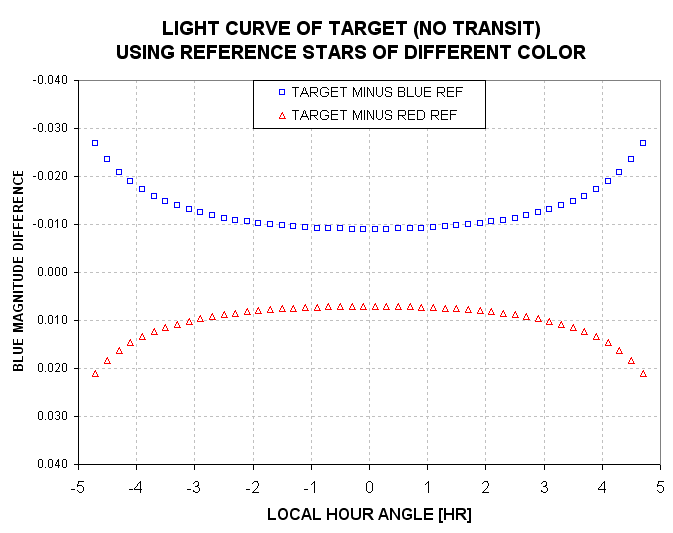
Figure 14.08. Light curve shapes of normal-color star
when blue and red reference stars are used and observations are made with
a B-band filter.
Is there any evidence
for this effect in real data? Yes. Consider the following figure, Fig.
14.09, showing the effect of reference star color on measured LCs.
The middle panel
uses a reference star having the same color as the target star. The top
panel shows what happens when a red reference star is used. It is bowed
upward in the middle. Air mass was minimum at 5.5 UT, which accounts for
a greater downward distortion of the LC at the end (when airmass = 1.3, compared
when airmass = 1.2 at the beginning). The bottom panel, using slightly bluer
stars for reference, has an opposite curvature. The curvature is less pronounced
in this panel compared to the middle one due to a smaller color difference.
Notice also in
this figure that reference star color not only affects transit shape, it
also affects transit depth. Assuming the middle panel is “correct” we can
say that the red star (top panel) produced an 10% increase in apparent depth,
whereas the blue star (bottom panel) produced a 8% decrease.
One additional
effect to note when using a different color reference star is “timing” –
by which I mean the time of mid-transit as defined by the average of the
times for ingress and egress. For this example the red reference star produced
a -2.4-minute error while the blue reference star produced a +2.1-minute
error.
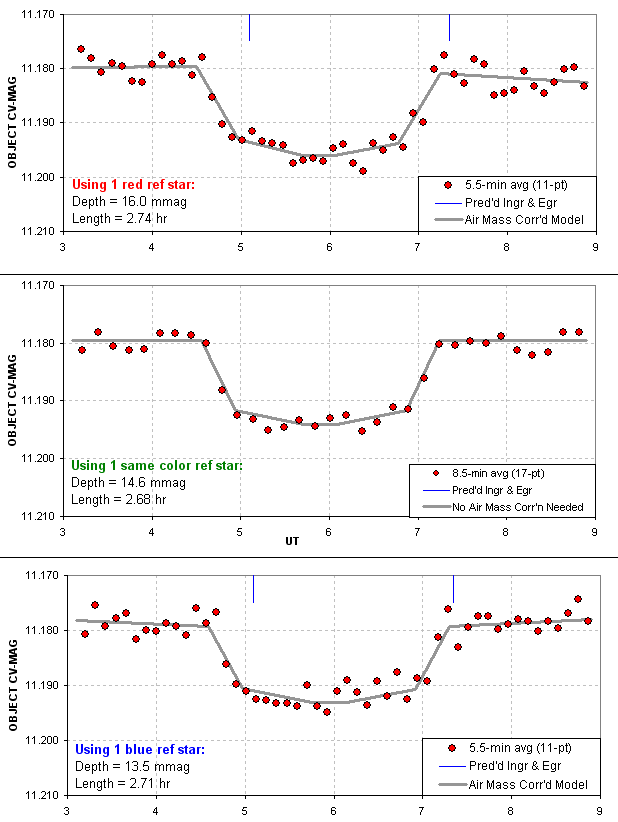
Figure 14.09. Effect
of reference star color on LC shape, depth, length and timing.
For shallow transits
it is therefore preferable to use a reference star with a color similar
to the target star. If this can’t be done then an air mass model may have
to be used to interpret the LC. The longer the out-of-transit (OOT) baseline
the easier it is to derive a proper fitting model. With experience, and
familiarity with the color of stars near the target, it is possible to process
the OOT baselines to reduce curvature effects. But when there is uncertainty
in star colors it is prudent to plan on a long observing session. Even when
a reasonable “fit” is achieved using different color reference stars be
prepared for errors in transit depth and timing.
Blue-Blocking Filter
Some observing
situations are best approached using a “blue-blocking filter.” As the next
graph shows it blocks everything blueward of V-band.
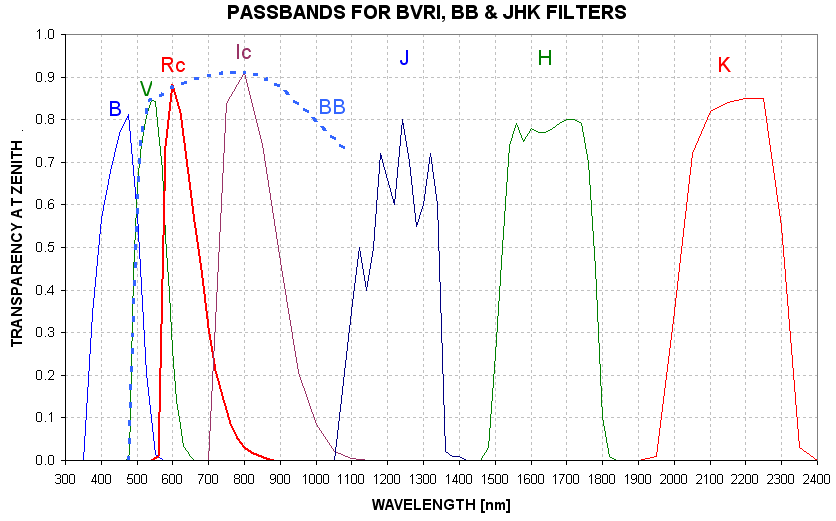
Figure 14.10. Filter
response functions times atmospheric transparency for standard B, V, Rc,
Ic filters, as well as the 2MASS J, H and K filters. Also shown is the blue-blocking
(BB) filter response. Actual response functions will depend on the CCD
response.
The BB-filter is
attractive for two reasons: 1) it reduces a significant amount of sky background
light whenever the moon is above the horizon, and 2) it reduces extinction
effects by a large amount without a significant SNR penalty. Concerning
the first point, the night sky brightness spectrum will be similar to the
site’s extinction spectrum during moon-lit nights. (On moonless nights there’s
no reduction of sky background level from use of a BB-filter.) For these
reasons at least one wide-field survey camera project uses a BB-filter (Ohio State University’s KELT Project,
based at the Winer Observatory, AZ).
When a typical
CCD response function is used (my ST-8XE), and adopting my site altitude,
the BB-filter’s “white star” effective wavelength is calculated to be 700
nm. This is intermediate between the R-band and I-band filters.
Using a BB-filter
stars that are blue and red have calculated extinctions of 0.124 and 0.116
mag/airmass. If a set of images that contain red and blue stars within
the FOV were measured and plotted versus air mass they would exhibit these
two slopes, i.e., they would separate at the rate of 8 mmag/airmass.
The following list
summarizes the calculated extinction slope differences for various filters
between stars that are blue (spectral type A2, 8000 K) and red (K3, 4500
K).
B-band
16 mmag/airmass
V-band
~6 mmag/airmass
R-band
3 mmag/airmass
I-band
~1 mmag/airmass
Unfiltered 59 mmag/airmass
BB-band
8 mmag/airmass
The BB-filter offers
a dramatic 7-fold reduction of extinction effects compared with using a
clear filter (essentially equivalent to unfiltered)! Keep in mind that the
red and blue stars used for these calculations are near the extremes of blueness
and redness, so the values in the above list are close to the maximum that
will be encountered.
The BB-filter’s
loss of SNR, compared to using a clear filter, will depend on star color.
For a blue star the BB-filter delivers 89% of the counts delivered by a
clear filter (at zenith). For a red star it is 94%. The corresponding increases
in observing time to achieve the same SNR are 41% and 13%. However, SNR
also depends on sky background level, and the BB and clear filters respond
differently to changes in sky background. During full moon the sky background
is highest, being ~3 magnitudes brighter than on a moonless dark night (away
from city lights). Also during full moon Rayleigh scattering of moonlight
produces a blue-colored sky background. I haven’t studied this yet but I
suspect that whenever the moon is in the sky the BB-filter’s lower sky background
level is more important than the few percent loss of signal, leading to
an improved SNR instead of a degraded one. In any case, a slight loss of
SNR is worth extra observing time in order to achieve dramatic reductions
of systematic errors in light curve baseline curvature that would have to
be dealt with for unfiltered observations.
Getting Star Colors
The 2MASS (2-Micron
All-Sky Survey) star catalog contains ½ billion entries. It is about
99% complete to magnitudes corresponding to V-mag ~17.5. TheSky/Six includes
J, H and K magnitudes for almost every star in their maps. The latest version
of MPO Canopus (with PhotoRed built-in) makes use of J and K magnitudes
to calculate B, V, Rc and Ic magnitudes. J-K star colors are correlated
with the more traditional star colors, B-V and V-R, as shown by Caldwell et
al (1993), Warner and Harris (2007) and others. The strong correlation
breaks down outside the J-K range of -0.1 to 1.0, but within this wavelength
region it is possible to predict V-R star colors with an accuracy of 0.021
magnitude (Warner and Harris, 2007). This is adequate for selecting same
color reference stars.
Occasionally J
and K magnitudes are missing from the star map programs in common use by
amateurs (these programs are also referred to by the unfortunate name “planetarium
programs”). When you need J-K for only a few such stars the following web
site is useful: http://irsa.ipac.caltech.edu/
Converting between
J-K and B-V can be done using the following equivalence (based on a scatter
plot published by Warner and Harris, 2007):
B-V = +0.07 + 1.489 (J-K) or J-K = -0.15 + 0.672 (B-V)
In choosing same-color
reference stars be careful to not use any with J-K > 1.0, where J-K
to B-V and V-R correlations can be double-valued. Staying within this color
range corresponds to -0.1 < B-V < 1.5. For stars meeting this criterion
the median B-V is +0.65, based on a histogram of 1259 Landolt star B-V values.
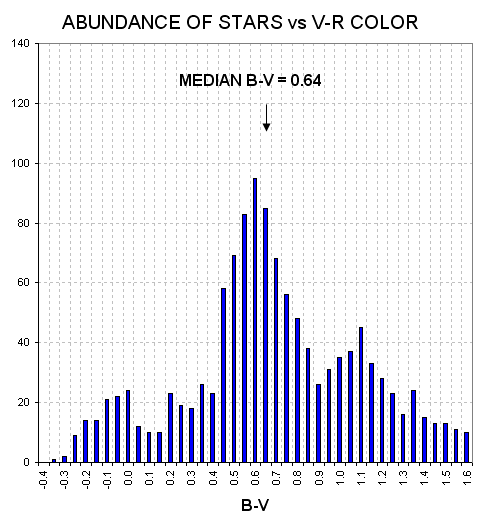
Figure 14.11. Histogram
of B-V for 1259 Landolt stars.
This histogram
shows that the bluest 25% of stars have B-V < +0.47. Using the Warner
and Harris equation this corresponds to J-K < +0.26. The reddest 25% of
stars with acceptable colors have B-V > +1.01, which corresponds to J-K
> +0.64. If there were 12 candidate reference stars in a FOV, for example,
it is likely there would be 3 with J-K < +0.26 and another 3 with J-K
> +0.64. If the target star is typical, with J-K ~ 0.39, there should
be ~6 stars with a J-K color difference less than ~0.2. Therefore:
A
reasonable goal for “same color” stars is a J-K difference < ~0.2.
It’s possible to
associate J-K with star surface temperature. The typical J-K of +0.4 corresponds
to Tstar = 5800 K. The bluest 25% of stars have Tstar > ~7700 K, and
the reddest 25% have Tstar < ~4000 K. These are close to the temperature
extremes that were used to calculate zenith extinction sensitivities to
star color. Therefore, the list of extinction slope differences for red
and blue stars, for various filters (in the previous section of this chapter),
should be representative of situations faced by exoplanet transit observers.
In other words,…
Star color matters!
─────────────────────────────────
Chapter
15
Stochastic
Error Budget
─────────────────────────────────
This chapter will
illustrate how stochastic noise contributes to the “scatter” of points
in a light curve. I will treat the following error sources: Poisson noise,
aperture pixel noise, scintillation noise and seeing noise. All of these
components can be treated as stochastic noise. Poisson and scintillation
noise are usually the most important components. I will assume that several
stars are chosen for use as reference (“ensemble photometry”).
“Stochastic” uncertainty
is produced by a category of fluctuation related to random events. For
example, it is believed that the clicking of a Geiger counter is random
because the ejection of a nuclear particle is unrelated to events in the
larger world; such events are instead prompted by laws that are not yet
understood governing events within the nucleus. To observers in the outer
world the particle ejections of radioactive nuclei occur at random times.
Photons from the
heavens arrive at a CCD and release an electron (called a “photoelectron”)
at times that can also be treated as random. As a practical matter, the
noise generated by thermal agitation within the CCD and nearby circuitry
is also a random process. Scintillation is generated at the tropopause and
causes destructive and constructive interference of wave fronts at the CCD,
causing the rate of photon flux at the detector to fluctuate in what appears
to be a random manner. All of these processes exhibit an underlying randomness,
and their impact on measurements is referred to as “stochastic noise.”
The “Poisson process” is a mathematical treatment of the probabilities
of the occurrence of discrete random events that produce stochastic noise.
The previous chapters
dealt with “systematic uncertainties” and tried to identify which ones
were most important. This chapter deals with sources of stochastic uncertainty
in an effort to identify which ones are most important. Both sources of
uncertainty are important aspects of any measurement, and I’m a proponent
of the following:
“A measurement is not
a measurement until it has been assigned stochastic and systematic uncertainties.”
This may be an
extreme position, but it highlights the importance of understanding both
categories of uncertainty that are associated with EVERY measurement, in
every field of science. This chapter therefore strives to give balance to
the book by describing the other half of uncertainties in photometry. The
components of stochastic noise will be treated using the XO-3 star field
as an example, with specific reference to my 2007.04.15 observations of it.
Poisson Noise
A Poisson distribution
describes what can be expected when a finite number of “random” events
produce a measured "count" (an integer) during a pre-set time interval.
This is the situation for readings of each CCD pixel at the end of an exposure.
Consider the process of a photon dislodging an electron from a silicon crystal
in the CCD (related to the "photoelectric effect"). This one event yields
one electron for detection after the exposure is complete. When a pixel
is "read" by electronic circuitry this one electron will contribute to that
pixel’s ADU count by an amount that depends on the CCD gain. For my SBIG ST-8E CCD, the gain
is 2.3 electrons per count (where each "count" is also called an ADU, or
analog data unit). Therefore, the number of photoelectrons needed to produce
a count of C is n = 2.3×C (for my CCD). This is true whether I define
C to be the count from just one pixel or the sum of counts produced by a
star that may be registered by several pixels (called flux). You can measure
your CCD’s gain and it may differ significantly from the value given in the
User’s Manual. For example, my CCD has a gain of ~2.7 instead of 2.3 electrons
per ADU.
Stochastic events
have the property that the SE uncertainty of the total number of events
is the square-root of the number of such events (provided the number of
events is large). Thus, when we measure n stochastic events occurring
within a specified integration interval, we must state that we have really
just measured a value n ± sqrt(n) events. Since the measurement
C is based on 2.3×C events (for this particular CCD) we must state
that we have measured: 2.3×C ± sqrt (2.3×C) "events."
Stated in terms of counts, we measure C ± sqrt (C/2.3).
This fundamental uncertainty is referred to as Poisson noise. To summarize,
Poisson noise from a bright star is:
Np = sqrt (C / gain)
Np
= sqrt (C / 2.3) for the SBIG ST-8E CCD.
This result can be expressed in terms of mmag:
Poisson SE [mmag] = 1086 / sqrt (2.3×C )
Whenever an exoplanet’s
light curve is to be produced from a set of images there will usually be
several stars suitable for use as reference stars. Consider the example
of XO-3, whose star field is presented in the figure on the next page. Note
that XO-3 has a B-V color of 0.45, whereas all other stars are redder (larger
values of B-V). Only two stars have close to the same color, stars #1 and
#6. In the following example these two stars will be used for ensemble photometry
reference.
On the date 2007.04.15
this star field was observed with an I-band filter, with exposure times
of 60 seconds, binned 1x1 and CCD cooler set to -24 ˚C (with my 14-inch
telescope). FWHM was typically 6 pixels, so I chose a signal aperture photometry
radius of 15 pixels (2.5 × FWHM, a safe choice). With this aperture
the measured fluxes for XO-3, Star #1 and Star #6 were 346000, 161000 and
963000 counts. The maximum counts for these stars varied with FWHM, of course,
but typically they were ~9200, 4300 and 22000 counts (SNR ~3000, 1100 and
8000.) Using the above equation we calculate Np values for the three stars
to be 388, 265 and 647 counts. Measurements of each star will have Poisson
uncertainties of 1.22, 1.78 and 0.73 mmag (i.e., 1086 / sqrt (2.3 ×
Flux). For each image the three flux readings will be converted to magnitudes
and the XO-3 magnitude will be adjusted by whatever amount is needed to bring
the average magnitude of the two reference stars into agreement with what
is expected for them from an atmospheric model for extinction.
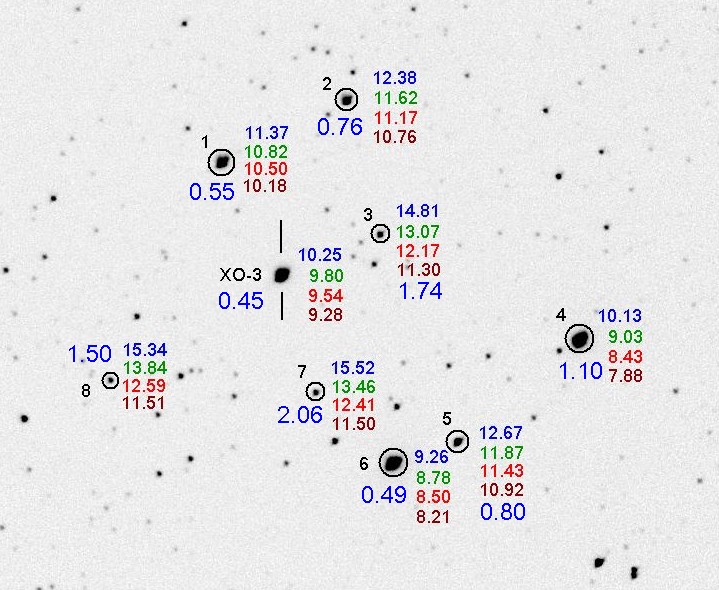
Figure 15.01. XO-3
star field, showing BVRcIc colors of several stars. The B-V star colors
are shown in large blue numbers.
Using the above
example, the ensemble photometry adjustment will have an uncertainty given
by ½ × (1.782 + 0.732)0.5 = 0.96 mmag. The
general equation for this (homework for the reader) is:
Ensemble Photometry Poisson SE = 1/n × (SE12
+ SE22 + SE32 + … +SEn2)½
where n is the number of reference stars and SEn are the
Poisson uncertainties for each reference star (expressed in mmag units).
Clearly, as n increases the effect of uncertainties (due
to Poisson noise) diminishes, approaching the limit zero for an infinite
number of reference stars. XO-3’s Poisson noise uncertainty of 1.22 mmag
must be orthogonally added to the Poisson uncertainty produced by the reference
stars. Hence, after performing an ensemble photometry adjustment using these
two reference stars XO-3 will exhibit a total Poisson noise uncertainty of
(1.222 + 0.962)½ = 1.55 mmag. This
is the Poisson component of RMS scatter for each image that can be expected
in a final light curve.
Aperture Pixel
Noise
Consider noise
contributions from the process of "reading" the CCD ("CCD read noise"), plus
noise produced by thermal agitation of the crystal's atoms ("CCD dark current
noise"), and finally from noise produced by a sky that is not totally dark
("sky background noise"). These are three additional sources of noise in
each CCD reading (the last two are Poisson themselves since they are based
on discrete stochastic events, but we’ll treat them here in the traditional
manner). These three noise sources are small when the star in the photometry
aperture is bright and the CCD is very cold (to reduce dark current noise).
For that situation it can be stated that the star's measured flux (total
counts within the aperture minus an expected background level) will be uncertain
by an amount given in the previous section. If, however, the CCD is not very
cold (which is going to be the case for amateurs without LN2 cooling), and
when the sky is bright (too often the case for amateur observing sites),
these components of noise cannot be ignored.
I’ll use the term
“aperture pixel noise” to refer to the sum of these three sources of noise
(sky background level, CCD dark current noise, and CCD readout noise).
When the photometry aperture is moved to a location where there are no
stars MaxIm DL (MDL) displays the RMS scatter for both the signal aperture
and sky background annulus. For the 2007.04.15 observations this RMS was
~4.3 counts. The fact that each pixel’s reading has a finite uncertainty
has two effects: 1) the average level for the sky annulus background is
not perfectly established, and 2) the flux within the aperture (the sum
of differences between the signal aperture pixel readings and the average
background level) is also uncertain.
Among the b pixels within the sky background annulus the average count
is Cb and the standard deviation of these counts is Ni, which we will identify
as the source for “aperture pixel noise.” We will assume that every pixel
in the image has a stochastic uncertainty of Ni. The average value for
the sky background level has an uncertainty given by Nb = Ni / sqrt (b-1).
Star flux is defined
to be the sum of counts above a background level. One way
to view this calculation is to subtract the background level from each
signal aperture pixel count, and then perform a summation. An equivalent
view is to sum the signal aperture counts, then subtract the sum of an equal
number of background levels. The second way of viewing the calculation lends
itself to a simple way of calculating SE on the calculated flux, since we’re
simply subtracting one value from another and each value has its own uncertainty.
The first value, the sum of signal aperture counts, will be uncertain by
the amount Nss = Ni × sqrt (s), where s
is the number of pixels within the signal aperture. The second number, the
sum of counts that would be expected for these s pixels if
no star were present within the signal aperture, will have an uncertainty
Nbs = Nb × sqrt (s) = sqrt (s) ×
Ni / sqrt (b). The uncertainty on calculated star flux (neglecting
Poisson noise) will be the orthogonal sum of these two uncertainties. In
other words, since Ns2 = Nss2 + Nbs2, we
derive that Ns2 = s × Ni2 ×
(1 + 1/b), and since (1 + 1/b) ~ 1, we can state that:
Ns = sqrt(s) × Ni.
Since the 2007.04.15
images exhibit Ni ~ 4.3 counts, and since s = π 152
= 707 pixels, we calculate that Ns = 114 counts. For XO-3, producing
346000 counts, this represents an uncertainty of 0.36 mmag. Notice that
this is less than Poisson noise.
Scintillation
Noise
At tropopause altitudes
clear air turbulence is common, and the temperature inhomogeneities produced
by turbulence cause slight bending of the wave fronts of starlight which
produce a component of constructive and destructive interference at ground
level, which we observe as scintillation. The smaller the aperture, the
greater the scintillation. The naked eye’s aperture is so small that an
additional component of scintillation is produced by temperature and humidity
inhomogeneities near ground level (where “atmospheric seeing” degradation
is produced). These visual changes in brightness are called "twinkling"
and because the tropopause component is common to both there is a correlation
between the amount of twinkling and scintillation. Incidentally, since atmospheric
seeing is degraded mostly by turbulence near the ground, visually perceived
twinkling and seeing are partially correlated whereas scintillation and
seeing are less correlated.
Everyone knows
that stars “twinkle” different amounts on different nights. Twinkling also
is greater near the horizon. Faint stars twinkle as much as bright stars.
Planets don't twinkle. What’s going on?
These common facts are helpful in understanding what to expect for attempts
to monitor the brightness of a star that is undergoing an exoplanet transit.
For example, the fact that planets don't twinkle means that a reference
star's scintillation (another word for twinkling) will be uncorrelated
with the target star's scintillation (since the angular separation of reference
and target stars is greater than the angular size of a planet, and planets
don’t twinkle). This is unfortunate, for it means that a differential photometry
analysis that uses one reference star will increase the target star's brightness
variations due to scintillation by ~41% (i.e., the fluctuations
are root-2 times the value without using a reference star). Using many
reference stars reduces the effect of uncorrelated reference star scintillation
back to where it is dominated by just the target star's scintillation.
It also can be stated that there's no need to choose reference stars that
are near the target star to reduce scintillation, since essentially all
correlation is lost beyond angular distances of ~10 "arc (a typical planet
angular diameter).
A classic study
of scintillation was published by Dravins et al (1998).
They studied scintillation’s dependence upon telescope aperture, air mass,
site altitude and exposure time. Their equation relating all these parameters
is:

where σ = fractional intensity
RMS fluctuation (scintillation), D = telescope diameter [cm], sec(Z) = air
mass, h = observatory site altitude above sea level [m], h0 (atmospheric
scale height) = 8000 [m], and g = exposure time [sec].
For me, h = 1420 meters and D = 35.6 cm, so I calculate an expected
typical scintillation noise to be:
Scintillation
noise [mmag] = 5.35 × AirMass1.75 / sqrt(g)
where g = exposure
time [seconds]. For air mass = 1.9 and T = 60 seconds, scintillation =
2.12 mmag. Keep in mind that the magnitude of scintillation may vary greatly
from night-to-night, as well as on time scales of a few minutes.
Seeing Noise
When I made about
1000 short exposures of the moon for the purpose of creating an animation
showing terminator movement I encountered two unexpected things: 1) seeing
varied across each image, and 2) position distortions were present. The
first item means that no single image was sharp at all parts of the image.
One image might be sharp in the upper-left hand area (FWHM ~1.5 ”arc) and
fuzzy elsewhere (3.5 ”arc), while the next image might be sharp in the middle
only. My impression is that the sharpness auto-correlation function usually
went to zero ~5 ’arc away, and the areas where one image was sharp were poorly
correlated with the next image’s sharp areas. The second item means that
position distortions within an image were present, which made it impossible
to combine two images with just one offset for bringing all regions of the
FOV into alignment. A time-lapse movie of these images resembles looking
into a swimming pool and seeing different parts of the pool bottom move in
ways that were uncorrelated. These two phenomena were seen for about two
hours, so it wasn’t just an early evening atmospheric effect. I used a V-band
filter, an exposure time of 0.1 second and images were spaced ~8 seconds
apart. (Some of these moon images can be seen at http://brucegary.net/Moon/Moon7524.htm
and an animation of seeing can be found at http://brucegary.net/ASD/x.htm,
Fig. 4.)
Since these were
short exposures the spatial seeing differences were entirely atmospheric,
unlike long exposures that can be influenced by imperfect tracking. Even
with perfect tracking we can predict that the longer the exposure the smaller
the spatial differences in sharpness. To understand this, imagine a 3-dimensional
field of atmospheric temperature with inhomogeneities that are “frozen”
with respect to the air. Now imagine that the air is moving and carrying
the temperature structure across the telescope’s line-of-sight. At one instant
the line-of-sight to one part of the FOV may be relatively free of temperature
structure, and exhibit sharpness, while the opposite is true for another
line-of-sight. But as the air moves past the telescope the regions of sharpness
in the FOV will vary. If a typical time for variation is 1 second, for example,
then after 16 seconds the contrast in sharpness will be of order 1/4th
as large compared with the contrast for individual short exposures. In theory,
there will always be some variation of FWHM sharpness across an image,
regardless of exposure time.
Consider using
an aperture that captures a fraction of the complete PSF for a star. Refer
to Fig. 10.02 for a plot of photometry signal aperture “capture fraction”
versus size of the aperture in relation to FWHM. For a typical choice of
aperture radius ~2.5 times FWHM, 99% of a star’s total flux is captured by
the photometry aperture. If FHWM varies across the image within the range
3.0 to 3.3 ”arc, for example, the capture fraction could vary between 0.987
and 0.980, or 7.6 mmag. Smaller apertures would produce even larger differences.
Since patterns
of seeing across an image will be uncorrelated from one image to the next
(if they have exposure times longer than ~10 seconds), the errors in relating
an exoplanet’s flux to the fluxes of references stars (produced by seeing
variations) will be different from image to image. The effect of this upon
a light curve is to merely increase RMS scatter. In other words, there
won’t be any systematic effects that would change the shape of the light
curve. This is my reason for including variable seeing in this chapter
as “noise.”
I don’t know of
any study analogous to that by Dravin’s et al (1993) that can be used to
predict the magnitude of noise introduced to a light curve by seeing variations.
For the moment let’s simply treat it as an unknown small effect, and if
empirically-determined RMS scatter requires invoking something unknown
we can consider seeing variations to be a candidate for explanation.
Comparing Observed
with Predicted RMS Scatter
For the 2007.04.15
observations I measured an RMS scatter of 2.63 mmag for a one-hour period.
How does this compare with the total errors calculated in the previous
sections? Here’s the list:
1.55 mmag
Poisson noise
0.36 mmag
Aperture pixel noise
~2.12 mmag
Scintillation noise
?.?? mmag Unidentified
sources of noise (“seeing” noise, etc.)
~2.65 mmag Total
noise predicted
2.63 mmag
Measured noise
The agreement is
acceptable, especially considering the uncertainties. The most variable
of these components is scintillation noise. The amplitude of scintillation
can change by a factor two during the course of minutes, and night to night
variations can differ by similar amounts (depending on the location of jet
stream winds).
It’s possible to
evaluate the presence of “seeing noise” by reprocessing images using a
large photometry aperture. For example, when the 2007.04.15 images are
processed using an aperture radius of 20 pixels instead of 15, the measured
RMS scatter increases to 2.76 mmag. Some increase can be expected from
a larger “aperture pixel noise” (the predicted total noise changes from
2.65 to 2.67 mmag), but the fact that the measured noise increased more
than the predicted amount, instead of decreasing, suggests that “seeing
noise” was not important for this observing session.
I use a special
spreadsheet to help guide the choice of reference stars. It allows me to
see the predicted effect of adopting various sets of reference stars and
aperture sizes. For example, notice in Fig. 15.01 that Star #4 is much brighter
than the other stars that I adopted for use as reference. If it replaced
Star #1 the RMS scatter is predicted to be reduced to 2.50 mmag. This is
a small payoff considering the extreme redness of Star #4, which can be verified
in the photometry analysis spreadsheet by actually trying out the use of
Star #4 instead of Star #1 for reference.
It should be noted
here that the case of 2007.04.15, based on use of an I-band filter, is
not meant to show a representative RMS scatter for light curves. Lower
scatter can be achieved by observing with an R-band filter (1.7 times as
much flux), or a blue-blocking BB-band filter (4 times the flux). Also,
the XO-3 star field does not have a good choice for same color stars, and
this affects the level of RMS scatter that can be achieved. XO-1 and XO-2,
for example, provide better reference star candidates. It is possible to
achieve ~1 mmag RMS scatter per 1-minute image using a 14-inch telescope
provided a good set of reference stars is nearby, a R-band or BB-band filter
is used, and scintillation conditions are low.
Larger telescope
apertures should be able to achieve lower “mmag precision” in spite of
the fact that exposure times would have to be shortened to avoid saturation.
It should be each observer's responsibility to use the concepts described
here to calculate an observing strategy that produces light curves with
a minimum RMS scatter as well as a minimum of systematic errors based on
the observer’s specific telescope and observatory situation.
An excellent discussion
of CCD hardware can be found in the book Handbook of CCD Astronomy
(2000) by Steve B. Howell. Some of the material in this chapter is based
on this book.
─────────────────────────────────
Chapter
16
Anomalies:
Timing and LC Shape
─────────────────────────────────
Timing Anomalies
and Other Exoplanets
A transiting hot
Jupiter exoplanet in a circular orbit with no other planets in the system
will produce transits at uniformly spaced intervals. This statement neglects
the very slow third-order effect related to the star’s oblateness, but
these changes are very slow. If the hot Jupiter is in an elliptical orbit
the transits will shift steadily in time due to precession of the orbit’s
periastron (location of closest approach to the star). In that case the
transits may also change shape, or entirely disappear (though unlikely in
a lifetime).
A more interesting
possibility is for the hot Jupiter to exhibit anomalies that change over
the course of a few months due to another planet in an orbit close to that
of the hot Jupiter (Algol et al, 2005; Holman and Murray,
2005, Steffen, 2006). The greatest effects will be produced when the orbit
periods are resonant. For example, if an Earth-like planet is in a 2:1 period
resonance with the hot Jupiter, it can cause the hot Jupiter to shift its
orbital position in ways that cause transits to alternate between coming
early or late with a periodicity on the order of a year. The amplitude of
these “timing anomalies” can be as high as 3 minutes (Steffen, 2006).
This is perhaps
the most exciting aspect of amateur participation in exoplanet transit
observing. Ground-based professional telescopes are too expensive, on a
per minute basis, for such long term projects. Space-based telescopes devoted
to such a project could do a good job with this, but so far the ones in
orbit, or scheduled to launch, are designed for specific tasks that render
them unsuited or unable to conduct the required follow-up observations of
all transiting exoplanets. For example, the Kepler Mission telescope will
stare at the same star field (Lyra/Cyngus) for 4 to 6 years. It will therefore
not be used to search for Earth-sized planets in the known transiting exoplanet
systems. Within a few years there could be several dozen transiting exoplanets,
and probably all of them will be outside the Kepler Telescope’s FOV. Thus,
ground-based and other space-based telescopes will be needed for transit
timing variability studies.
Any transit observation
meant to contribute to an archive of mid-transit timings should be made
with careful attention to accurate image time-tags. This means the computer
that records images should use a program that automatically synchronizes
the computer’s clock with a time standard. I use AtomTimePro, which I’ve
set for updates every 3 hours. The user should also pay attention to the
“meaning” of image time tags. For example, MaxIm DL records start times
in the FITS header, but when it performs photometry the CSV-file has a JD
value corresponding to the mid-exposure time.
Amateur timings
are likely to exhibit uncertainties of 1 or 2 minutes for each transit’s
mid-transit time. This is based on my analysis of XO-1 amateur timing measurements.
Averaging of many timing measurements will reduce this uncertainty.
The next graph
is a plot of 28 XO-1 transit timings by mostly amateurs during the period
2004 to 2007. There is nothing unusual about the pattern of timings in relation
to a straight line fit. This corresponds to a constant period. So far,
however, all observations are clustered near “opposition” at yearly intervals,
so a one-year periodicity cannot be ruled out. Other periodicities appear
to be constrained to amplitudes less than ~0.001 day, or 1.4-minutes.
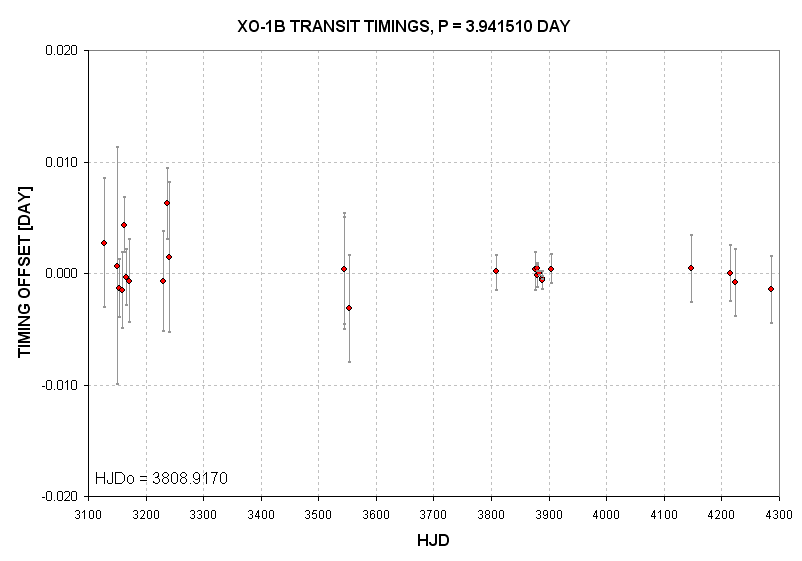
Figure 16.01. Transit
timings for XO-1.
This is just one
example of what amateurs are capable of doing in a search for timing anomalies.
As more amateurs join the ranks of exoplanet transit observers there will
be a more data dense archive of timings to work with for this and the other
exoplanets.
Light Curve Shape
Anomalies
Jupiter and Saturn
both have rings and moons, so it is reasonable to wonder if hot Jupiter
exoplanets also have them. Specifically, can amateurs detect their presence
from high quality light curves.
Shortly after TrES-1
was announced (in 2004) a group of amateurs observed transits of this exoplanet
and shared their light curves. I saw evidence of a brightening right before
ingress and possibly right after egress in several of these light curves.
Joe Garlitz in Oregon also noticed this
unusual feature. Someone called my attention to studies by Barnes and Fortney
(2003) who had investigated the possibility of detecting the presence of
rings around giant exoplanets by searching for light curve brightening just
outside transit that would be produced by forward scattering of star light.
Ron Bissinger performed a detailed analysis of light curve observations
(mostly amateur) and concluded that the brightenings were statistically
significant but required confirmation (Bissinger, 2005). The Hubble Space
Telescope later failed to confirm these brightenings. Nevertheless, each
new transiting exoplanet discovery represents another possibility for detecting
exoplanet rings.
Another light curve
anomaly to look for is an extra loss of brightness just before ingress,
or just after egress, caused by a large moon of the exoplanet responsible
for the main transit event. Searches have so far failed to detect the expected
feature of an exoplanet moon, but the value of such a discovery means that
every new exoplanet discovered should be studied with this feature in mind.
Rings and moons
will produce brightening and fading anomalies that are much smaller than
the main transit event’s mid-transit depth. The Hubble Space Telescope is
ideal for this task. However, HST will eventually degrade and become unusable,
and this may happen before the James Webb Space Telescope is launched (2013
or later). Amateurs wishing to beat the big space-based telescopes in detecting
rings or moons should consider performing a median combine of many ingress
and egress observations. Rings are likely to be present for both ingress
and egress, so folding of egress to match the shape of ingress is permissible.
Moons are likely to be in an orbit that resonates with the exoplanet’s
orbit about the star, which means that if one ingress shows a fade feature
other ingress events are also likely to show the same fade feature. This
means that there probably is reason to stack ingresses, and also stack egresses.
But don’t fold egress data with ingress because a moon is not likely to
affect both. Data averaging is advisable. I recommend 5-minute bins. However,
“running averages” are unsafe at any size and should be
avoided because they easily produce the impression of self-consistent patterns
that don’t exist.
Small amplitude
oscillations within a transit are sometimes thought to exist in measurements,
but it is prudent to assume that at this time none of them are real. Still,
small features within a transit are worth searching for. After all, the
star undergoing transit may have sunspots. A credible detection of such
a feature would require confirmation from simultaneous observations by another
observer. Observer teams may some day coordinate observations of the same
transit for this purpose.
Don’t forget that
it is always worth observing a transiting exoplanet between transits in
a search for anomalous fades caused by another exoplanet in the same star
system. The length of such a fade event could be shorter than the main transit
length (if the new planet is in an inner orbit) or longer (if in an outer
orbit).
Other subtle anomalies
of exoplanet light curves may become important as theoreticians and observationalists
continue the study of this new field. Every observer should therefore be
prepared to accept as “real” an observational anomaly that is not readily
explained. Part of the excitement of exoplanet observing is that this is
a young field that may produce future surprises not yet imagined.
Since amateurs
have a unique opportunity to contribute to timing studies of known exoplanets,
and thereby contribute to the discovery of Earth-mass exoplanets, there
is a growing need for more advanced exoplanet observers as more exoplanets
are discovered. It will be important for these amateurs to coordinate their
observations, and to contribute them to a standard format archive. A case
will be presented in the next chapter for establishing such an archive.
I claim that attention should be paid to what constitutes an “optimum observatory”
for exoplanet observing. This is also a topic for the next chapter.
─-───────────────────────────────
Chapter
17
Optimum
Observatory
─────────────────────────────────
Dreaming! Every
amateur dreams about upgrades to the backyard observatory.
Whenever someone
asks for a recommendation of what telescope to buy, I have to first ask
“What do you want to do with it?” For “pretty pictures” of a specific category
of objects the answer would be one kind of telescope and camera (about which
I would be clueless, since I’m no good at that). But for exoplanet transit
light curves, I could give a pretty specific answer. That’s what this chapter
is about.
Some of the following
paragraphs (presented in smaller font) are taken from a “white paper” I
submitted to the NASA/NSF “Exoplanet Task Force” (ExoPTF) in March, 2007.
My white paper argued for government sponsorship of a network of amateur
observatories for coordinated monitoring of known transiting exoplanets for
the purpose of discovering Earth-sized exoplanets. Part of the case I presented
was that the optimum observatory for this task is only slightly more expensive
than existing amateur budgets, yet sufficiently more expensive for those
few amateurs who are capable of participating in such a search that financial
help is needed. (If you interpret this to be a shameless, self-serving attempt
to upgrade my observatory by responding to a future “request for proposal”
by NASA, you would be correct!)
Here is the argument
I presented to the ExoPTF in which I derived that the optimum observatory
would consist of a 20 to 30-inch aperture telescope as part of an observatory
costing ~$75,000. (I now realize that the aperture range should be 20 to
40 inches).
Precision photometry (i.e., 1-minute
precision of ~2 mmag) has many requirements: 1) the plate scale should
assure that a star’s full-width at half-maximum (FWHM) be at least 3 pixels.
For CCD cameras using chips having 9 micron pixels, and for sites with
FHWM ~ 2.5 “arc, this means the plate scale should be ~0.7 “arc/pixel. If
the plate scale is smaller too many pixels are within the photometry aperture
circle, leading to SNR degradation. 2) An aperture should be large enough
that Poisson noise and scintillation noise are small. 3) The focal length
should be short enough that the FOV is likely to contain same-color stars
for use as reference; this requirement translates to FOV larger than ~12
x 18 ‘arc. 4) The telescope should be in a mount that does not require meridian
flips. 5) Image quality must be the same for the entire FOV; in other words,
focal reducers cannot be used. 6) There should be minimal degradation of
image sharpness due to winds vibrating the telescope; this translates to
either the use of an open tube or a closed tube inside a dome.
The optimum effective
focal length (EFL) is ~100 inches when 9 micron pixel dimensions are used
and FWHM seeing of ~2.5 “arc is to be accommodated. A 30-inch telescope
would have to have an f-ratio of 3.3 to achieve this EFL without using a
focal reducer lens. When f-ratio becomes small, maintaining optical collimation
becomes more difficult. This is one reason larger apertures are undesirable.
A 40-inch aperture with f-ratio = 5 will have EFL = 200 inches, a plate
scale of 0.35 “arc/pixel and a FOV =17 x 11 ’arc when a large format CCD
is used (35 mm longest dimension). The plate scale is acceptable since the
noise penalty of having to use 4 times as many pixels in the signal aperture
for a 2.5 “arc FWHM star will be compensated by the larger aperture collecting
area. Any larger aperture, however, will reduce the FOV, which will begin
to limit the number of stars available for use as reference. Thus, a 40-inch
aperture is an approximate upper limit for the range of apertures that are
optimum for exoplanet light curve measurements. (XO-2 is a special case,
because an identical star is located 31 “arc away.)
To illustrate some
considerations in selecting an “exoplanet optimum” telescope system, consider
the following specific components. The 20-inch Meade RCX 400 has a tube
made with low-thermal expansion material, which would reduce the need for
focus adjustments. The optical design is a modified version of Ritchey-Chrétien,
and produces sharp images for a large FOV. It has an f-ratio of 8, so the
EFL is 160 inches, yielding a plate scale of 0.46 “arc/pixel. The FOV with
a large format CCD chip would be 20x30 ‘arc. The German equatorial mount
that it normally comes with is unacceptable for exoplanet observing. The
Optical Tube Assembly (OTA) alone would cost ~$20k and a quality fork mount
purchased separately would cost ~$25k. Integrating the OTA to the fork mount
might cost another $5k. Since the RCX telescope is a closed-tube OTA a dome
would be needed to protect it from wind vibrations. This will add another
~$15k for an automated dome. A large format CCD would cost ~$10k. SBIG’s
AO-L tip/tilt image stabilizer costs $2k. Buried cables for controlling the
telescope, CCD and dome, plus a computer system with control software would
cost ~$3k. The total cost for this system is ~$80k.
Other options are
possible. A ScopeCraft 24-inch, f/3.1, open tube telescope with a roller-driven
horseshoe mount would cost ~$45k. A dome would not be needed for such a
telescope, but a sliding roof observatory would be, costing ~$10k. The same
CCD camera and other items would be needed, so the total cost would be about
the same, or ~$70k.
Most hot Jupiter exoplanet transits
last ~3 hours. Because of the need for verifying that reference star color
is not affecting the transit shape, depth and mid-transit timing (in a
manner that is correlated with air mass), it is important to start observations
at least 1.5 hours before ingress and continue until at least 1.5 hours
after egress. Thus, 6-hour observing sessions are common, and 8-hour sessions
are even better. Observations for more than one observing site are sometimes
needed, provided the sites span a sufficient longitude. When observations
from two or more observatories are to be combined to produce one light curve,
it is helpful that they be identical systems. Systematic effects can be
minimized when using the same image scale (same blending of interfering
stars), same FOV (allowing for use of the same reference stars) and the
same image quality (use of the same photometry apertures).
From there in the
white paper I went on to argue that a network of these optimum observatories
should be constructed at sites spanning a wide longitude range to assure
that each transit would be observed in its entirety. It is clear that such
an amateur project would be cheaper than any space-based telescope mission,
or any network of professional ground-based observatories.
I envision a network
of 6 identical telescopes deployed in the backyards of amateur exoplanet
observers who have a demonstrated history of quality observing and dedication
to the task. A range of longitudes would be needed to provide coverage of
entire transits. The observatories should consist of pairs, with a pair
at each of three longitudes. Pair members should be at sufficient distance
from each other to reduce the chances that bad weather at one location is
correlated with bad weather at the other location. A more important reason
for situating identical observatories in same longitude pairs is to provide
redundant observations that could support each other when a real LC anomalous
feature occurs. This is similar to the principle aspired to by SETI projects
in which two telescopes observe the same candidate stars in coordination;
if an unusual signal is detected by one telescope the other one, located
sufficiently far away to not be affected by the same local interferences,
can provide corroboration (not yet implemented).
A network of advanced
amateur observatories optimized for exoplanet transit observing should
have the guidance of a professional astronomer. He will know other professionals
to contact when unexpected observed behaviors are encountered. Once the
initial construction costs have been borne the part-time professional will
probably constitute the major cost for continued operation of the exoplanet
observing network.
At the present
time there is no “universal archive” for exoplanet timings or light curve
measurements. Each group of observers maintains their own archive, but these
groups do not share because of an understandable desire to announce discoveries
and continue to be funded by their sponsoring agency. However, a greater
good will eventually be served by creating a global archive, fashioned along
the lines of the AAVSO (American Association of Variable Star Observers).
Even non-members of the AAVSO can submit observations to their immense archive
of star brightness observations, and submit queries for what’s in the archive
for a specific star for a specific date interval.
I am suggesting
the creation of an Exoplanet Transit Archive (ETA) that would maintain
light curve observations as well as mid-transit timing submissions. It
would be possible for the ETA to perform automated analyses of submitted
LC data to solve for air mass curvature and temporal trends, then solve
for transit shape using a simple model. The output of this analysis would
be a refined set of values for mid-transit time, transit depth, transit
length, a shape parameter (related to the ratio of planet radius to star
radius). ETA should be available to anyone, both for data submission and
information query. The need for ETA will grow with the number of exoplanet
observers. The ETA staff should be familiar with common shortcomings of
amateur exoplanet transit observations in order to maximize the value of
extracted information and minimize the amount of misleading information from
ETA submissions. Since the proposed network of amateur observatories described
in this chapter is in response to the growing need for amateur observations,
and since the proposed network of advanced amateur observers will be familiar
with exoplanet observing pitfalls, it is natural for the ETA to be created
in coordination with the amateur observatory network. The professional astronomer
chosen to lead the amateur network of advanced observers should therefore
be charged with creating the ETA.
I believe this
is the best time for either government or institutional funding for creating
such a professional/amateur partnership. If 2007 is eventually viewed as
the year transiting exoplanet discoveries began to “explode,” how fitting
if it were also the year that a commitment was made to creating the ETA
and a network of identical amateur observatories. This first decade of the
21st Century has the potential for becoming one of the most
exciting periods in the history of astronomy, especially for the amateur
astronomer.
APPENDIX A – Evaluating
Flat Field Quality
Chapter 5 described
a way to create a master flat field. This appendix describes ways to evaluate
the quality of a flat field. Recall the two sets of flat fields in Chapter
5 made with different optical configurations, repeated here.
Figure A.01 Flats
for B, V, Rc and Ic filters for a configuration with a focal reducer lens
placed far from the CCD chip The edge responses are ~63% of the center.
Figure A.02 Flats
using the same filters but with a configuration with the same focal reducer
close to the CCD chip. The response range, smallest response to maximum,
are 88, 90, 89 and 89% for the B, V, Rc and Ic filters.
The first set of flats is relatively featureless aside from the overall
pattern of a fall off toward the edge, which resembles classical vignetting.
The second set shows more structure, including two dust donuts. Before we
condemn the second set of flats as a bad configuration for transit systematics
recall that what matters is the change of “flat field error”
versus pixel location. There’s no straight-forward way of knowing “flat
field error” versus FOV location for a given filter and a specified star
color. In fact, each star must have an appropriate flat field for its color.
For observations with a V-band filter what will a red star’s optimum flat
field look like? It probably will be a blend of the V-band and R-band flat
fields. Notice how different the V-band and R-band flat fields are in Fig.
A.02. A blue star, on the other hand, may need to be corrected using a blend
of the B-band and V-band flat fields.
Figure A.03. Star
field with B-V color labels. This is a 14.7x12.6 ’arc crop of the full
FOV (24x16’arc). North up, east left.
I will describe
three ways to evaluate the presence of defects in a master flat field.
One technique checks for patterns in magnitude-magnitude plots for two
stars in a large set of images. Another method involves observing Landolt
star fields and processing them using an all-sky analysis procedure. The
third method involves taking a long series of images of a pair of equally
bright stars within the FOV without autoguiding and comparing their ratio
versus time as they traverse various parts of the CCD pixel field. It resembles
the first method except that it makes use of intentional movements of the
star field with respect to the CCD pixel field.
Mag-Mag Scatter
Plots
There’s a clever
“reality check” to see if a drifting star field is producing systematic
brightness changes due to flat field errors (thanks, Peter McCullough, for
showing me this). I’ll illustrate it with an unfiltered 6-hour observation
session of the previous figure’s star field.
The stars in this
image were observed to rotate clockwise about the autoguider location in
the sky, which was 16.5 ’arc to the south of the main chip’s FOV center.
Stars in the center moved ~6 pixels during the 6-hour observing session,
and those near the upper edge moved ~9 pixels. If the flat field did a perfect
job of correcting all star fluxes to what they would be if they were near
the center of the image then this motion would be unimportant. A star near
the edge requires a larger flat field correction than a star near the center,
and any imperfections in the flat field are likely to affect edge stars
more. To see if stars have been correctly flat field corrected we can take
advantage of the fact that when a star field drifts any incorrect flat field
corrections are likely to differ for stars at different locations.
Consider Stars
#5 and #6 (in Fig. A.03). Their measured magnitudes during the entire observing
session are plotted in the next figure. Notice how “well-behaved” they
are, in the sense that they did not change brightness with respect to each
other. This result is unsurprising since the two stars are close together
and have similar colors. It shows what can be expected if flat field errors
at the two star FOV locations are not present.
Figure A.04 Mag-mag
scatter plot for two stars with same color and close together for the 6-hour
clear filter observing session of 2007.02.16.
Figure A.05 shows
what happens in a mag-mag scatter plot when one of the stars is near the
edge (Star #8) and the other is near the center (Star #5). Keep in mind
that for these observations the telescope was configured so that the flat
fields had a pattern very similar to those pictured in Fig. A.01, where
there’s a smooth fall-off of response from 100% near the center to ~63% near
the corners. In other words, the flat field response function is steep near
the edges, where Star #8 is located.
In this scatter
plot Star #8 (near the FOV edge) exhibits excessive scatter whereas Star
#5 (near the FOV center) is well-behaved. Star #8 moved ~8 pixels during
the observing session and the flat field correction during this movement
ranged from 9.4% to 10.0%. This suggests that the flat field correction was
imperfect, and produced an extra component of “magnitude variation” that
was not present for stars near the center or the image.
Figure A.05 Mag-mag
scatter plot for two stars with same color but far apart (5 ’arc) for the
same 6-hour unfiltered observing session of 2007.02.16.
The purpose of
the mag-mag scatter diagrams is to detect whether flat field error effects
are present. For the case illustrated by the previous two figures there appears
to be a problem with stars close to the FOV edge. When this happens stars
near the edge should not serve as reference stars since the mag-mag scatter
plot does not tell us how to adjust the flat field. This is one reason
the target and candidate reference stars should be placed near the FOV
center.
All-sky Photometry
Method for Flat Field Evaluation
There are 1259
“Landolt stars” that have been calibrated with extreme accuracy (Landolt,
1992). Most of them are in groups of 20 to 50 stars located along the celestial
equator at RA intervals of ~1 hour. Most Landolt stars have been observed
on several occasions and have been accepted for inclusion when they are found
to be constant, but long-term variables are occasionally encountered (I’ve
found two). Each group of Landolt stars is spread over an area that is usually
larger than a typical FOV. Using my FOV of 11 x 17 ‘arc, for example, it
is possible to include 6 to 10 Landolt stars in one image that are bright
enough for an amateur to achieve a high SNR (e.g., >500).
Figure A.06: Flat
field with V-band filter to be evaluated using Landolt stars.
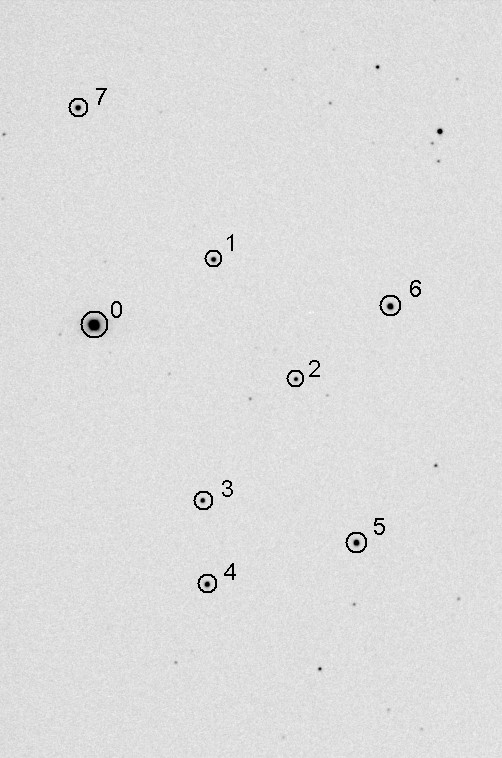
Figure A.07: Landolt
star field at RA/Dec = 15:38:51,
-00:19:33.
FOV = 11 x 17 ‘arc used in evaluating flat field quality by comparing measured
with Landolt magnitudes.
Figure A.06 is
a flat field using a V-band filter. It is darkest in the upper-right corner,
where a 1.095 flat field correction factor is required.
Figure A.07 is
a calibrated image showing 8 Landolt stars. If this image had been calibrated
using a good flat field then it should reveal this fact by showing agreement
with the Landolt star magnitudes at each of the 8 FOV locations sampled.
This is just one of ten sets of images, where each set has been positioned
with RA/Dec offsets so as to uniformly sample as much of the CCD area as
possible. If there is agreement between all 8 stars and their Landolt V-magnitudes
for all 10 image sets then it would be fair to surmise that the flat field
is accurate. A more accurate surmise would be that the large spatial wavelength
components representing the flat field are accurate. Using this technique
there is no way to probe the flat field’s quality at short spatial wavelengths.
In theory a flat
field could be constructed by repeatedly dithering RA and Dec until all
regions of the CCD have been sampled by Landolt stars. I don’t recommend
doing this, for several reasons that are described below. Nevertheless,
it is feasible to check the quality of a flat field by observing a Landolt
star field with a few carefully selected RA and Dec offsets.
Figure A.07 includes
8 Landolt stars brighter than 13th magnitude. It was observed
with 10 different RA/Dec offsets, producing 70 locations on the CCD pixel
field where a measured magnitude could be compared with a Landolt magnitude
(the number is less than 80 because some RA/Dec offsets placed Landolt stars
outside the FOV). All observations were made with a V-band filter. Star
color effects are removed by solving for a star color coefficient in an
expression for V-magnitude:
V-mag = 19.670 – 2.5 * LOG10
(S / g) – Kv’ × AirMass – 0.055 × C’
where S is star
flux [counts], g is exposure time [seconds], Kv’ is zenith extinction for
the V-band filter [magnitude/air mass] and C’ is a linearized version of
star color C, defined as C = 0.57 × (B-V) - 0.30. The linearized version
is C’ = C + 1.3 × C2. The constants 19.670 and -0.055
were derived from a least-squares fitting procedure using the 70 star flux
measurements. All images for this session were made near transit, so air
mass was constant and it didn’t matter what value was used for Kv’.
If the flat field
used in calibrating these images was good then it should be possible to
achieve a good quality fit for all 70 Landolt star magnitude measurements.
For this set of images the residuals had an RMS deviation of 0.023 magnitude.
A plot of these residuals versus star magnitude is shown in Fig. A.08.
In this figure
it is apparent that some stars are persistently brighter or fainter than
the model fit and this could be due to the star changing brightness during
the two decades between the time the Landolt measurements were made (1980s)
and the present. It is not unreasonable to hypothesize that a star changed
brightness by 0.024 magnitude during that time (this is the largest average
difference found from the above fitting procedure). If star brightnesses
are adjusted to produce zero averages the RMS scatter becomes 0.017 magnitude.
Whichever choice is made the resulting conclusion is approximately the same:
the flat field was successful at about the 0.02 magnitude level. The RMS
residuals (range = 0.017 to 0.024 magnitude) correspond to ratios within
the range 1.6 to 2.2 %.
Does this constitute
a validation of the flat field? Not really! After all, the maximum flat
field correction for the flat field under evaluation is 9.5%, and the typical
RMS variation for star locations is ~1.2%. In other words, the “all-sky
photometry method for evaluating a flat field” is simply too imprecise for
evaluating typical flat fields. There is little prospect that better quality
all-sky photometry can be counted on for improving the value of its use
for evaluating flat fields. After all, an RMS scatter in the range 0.017
to 0.024 magnitude is pretty good for all-sky photometry.
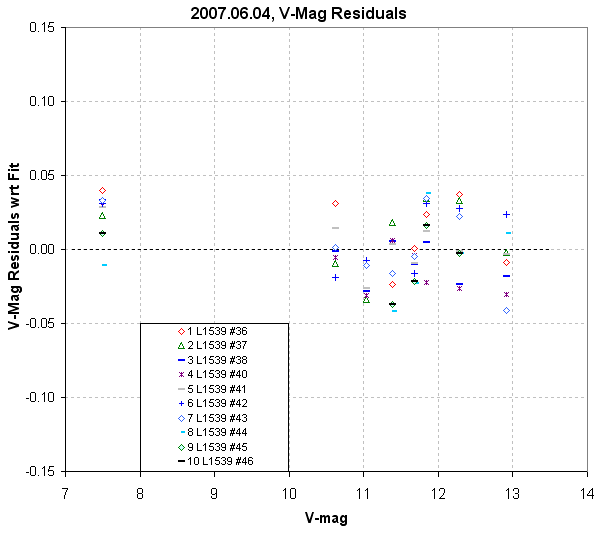
Figure A.08. V-magnitude
residuals with respect to model fit (using the two parameter values 19.670
and -0.055) plotted versus star magnitude.
This method for
evaluating a flat field will only be useful for ruling out the presence
of large errors. These large errors are more likely to be present when the
flat field has a large amount of vignetting, or when there is reason to
suspect the presence of a large stray light component in the flat field.
Only when flat field errors of ~3% or larger are thought to be present,
or need to be ruled out, will this method for evaluating a flat field be
useful.
Star Ratio Changes
with Star Field Offsets
The previous section
shows, I hope, that attempting to establish a flat field shape using accurate
magnitude information of Landolt stars is a too ambitious goal. It may be
useful for identifying gross errors, such as those exceeding ~3%, but the
approach cannot be used to identify errors of much lower amounts.
In this section
we will pursue the less ambitious goal of answering the question:
What
are typical error differences in the flat field for randomly-chosen
pairs of pixel location areas?
This question is
relevant to the task of producing exoplanet light curves with a minimum
of systematic shape errors. After all, if it can be shown that a pair of
stars maintain the same flux ratio for many pixel offset settings, then it
is fair to assume that image rotation movements of a target star and its ensemble
of reference stars will maintain a similar stability of flux ratios.
To perform this
test we don’t need Landolt star fields; we only need stars that do not
vary on hourly time scales. The previous section dealt with a set of observations
of a star field with a variety of position offsets, and since these images
have already been processed I will use them in this section to evaluate
the new, less ambitious question.
We must keep in
mind that every star’s flux measurement is noisy due to Poisson noise,
scintillation noise and aperture pixel noise. These sources of noisiness
could mask real changes in flux ratios produced by flat field errors. Let’s
calculate noise levels from these sources before proceeding with a calculation
of observed flux ratio changes.
The images were
made with 10-second exposures at air mass ~1.25, so scintillation is estimated
to be on the order of 2.5 mmag. Star fluxes ranged from 4100 to 590,000
counts, so Poisson noise is calculated to range from 10.7 to 0.9 mmag, respectively.
Aperture pixel noise is calculated to be 0.5 mmag. Each star is therefore
expected to exhibit values for fundamental SE that range from ~3 to 11 mmag.
Since these noise sources are uncorrelated from star to star, when two
stars are compared the magnitude difference should exhibit root-two greater
SE, or ~4.2 to 16 mmag. The image sets that were processed in the previous
section consisted of 10 images per set, so when average magnitude differences
are used the expected SE will be root-10 smaller than for single image differences.
Therefore, we can expect to encounter fundamental SE uncertainties of 1.3
to 4.9 mmag when comparing the average magnitude of stars in sets of 10
images.
The measured magnitude
differences between star pairs in 10 image groups (10 images per group)
are SE = 17, 28, 25, 20, 28 and 24 mmag. These six SE values correspond to
six star pairings. The median and average of these six SE values are both
24 mmag. Thus, the measured SE is greater than expected from the assumed Poisson
noise, scintillation noise and aperture pixel noise. It is possible that
scintillation noise was greater than usual for the observing session. Otherwise
I would have to conclude that the flat field error map exhibited large variations,
such as 17 mmag (1.6%).
The suggestion
that the flat field error map has a 17 mmag RMS variation can be used to
infer the magnitude of systematic light curve variations if the image rotation
and movement across the pixel field was comparable to the spacing of stars
used to derive the 17 mmag value. The average spacing between stars is ~
5 ’arc. Typical image movements during a light curve observing session are
much less than this. We do not have information about the spatial auto-correlation
distances for these flat field errors, so it is not possible to predict
the magnitude of systematic light curve errors for typical movements. A proper
analysis would correlate magnitude differences with star separation distance,
and I have not done this.
It could be argued
that the spatial structure of the flat field response distribution can
be used as a guide in estimating the spatial structure of the flat field
error map. If this is justified, then visual inspection of Fig. A.06 suggests
that the error map is dominated by spatial structures having wavelengths
~5 ’arc. Since typical movements of the star field (for my present polar
alignment) are << 1 ’arc (they’re on the order of 0.1 ’arc), a bold
prediction could be made that I should encounter systematic light curve
errors <4 mmag (and possible ~0.4 mmag).
The reader is invited
to pursue an investigation of their own system’s flat field errors using
their own observations and guided by the ideas presented in this appendix.
No doubt, there must be other ideas to be guided by, and the author would
appreciate feedback on any results or ideas on this matter.
APPENDIX B – Selecting
Target from Candidates List
This appendix is
for those few amateurs who are privy to a secret list of possible exoplanet
transits maintained by professionals who operate wide-field camera surveys.
As I write this only the XO Project produces such a list for use by a small
group of amateur observers. However, I anticipate that in the future professional
teams with survey cameras will solicit amateurs to conduct follow-up observations
using their secret candidate lists. When that happens, the amateurs invited
to join those extended teams will want to learn how to wisely choose candidates
from the list for each night’s observation.
The candidate list
is based on wide field camera surveys with poor spatial resolution but
good sensitivity. Because of the poor spatial resolution most “candidates”
are faint eclipsing binaries whose light is blended with a brighter star
that is mistaken by the survey candidate analysis software for being the
eclipser. This common situation is called “EB blending.” The main role
for amateur observers is to determine which star is fading and by how much.
As a bonus the amateur light curve can reveal the shape of the event, and
if it is closer to flat-bottomed than V-shaped, as well as shallow, there
will be heightened interest in additional observations.
If you’re going
to spend 6 or 8 hours observing a candidate it is reasonable to spend a
few minutes evaluating the merits of various candidates on a list showing
predicted transits for the night in question. Exoplanet candidates derived
from survey camera data will contain the following information for each
candidate: periodicity (P), length of transit (L), depth (D) and maybe star
color J-K. Let’s assume that an ephemeris of predicted transit times is
available for each UT date (and possibly restricted to what’s observable
from the observer’s site). On any given night there may be half a dozen candidates
with transits that can be observed. If J-K is not given then the observer
should obtain it from a star catalog (such as TheSky/Six). The following
graph can be used to identify candidates that have transit lengths compatible
with the transit being from an exoplanet instead of an eclipsing binary
that is blended with another nearby star (giving the appearance of a small
depth).
Consider the following
information for a survey candidate that has never been observed in a way
that defines its LC accurately: P = 3.9 days, length of transit = 2.2 hours,
J-K = 0.41. Using this figure locate the point for J-K = 0.41 and P = 3.94.
Then read the y-axis value of 2.8 hours. This is the longest possible length
for a transit (i.e., it’s the length for a central transit).
The survey catalog’s measured length of 2.2 hours is less than this maximum
length, which is consistent with an exoplanet transit.
Consider another
survey candidate example: P = 2.4 days, length = 2.6 hours, J-K = 0.60.
Referring to the graph again we find that the longest possible transit is
2.1 hours. The survey’s reported length of 2.4 hours is too long. These
transit numbers are incompatible with an exoplanet transit, and we may suspect
that this is an eclipsing binary that is blended with another nearby star.
An “EB blending” situation can lead to an incorrect J-K for the star undergoing
transit, so it is still possible that this candidate is an exoplanet; but
since there are so many more EB blending situations than exoplanet transit
situations the odds favor the EB blending interpretation, and an observer
should be wary of investing time in observing such a candidate.
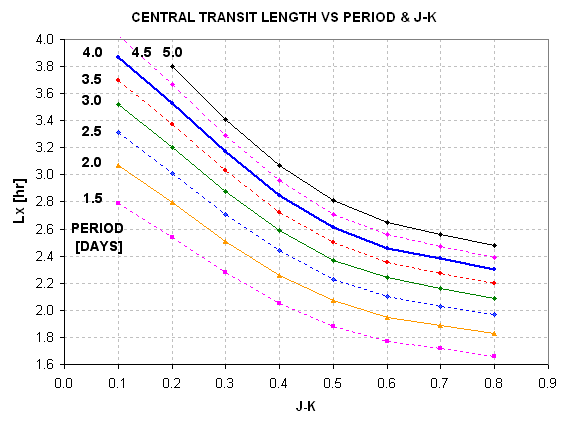
Figure B.01 Central
transit length, Lx, versus J-K star color and orbital period.
Although Appendix
D contains an extensive treatment of concepts for fitting LCs to exoplanet
transit models, I will give a brief description here of the concepts underlying
this figure. Main sequence stars, which comprise ~90% of all stars, have
sizes and masses that are correlated with their colors. Since J-K colors
are available for almost all stars that an amateur will encounter for this
purpose I have chosen to use this color instead of B-V. Knowing a star’s
J-K means that we can infer the star’s radius and mass (assuming it’s a main
sequence star). Knowing the secondary’s orbital period allows us to calculate
its orbital radius, using the simple relationship that orbital radius is
proportional to (P)2/3 times (total system mass)1/3.
From orbital radius and period we can calculate the secondary’s orbital velocity,
and combining this with the star’s radius we can derive the time it takes
for a central crossing.
If we define transit
length to be the “full width at 1/3 maximum” for the transit feature then
we have a parameter that closely corresponds to the time it takes for the
center of the secondary to traverse the transit chord across the star.
Exoplanet transits from survey cameras will fold many transit events to
produce a less noisy transit shape. It will have a noise level (~5 to 15
mmag) that is not much smaller than transit depth. In practice the transit
length listed in the survey candidate catalog will be shorter than contact
1 to contact 4, and is often an approximation of “full width at 1/3 maximum.”
To the extent that this is true the above figure will give reliable guidance
on maximum possible transit length.
Exoplanet candidate
ingress and egress times can be wrong by an hour or two. When planning
an observing session for a candidate it is wise to allow extra observing
time before ingress or after egress to be sure of capturing it. Otherwise
you may issue a “no show” report that can be misleading.
Exoplanet candidate
observing can be useful if only a partial transit event is observed. This
at least will show which star is undergoing transit, and it is usually
possible to categorize the candidate as being an EB blend versus a shallow
transit from measured depth of only a part of the transit event. Therefore,
when planning a night’s observations it’s OK to selecting a candidate when
only part of the predicted transit can be observed.
Many of the considerations
presented in Chapter 3 for selecting an exoplanet for a night’s observations
also apply to selecting an exoplanet candidate.
APPENDIX C - Algorithm
for Calculating Air Mass from JD, Site Coordinates and RA/Dec
1) Subtract 2451545
from JD
2) Multiply this
by 24.065709824419 and add 18.697374558.
3) Subtract 24
× INT ( above value / 24)
4) Add EastLongitude
/ 15 (this is GMST)
5) If < 0, add
24 (this is LST)
6) Multiply by
15 and subtract RA [deg] (this is LHA)
7) If LHA >
180, subtract 360
8) Calculate cosine
(LHA ), i.e, Cosine (LHA / 57.2858…)
9) Multiply by
Cosine ( Latitude )
10) Multiply by
Cosine ( Dec )
11) Add Sine (
Dec ) × Sine (Latitude )
12) Air mass is
reciprocal of above
APPENDIX D - Planet
Size Model
INTRODUCTION
This appendix is long. It has nothing to do with exoplanet transit observing
tips, and that’s why it’s in an appendix. I present it for those readers
who think it might be fun to play “modeler” and who want to interpret a
well-established LC in terms of planet size. I must admit that the simple
procedures leading to the final one described here has misled me a few times.
However, after each failure I reviewed my assumptions and learned from them.
One lesson is that if an internally consistent solution is impossible then
consider the star to be “off the main sequence,” where star color to size
and mass conversions are questionable. Consider also the possibility that
the transits are produced by a triple star system, in which the depth only
appears shallow when in fact it is a deep eclipsing binary that is blended
with a third star that’s within the photometry aperture (and possibly a
close binary with the eclipsing binary pair).
The goal of this
appendix is to describe a simple model that I developed for converting
a transit light curve (LC) to an estimate of the size of the secondary,
which is then used to discriminate between the secondary being an exoplanet
versus a small and faint star (i.e., an eclipsing binary
system).
A "concept description"
section uses actual R-band measurements of an exoplanet to illustrate how
a LC can be interpreted. The "model" employs limb darkening relationships
for each filter band. The primary star's B-V color (closely associated
with spectral type) is used to derive the star's mass and radius, on the
assumption that it's a main sequence star (like ~90% of stars). Orbital
period is used to calculate orbital velocity (assuming a circular orbit).
The planet's radius and "central miss distance" (related to inclination)
are adjusted to match the LC depth and duration.
A proper solution
for planet radius will involve a fit to the entire LC, not a solution based
on agreement with the LC’s depth, length and shape parameter that is employed
by the simple solution in this appendix. A crude method is presented for
determining if the shape is similar to what an exoplanet can produce, versus
what a blend of an eclipsing binary (EB) with another nearby star would
produce. My shortcuts reduce accuracy, of course, but if an approximate
answer is acceptable then the procedure described here may be useful.
Section 1 is a case study that is used to illustrate the concepts employed.
Far more steps are shown than would be used in practice. The goal for this
section is to determine the size of the secondary (exoplanet or EB binary
star).
Section 2 shows how to use information about the LC's shape to assess
whether the LC is compatible with an exoplanet or an EB whose light is
blended with a nearby star to produce what merely appears to be a small
transit depth.
Section 3 is a summary of only those things that need to be done, after
the underlying concepts are understood, to convert the basic properties
of a LC and star color to a solution for secondary size and likelihood of
the transit belonging to an exoplanet versus an EB.
Section 4 describes an Excel spreadsheet that can be downloaded and
run to do just about everything described on this appendix. The user enters
transit depth, transit length, period and star color (B-V) in cells corresponding
to the LC's filter band and a cell displays a 3-iteration solution for
Rp/Rj (if a solution exists). It also can be used to assess the likelihood
of the LC shape belonging to the exoplanet domain, based on the user's input
of a shape parameter, S.
1. CONCEPTS OF
LC INTERPRETATION - A CASE STUDY
I like explaining
things through the use of a specific example. The reader's job is to "generalize"
from the specific. I'm going to treat real observations of a "mystery"
star's transit light curve; this way we can grade the results of my crude
analysis procedure using a rigorous treatment by professionals.
Let's assume the
following:
GIVEN:
B-V = +0.66 ± 0.05 (which can be derived from
J-K)
orbital period, P = 3.9415 days,
R-band observations
transit depth, D = 23.7 ± 0.4 mmag,
transit length, L = 2.97 ± 0.03 hours
(contact 1 to 4).
The D and L values were derived from the transit
light curve in Fig. D.01, measured with an amateur 14-inch telescope (pretend
you don’t know which star this is).
After a transiting
candidate has been observed, and before radial velocity measurements have
been made to assess the mass of the secondary, this is all the information
we have to work with. Using this limited information there are many steps
for interpreting the LC to estimate secondary size, Rp/Rj (exoplanet’s
circular radius divided by Jupiter’s equatorial radius).
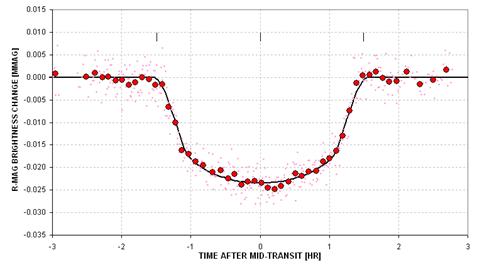
Figure D.01 Transit light
curve for a mystery star whose LC we shall try to "solve" using the procedures
described on this web page.
SOLUTION:
Star's radius,
Rstr = 0.99 × sun's radius (based on equation below)
Rstr = 2.23 - 2.84 × (B-V) + 1.644 × (B-V) 2 - 0.285 * (B-V) 3
Planet radius,
Rp/Rj = 1.41 (1st iteration)
Rp/Rj = 9.73 × Rs × SQRT [1 - 10 ^ (1-D/2500)],
which assumes central
transit and no limb darkening
At this point we
have an approximate planet size. It's a first iteration since limb darkening
has been neglected. The next group of operations is a 2nd iteration.
Star's mass, Mstr
= 0.97 (times sun's mass)
Mstr = 2.57 - 3.782 × (B-V) + 2.356 × (B-V) 2 - 0.461 ×
(B-V) 3
Planet orbital radius, a = 7.22e6 [km]
a = 1.496e8
* [Mstr^1/3 × (P / 365.25)2/3],
where dimensions
are P[days], Mstr[solar mass] & a[km]
Transit length maximum, Lx = 3.28 [hr] (corresponds to central transit)
Lx = 2 (Rstr × Rsun + Rp/Rj × Rj) / (2 π a
/ 24 × P)
where Rsun = 6.955e5
km, Rj = 7.1492e4 km
Miss distance, m = 0.42 (ratio of closest approach to center to star's
radius)
m = SQRT [1 - (L / Lx) 2 ]
Limb darkening effect, LDe = 1.16 (divide D by this)
I(m)/I(av) = [1 - 0.98 + 0.15 + 0.98*m - 0.15*m2 ] / 0.746, for
B-band
" = [1 - 0.92
+ 0.19 + 0.92 × m - 0.19 × m2 ] / 0.787, for
V-band
"
= [1 - 0.85 + 0.23 + 0.85 × m - 0.23 × m2] / 0.828, for
R-band
" = [1 - 0.78 + 0.27 + 0.78 × m
- 0.27 × m2] / 0.869, for
I-band
Corrected transit
depth, D = 20.4 mmag (1st iteration for D)
D = D / LDe (this is the D that would have been measured if the
star were
uniformly
bright)
Planet radius,
Rp/Rj = 1.31 (2nd iteration for Rp/Rj)
(Same eqn as above but now assumes m = 0.42 and appropriate limb
darkening)
Transit length
maximum, Lx = 3.25 [hr] (2nd iteration for central transit length)
(Same eqn as above)
Miss distance,
m = 0.405
(Same eqn as above)
Limb darkening
correction, LDe = 1.165 (divide D by this)
(Same eqn as above)
No more iterations
are needed since the two miss distance results (& limb darkening corrections)
are the same. We have a stable solution:
Rp/Rj = 1.306
To assign a SE
to this solution it is necessary to repeat the above procedure using a range
of values for the measured transit depth and length. When this is done
(using an Excel spreadsheet) we get Rp/Rj = 1.306 ± 0.063 (with B-V
uncertainty contributing the greatest component of SE). Note that the stated
SE doesn't include the uncertainties associated with the equations converting
B-V to stellar radius and mass, nor does it allow for the possibility that
the star is "off the main sequence."
EVALUATING THE
SOLUTION
How good is this
result? Let's compare it with a detailed model-fitting analysis by professional
astronomers. The "mystery" exoplanet is no mystery. It's XO-1, whose
discovery was announced May 18, 2006 and published
in the September issue of the Astrophysical Journal by McCullough
et al (2006):
http://xxx.lanl.gov/abs/astro-ph/0605414
(abstract), and
http://arxiv.org/PS_cache/astro-ph/pdf/0605/0605414.pdf
(complete article).
This article reports that Rp/Rj = 1.30 ± 0.11. This compares
well with the simple model result calculated here, of Rp/Rj = 1.31 ±
0.07. (The larger SE for the professional result reflects a realistic
assessment of such systematic uncertainties as converting B-V to stellar
radius and mass.)
The B-band
light curve for XO-1 is measured to have D = 24.8 ± 0.5 and L =
2.95 ± 0.03. For these inputs the procedure described above gives
Rp/Rj = 1.29 ± 0.06.
GRAPHICAL
REPRESENTATION OF EQUATIONS
The following
graphs can be used instead of the equations for deriving star radius, mass
and limb darkening correction (derived from Allen's Astrophysical Quantities,
Fourth Edition, 2000):
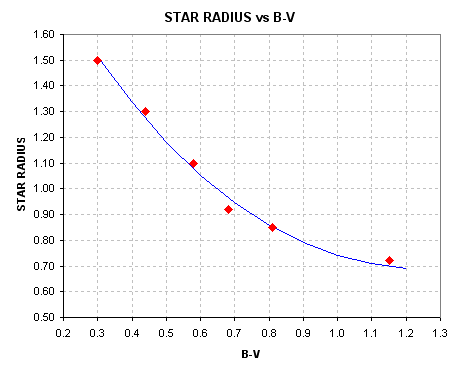
Figure D.02. Converting star color
B-V to stellar radius (assuming main sequence).
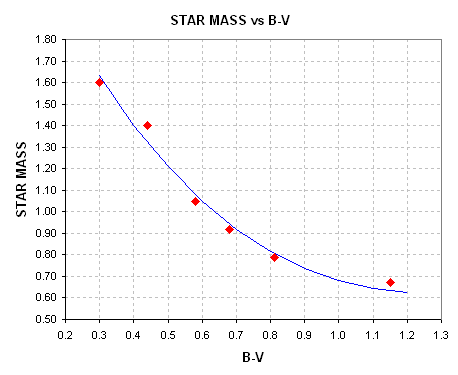
Figure D.03. Converting star color B-V to stellar mass (assuming
main sequence).
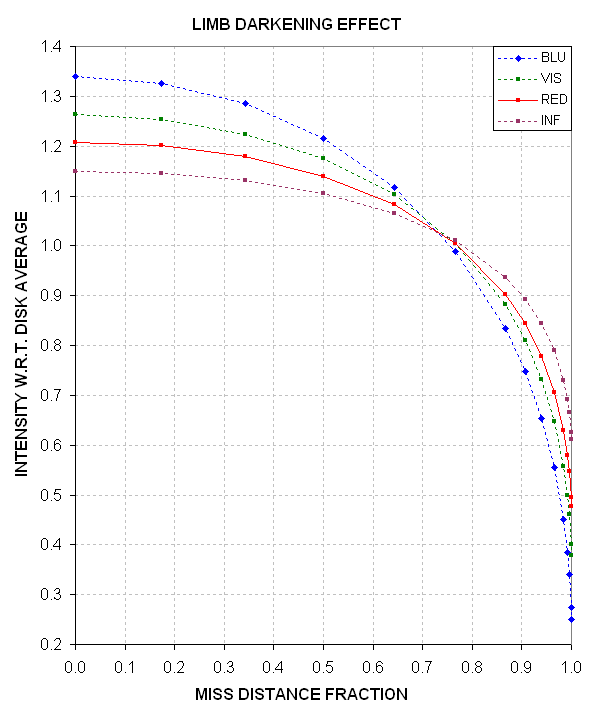
Figure
D.04. Converting miss distance
and filter band to intensity at that location, normalized by disk-average
intensity (assuming a sun-like star).
The following
two figures show how transit shape and depths could behave when the miss
distance changes from near-center to near-edge. These are real measurements
(graciously provided by Cindy Foote) that were categorized as EB based on
the depth values. The concept is the same, whether it's an exoplanet or
small EB, because in both cases a central transit should produce a greater
loss of light in B-band than R-band, and for a near-edge transit the reverse
is true.
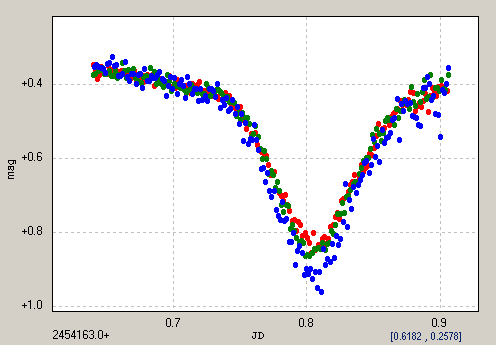
Figure D.05. Transit depth is greatest for B-band, consistent
with miss distance <0.73 (courtesy of Cindy Foote).
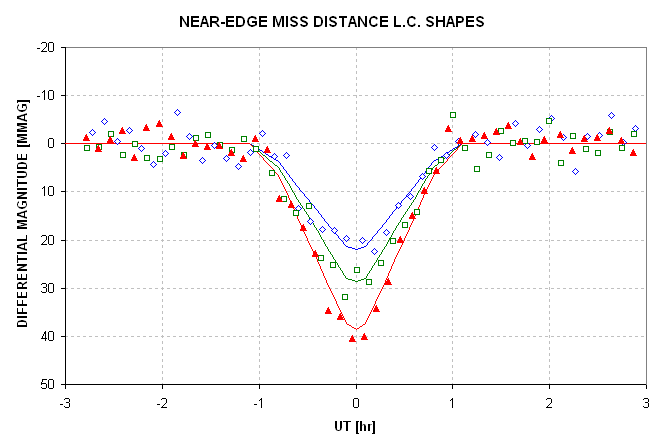
Figure D.06. Transit depth is greatest for R-band, consistent
with a miss distance >0.73 (courtesy of Cindy Foote).
2. VERIFYING THAT LIGHT CURVE SHAPE
IS NOT AN E.B. BLENDING
Wide-field
survey telescopes provide an efficient means for detecting stars that are
undergoing periodic fades with depths small enough to be caused by an exoplanet
transit (e.g., depth < 30 mmag) A fundamental limitation of such a survey
is that in order to achieve a wide field of view the telescope's resolution
is poor, and this leads to many "false alarms" due to the "blending" of
light from stars within the resolution circle. If, for example, the resolution
circle has a radius of 1 'arc and the flux from all stars within this circle
corresponds to ~11th magnitude, it is common for several stars to be present
within the resolution circle that are fainter than 11th magnitude but with
fluxes that add up to 11th magnitude. If this situation occurs, and if one
of those stars is an eclipsing binary (EB) with a large transit depth, the
transit depth measured by the survey telescope will be smaller, and possibly
small enough to resemble one produced by an exoplanet. This is a common
occurrence.
There are
two blending situations that need to be considered: 1) the EB is part of
a triple star system, so the blending star is too close to the EB to be resolved
by ground-based telescopes, and 2) the EB and the blending star are far enough
apart (usually gravitationally unrelated but close together in our line-of-sight)
that their angular separation is within the resolution limits of ground-based
telescopes. The second of these blending situations is probably more common
than the first.
When a survey
telescope produces many candidates per month it is not feasible to rule
out an EB explanation for each one by measuring radial velocities during the
course of a few nights with a telescope large enough to produce spectrograms
that have the required accuracy. Although radial velocity measurements
would allow the determination of the secondary's mass, and thus distinguish
between EB and planet transits, large telescope observing time is too costly
for such an approach.
A better alternative
is to perform follow-up observations of the survey candidates using telescopes
with apertures sufficient to identify the most common blending situation.
Amateurs with telescope apertures 8- to 14-inches, for example, have more
than sufficient resolution to determine which star within the survey's
resolution circle is undergoing transit, thus easily identifying most cases
of EB blending. These amateur telescopes also have sufficient SNR for an
11th magnitude star, for example, to allow the transit light curve to be
determined with good enough quality to sometimes identify the presence of
a triple star system EB. There may be more cases of triple star EBs that
resemble exoplanet transits than there are actual exoplanet transits. Therefore,
it is important to be able to interpret a transit light curve to distinguish
between a triple star EB and an exoplanet.
This section
demonstrates how amateurs can distinguish between exoplanet light curves
and "EB triple star blended light curves" of similar depth, so that additional
amateur observing time is not wasted on non-exoplanet candidates.
As an additional
check the shape of the measured transit light curve can be compared with
a model calculation. First, let's consider LC shapes for various sized
secondaries (either an exoplanet or EB star) transiting across the center
of the star they orbit. The following figure was derived from a model that
used sun-like R-band limb darkening.
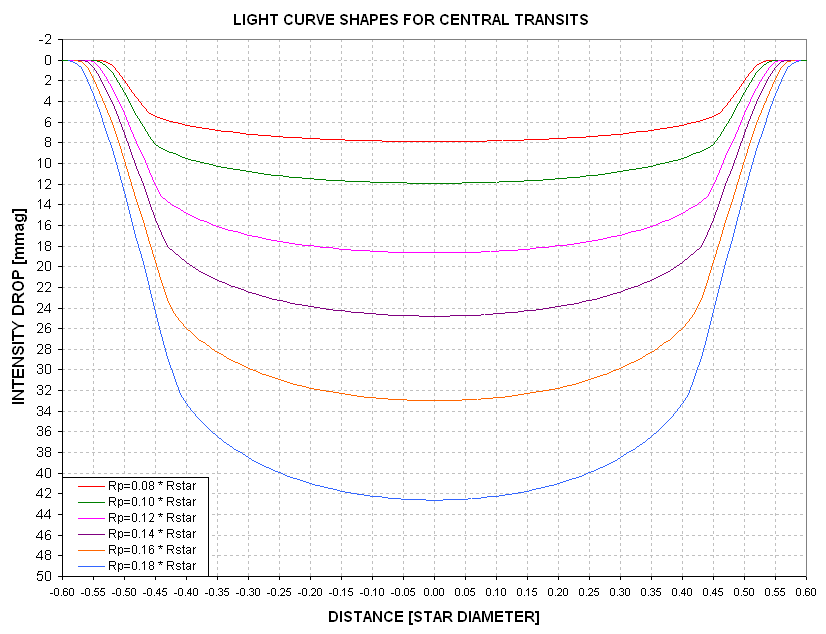
Figure
D.07. Model light curves for
central transits by different sized secondaries. An R-band sun-like limb
darkening function was used.
First contact
occurs when the intensity begins to drop, and second contact can be identified
by the inflection where the slope changes from steep to shallow. A "shape"
parameter is defined as the ratio of time the secondary is partially covering
the star to the entire length of the transit (e.g., contact 1 to contact
2 divided by contact 1 to mid-transit). For example, in the above figure
consider the trace for Rp/Rstr = 0.12: contact 1 and 2 occur at -0.55 and
-0.44, and contact 1 to mid-transit is 0.55. For this transit the shape parameter
is S = (0.55-0.44) / 0.55 = 0.20.
Let's estimate
the shape parameter for a real transit.
In Fig. D.08
my readings of contact 1 and 2 are -1.48 and -1.05 hour. The shape parameter
is therefore 0.29 (0.43 / 1.48). Assigning SE uncertainties and propagating
them yields: S = 0.29 ± 0.01.
Figure D.09
shows how the shape parameter varies with secondary size for central transits.

Figure
D.08. Measured light curve with
the contact times indicated.
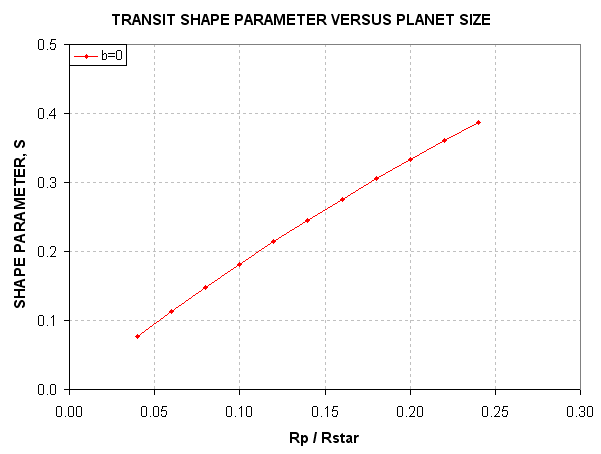
Figure D.09. Shape parameter, S, versus planet size
for central transits.
We next consider
how the LC shapes vary with miss distance (also called “impact parameter”).
We'll adopt one secondary size and vary the miss distance.
Figure
D.10. Shape of LCs for various
miss distances (b) and a fixed secondary size of Rp/Rstr = 0.08.
(Note that
I’ve changed terminology for "center miss distance" from m to b.
Sorry, but I used both symbols for this parameter while calculating the
graphs.)
The following figure
summarizes the dependence of S on many choices for planet size and
miss distance.
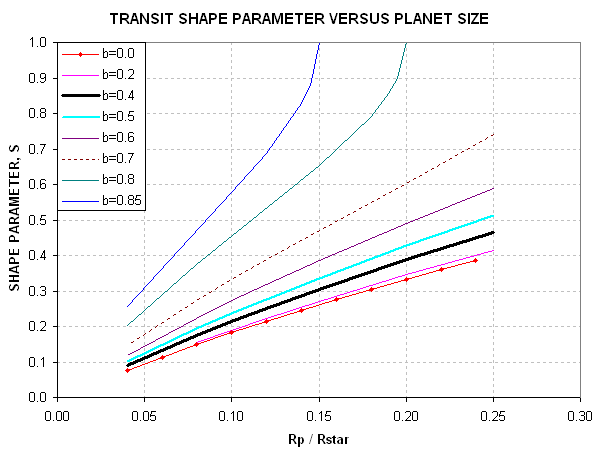
Figure D.11. Shape parameter
for a selection of secondary sizes and center miss distances, b.
Recall that for
this LC we determined that S = 0.29 ± 0.01. The shape alone
tells us that Rp/Rstr < 0.17. From the previous section we derived m
= b = 0.40 (the thick black trace in the above figure), so this means
Rp/Rstr ~ 0.13. It's not our purpose here to re-derive Rp/Rj, but let's
do it to verify consistency. Rp/Rj = 9.73 × Rp/Rstr × Rstr/Rsun
= 9.73 × 0.13 × 0.99 = 1.25. This is smaller than 1.31 derived
from the transit depth, but notice that the 1.25 estimate came from the light
curve shape, S, and extra information about miss distance. The consistency
check is successful.
Our goal in this
section is merely to distinguish between exoplanet light curve shapes and
EB shapes. It will be instructive to consider secondaries at the threshold
of being a star versus a planet. This is generally taken to be Rp/Rj ~1.5.
For such "threshold secondaries" the Rp/Rstr will depend on the size of
the star, which in turn depends on its B-V (spectral type). Let's list some
examples, going from blue to red stars.
Blue star: (B-V ~ 0.30, spectral type
F1V), Rstr/Rsun ~1.5, Rp/Rstr ~0.10
Sun-like: (B-V ~ 0.65,
spectral type G2V), Rstr/Rsun ~1.0, Rp/Rstr ~0.15
Red star: (B-V ~ 1.20,
spectral type K6V), Rstr/Rsun ~0.7, Rp/Rstr
~0.22
The following figure
shows the dependence of "threshold secondary" Rp/Rstr versus B-V.
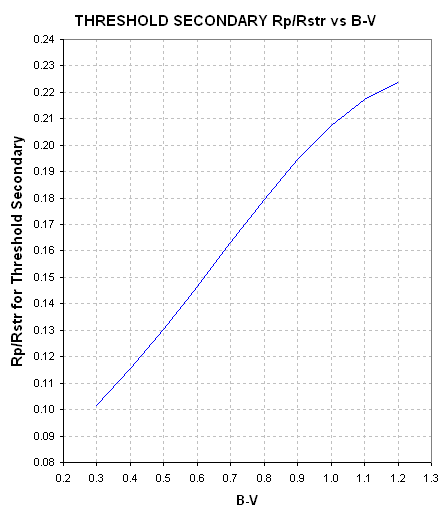
Figure D.12. Relationship
of "threshold secondary" Rp/Rstr versus B-V.
In order to use the above figure to distinguish between exoplanet versus
EB shapes we need to take into account the primary star's color. For example,
if B-V is sun-like, we can draw a vertical line at Rp/Rstr = 0.15 and consider
everything leftward to be exoplanets and everything rightward to be EBs.
Similarly, for any other B-V a vertical line can be placed upon this figure
to show the domains where exoplanets and EBs are to be found, as Fig.’s D.13a,b
illustrate.
Since XO-1 has
B-V = 0.66 ± 0.05 we can use the left panel to determine that it must
be an exoplanet. This determination is based on the shape parameter, S,
and the miss distance that was determined from Section 1 (plus the B-V
color for XO-1). Even if we hadn't performed a solution for miss distance
we could say that's it was likely that the B-V and S information was in
the exoplanet domain. If S were slightly smaller, say 0.27, then there
would be no dispute about the light curve belonging to an exoplanet. (Well,
all this is subject to my model assumptions, such as the "main sequence"
one.)
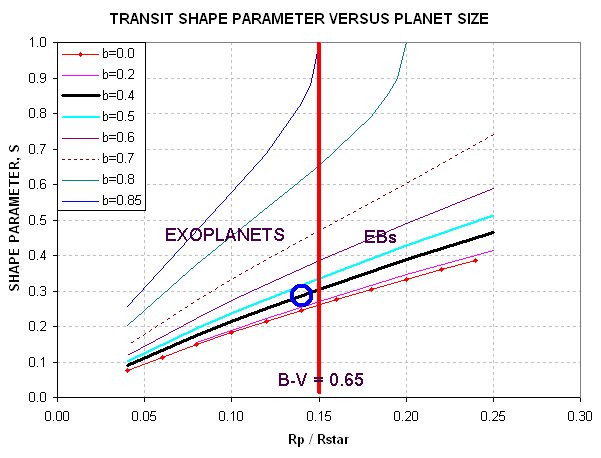
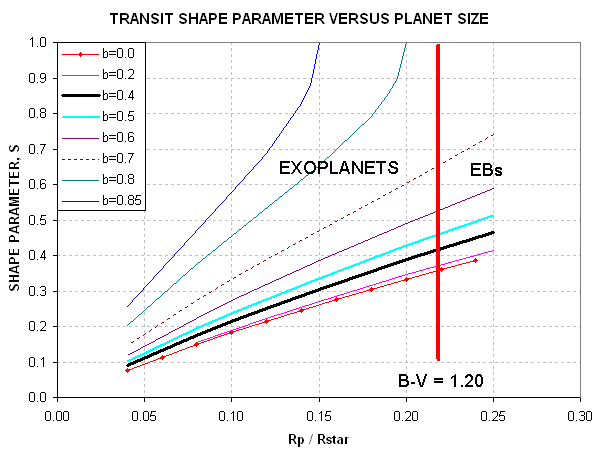
Figure D.13a,b. Domains for
distinguishing exoplanets from EBs based on B-V, shape parameter S,
and miss distance b, for two examples of B-V. The blue circle in
the left panel is located at the measured shape and center miss distance
for XO-1.
There's another graph that can be used for the same purpose as the previous
ones, and I think it's much more useful than the graphs in the previous
figure because it doesn't require knowledge about miss distance. Instead,
it requires knowledge about transit depth, D, which is easily measured.
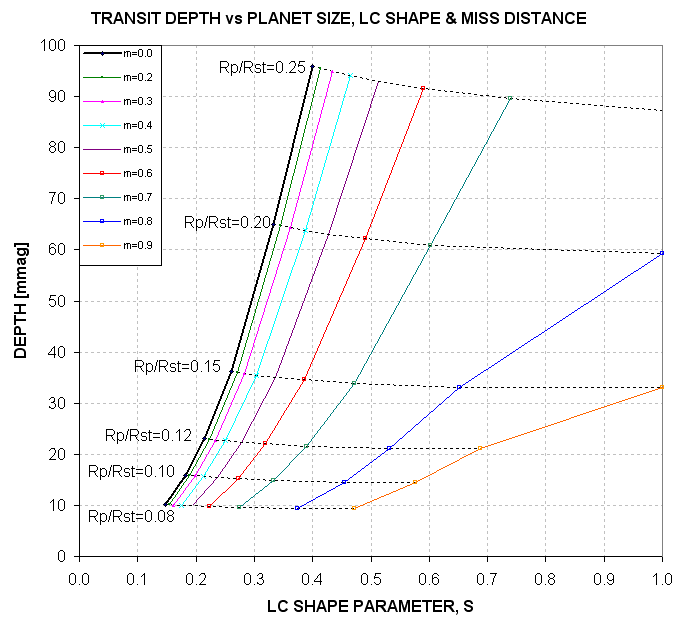
Figure D.14. Domains for
exoplanets and EBs, using parameters S and D as input (yielding
Rp/Rstr and miss distance as answers).
This figure requires knowledge of transit depth, D, instead of
miss distance. This is better since D is easily determined by casual
inspection of a LC. The shape parameter S is also easily determined
by visual inspection. Therefore, without any attempts to "solve" the LC
this plot can be used to estimate Rp/Rstr and miss distance. Then, by knowing
B-V we can specify an Rp/Rstr "threshold secondary" boundary in the figure
that separates the exoplanet and the EB domains.
Consider the previous
example, where XO-1 was determined to have S = 0.29 and D
~ 24 mmag. Given that B-V = 0.66 we know that a "threshold secondary" will
have Rp/Rstr = 0.156 (cf. Fig. D.06). Now, using the above figure, draw
a trace at this Rp/Rstr value, as in the following figure.
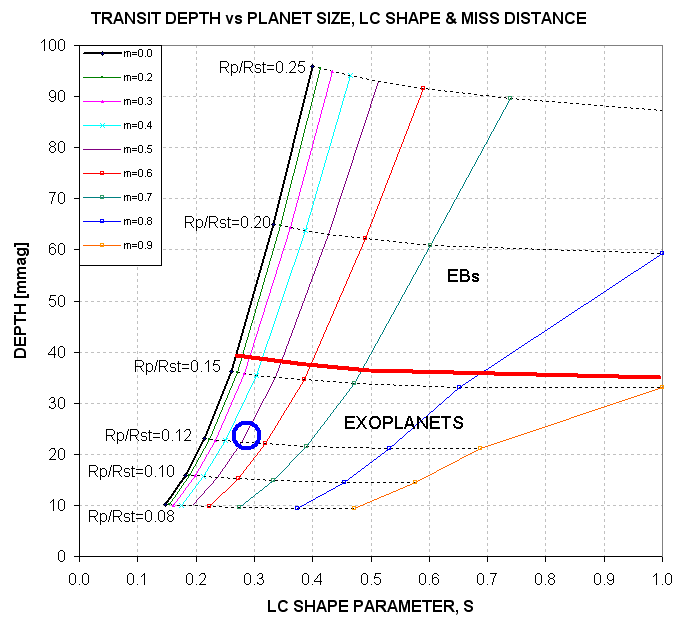
Figure D.15. Domains for
exoplanets and EBs for independent variables S and D with
a "threshold secondary" Rp/Rstr domain separator (thick red trace) at Rp/Rstr
= 0.16, corresponding to B-V = 0.66. The blue circle corresponds to the
S and D location for XO-1.
From this graph it is immediately apparent that, subject to the assumptions
of the model, XO-1 is an exoplanet instead of an EB. This conclusion does
not require solving the LC for Rp/Rstr, as described in Section 1. Indeed,
this graph gives an approximate solution for miss distance, m = 0.5 (not
as accurate as the solution in Section 1, but somewhat useful).
Here's a handy plot showing "threshold secondary" boundaries for other
B-V values.
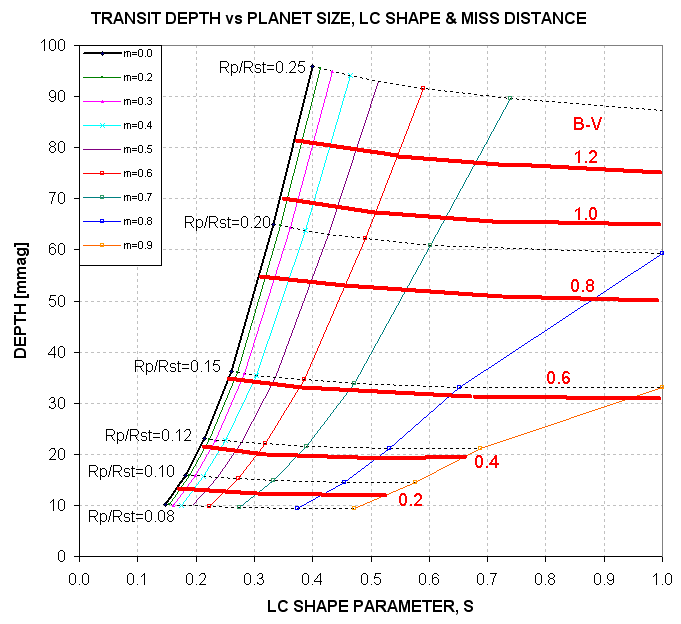
Figure D.16. The thick red
traces are "secondary threshold" boundaries, labeled with the B-V color
of the star, above which is the EB realm and below which is the exoplanet
realm.
This figure allows a quick assessment of a LC's association with an exoplanet
versus an EB. If the LC is an EB blend, such as the triplet case described
by Mandushev et al (2005), there may not be a "solution" using either the
above figure or the analysis of Section 1. To assist in evaluating this it
is helpful to have transit light curves for more than one filter band.
Again, this procedure
is only as good a guide as the underlying assumptions, the principal one
bring that the star undergoing transit is on the main sequence.
3.0 SUMMARY OF
TRANSIT LIGHT CURVE ANALYSIS
Much of the preceding
was meant to show the underlying concepts for quickly evaluating a transit
LC. It may have given an unfair impression of the complications involved.
This section will skip the explanations for "why" and just present a sequence
of what to do, like a cookbook. The figures needed by these steps are repeated
after the instructions.
1) Determine the
candidate star's B-V (OK to derive it from J-K)
2) Use the measured LC to determine transit depth, D, and shape parameter,
S
2) Using D and P to determine if the LC is likely to be an exoplanet,
or EB, or neither (cf. Fig. D.17)
3) If the LC is for an EB, no more analysis is needed. If it's an exoplanet,
then proceed
4) Use the Excel spreadsheet (link below) to convert B-V, D, L and filter
band to Rp/Rj and miss distance,
OR, do it manually by following
the steps below...
4) Determine the star's radius, Rstr, and mass, Mstr, from B-V (cf.
Fig. D.18)
5) Calculate 1st iteration of Rp/Rj, using following equation:
Secondary size, Rp/Rj = 9.73 × Rstr × SQRT
[1 - 10 ^ (-D/2500)]
6) Calculate secondary's orbital velocity, central transit length
and miss distance using these equations:
Planet orbital radius, a = 1.496e8 × [Mstr1/3 × (P / 365.25)2/3], where P[days],
Mstr[sun's mass] & a[km]
Transit length maximum, Lx = (Rstr ×
Rsun + Rp/Rj × Rj) / ( π a / 24 × P) where
Rsun = 6.955e5 km, Rj = 7.1492e4 km
Miss distance,
m = SQRT [1 - (L / Lx)2]
7) Using the miss distance and filter band, determine limb darkening
effect, LDe (cf. Fig. D.19)
8) Convert the measured transit depth D to a value that would have been
measured if there were no limb darkening, using the following eq:
D' = D / LDe
9) Repeat steps 5, 6 and 7 using D' instead of D.
10) If step 7 LDe is the same as the 1st time, then there's no need
for additional iterations. The last calculated Rp/Rj is the answer. Otherwise,
repeat steps 5-8 until a stable solution emerges.
Figure
D.17. If the D/S
location for the LC is above the red line corresponding to the star's B-V,
then it's probably an EB. If D/S is below then it's probably an exoplanet.
If it is to the left of the upward sloping trace (central transit), then
there's no solution, and you may be dealing with an EB blending or triple
star system.
Figure
D.18. Star's radius
and mass from B-V.
Figure
D.19. Limb darkening
effect, LDe, versus transit miss distance and filter band.
This completes the summary of what is done to assess a transit LC to
determine if it's due to an exoplanet or EB, and if it's an exoplanet to
determine its size. The purpose of this appendix has been to demonstrate
that a simple procedure can be used to guide the choice of survey candidates
for a night's observing in order to avoid spending time on unlikely (EB
blend) candidates.
4.0 EXCEL SPREADSHEET
Now that you
understand the concepts I can save you time by offering an Excel spreadsheet
that does most of what's described in this appendix. The user simply enters
light curve depth D, length L, and star color B-V in the appropriate cells
and the spreadsheet calculates a 3-iteration solution for Rp/Rj (provided
a solution exists). Here's the link for the Excel spreadsheet that does
everything described in Section 1: http://brucegary.net/book_EOA/xls.htm
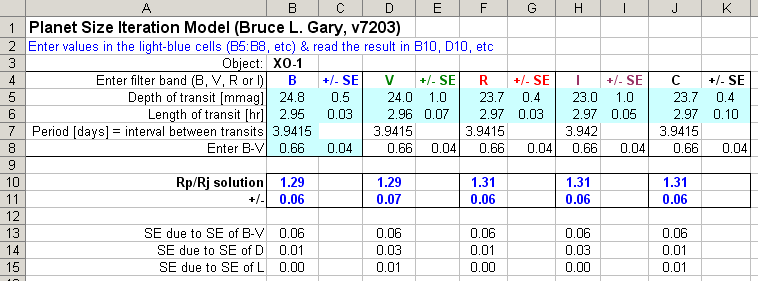
Figure
D.20. Example of the Excel spreadsheet
with XO-1 entries for several filter bands (B5:C8 for B-band, etc) and the
Rp/Rj solution (B10:B11 for B, etc).
The line for
SE of "Rp/Rj solution" is based on changes in D, L and B-V using their
respective SE. In this example note that the Rp/Rj solutions for all bands
are about the same, 1.30. This provides a good "reality check" on data
quality as well as the limb darkening model. Rows 13-15 show the SE on Rp/Rj
due to the SE on B-V, D and L separately. The largest component of uncertainty
comes from B-V. Even if B-V were known exactly there's an uncertainty in
converting it to star radius and mass, given that the "main sequence" of
the HR diagram consists of a spread of star locations and there's a corresponding
spread in the relationship between radius versus B-V and mass versus B-V.
A future version
of this spreadsheet will include a section for the user to enter a transit
shape parameter value, S, and an answer cell will show the likelihood
of S/D being associated with an exoplanet versus an EB. I also plan on
expanding the limb darkening model to take into account limb darkening
dependence on star color.
APPENDIX E – Measuring
CCD Linearity
The maximum ADU
counts that can be read out of a 16-bit CCD is 65,535. It is commonly understood
that you shouldn’t trust readings greater than about half this value, ~35,000
counts, due to something called “non-linearity.” Whereas you can trust
ratios of star fluxes when none of them have maximum counts, Cx, greater
than 35,000, when one of them has a Cx >35,000 it’s measured flux is
probably smaller than it should be. Only for a hypothetical CCD that is
linear all the way to 65,535 counts can you trust star fluxes with Cx values
in the range ~35,000 to 65,534 counts.
Don’t believe this!
I was pleasantly surprised with a measurement showing that my CCD is linear
all the way to ~59,000 counts! The implications for knowing this are significant.
If it’s true that you can safely use the longer exposure times corresponding
to Cx as high as ~59,000 counts, for example, then your observing will
be more efficient (less time spent downloading images), your scintillation
and Poisson noise will be lower (by up to ~40% for each image), and the
importance of readout noise will be less.
I’ll review the
cautious reasoning that continues to lead CCD users to be wary of high
Cx. Then I’ll illustrate how to measure your CCD’s linearity safety zone.
Cautious Conventional
Wisdom
Each pixel is capable
of “holding” an approximate total number of photoelectrons. The term “full
well capacity” is used loosely to refer to that number. However, we must
make a distinction between “full well capacity” and “linear full well capacity.”
A user’s manual
may state that your model of CCD has a “full well capacity” of 100,000
electrons, for example. That’s what the SBIG manual states for my ST-8.
The manual also states that my CCD’s “gain” is set so that each count represents
2.3 electrons. According to these two numbers “the well is full” at ~43,500
counts (100,000 electrons / 2.3 electrons per count). Since my CCD can produce
higher counts I assume that SBIG’s term “full well capacity” was a conservative
way of saying that a pixel fills at a linear rate up to 100,000 electrons
then becomes non-linear as it continues to fill further. In other words,
I assumed the manual meant to say that my CCD’s “linear full well capacity” was ~100,000 electrons. This would
imply that my CCD might be linear up to ~43,500 counts, but I remained cautious
for a long time by keeping exposures short enough that stars to be used photometrically
had Cx less than ~35,000 counts. The fact that stars would produce Cx all
the way up to digital saturation (65,535 counts) means that my CCD’s silicon
crystal pixels must be capable of holding at least 150,000 electrons at
readout time (65,535 × 2.3).
For a long time
I neglected to measure my CCD’s linearity thinking that all the specifications
in the manual were compatible with the common wisdom of keeping Cx below
about half scale in order to avoid non-linearity problems. I also postponed
measuring linearity in the belief that it would be difficult. It isn’t,
and it can be fun, especially if you learn good things about your CCD.
The following methods
are presented in a way that hopefully illustrates properties of CCDs and
ways to explore these properties from special observations and analysis.
Once this understanding has been accomplished subsequent measurements of
linearity will be almost effortless.
Twilight Sky Flats
Method
The simplest way
to determine how high Cx can be while still being within the linear region
is to expose a series of twilight sky flats using exposure times that produce
maximum counts, Cx, that span the entire region of interest: 30 to 65 kct
(kct = kilo-counts = 1000 counts). Any filter will work, but you’ll have
a “stronger” result by using the filter that has the worst vignetting. For me, the I-band filter is slightly
worse than the others, with a faintest area to brightest area ratio = 0.79.
It’s not necessary to do this for other filters since one photoelectron
is the same as another from the standpoint of silicon crystals in the CCD.
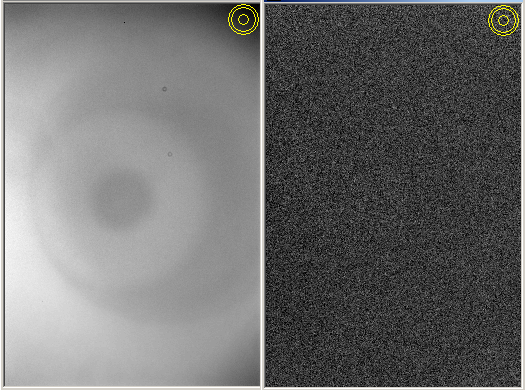
Figure E.01. I-band
flat field with Cx = 62 kct before and after calibration using a 34 kct
Cx flat frame. The faintest area (upper-right) to brightest have a “vignette
range” of 21% and 0.2%, implying that the flat field response was reduced
100-fold, to acceptable levels. The CCD appears to be “linear” even for
ADU values as high as 62 kct!
Average the images with Cx between 25 and 35 kct, which everyone will
accept as being free of linearity problems. Call this a master flat for
use with the brighter flat fields. Let’s define “vignette range” to be a
percentage version of the faintest to brightest area of the linear master
flat. For example, my I-band “vignette range” is 21 % (i.e., faintest to
brightest counts = 0.79).
Next, divide a
bright flat by the master flat. This can be done by treating the bright flat
as a light frame that must be calibrated using the master flat field. (I’m
assuming all flats were made using a dark frame at the time of exposure.)
After calibrating
all bright flat fields using the ~30 kct master flat you are ready to evaluate
linearity for each. Measure the average counts for the regions that were
faintest and brightest and express their ratio as a percentage. For example,
after calibrating my I-band flat that had Cx = 62 kct I measured the same
areas that were faintest and brightest in the master flat (also the same
areas that were faintest and brightest in the Cx = 62 kct before calibration),
and got a “vignette range” of 0.21 %. In other words, the “vignette range”
went from 21% to 0.21% simply by calibrating using the master flat field.
That’s a 100-fold improvement, and any flat with residual errors of 0.2%
is good! Flat field errors may be present in both flat fields, so it cannot
be concluded that both flats are good to 0.2%. The result we’re after, however,
is that a flat field with counts as high as 62,000 has the same brightness
distribution as the ones having a maximum count of ~35,000 counts. This can
be interpreted to mean that my CCD is linear all the way up to
~62,000 counts!
I performed the
same analyses using 4 other filters, and they all gave the same result.
The only problem encountered with flats having Cx >55 kct was the appearance
of hot pixels at three locations (with cold pixels nearby).
Star Flux Ratio
versus Maximum Counts Method
This method will
involve more analysis, but it will provide more information about how your
CCD responds to too much light.
The method involves
taking images of two stars in the same FOV with several exposure times.
The two stars should have a flux ratio of about 2:1 (magnitude difference
~0.75). Be sure the stars are near zenith; otherwise you’ll have to correct
for extinction.
The shortest exposure
time should be whatever produces Cx ~10 to 20 kct for the brightest star.
I’ll illustrate this method using a pair of stars near NGC 5371 with V-magnitudes
~9.0 and 9.7. My exposure sequence ranged from 5 to 40 seconds.
Figure E.02 is
a plot of Cx versus exposure time for the bright star.
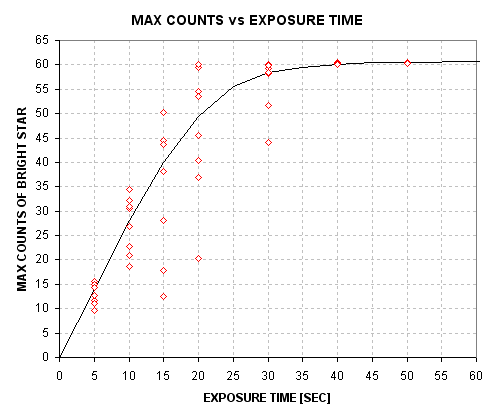
Figure E.02. Maximum
counts versus exposure time for the brighter of two stars.
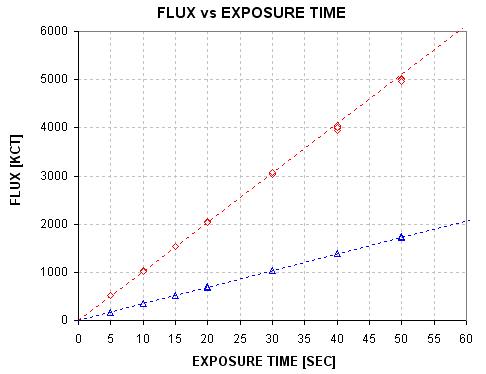
Figure E.03. Flux
versus exposure time for two stars.
There are two things to notice about Fig. E.02. First, typical Cx flux
values increase with exposure time until a “saturation” value of ~60 kct
is reached. Second, for each exposure time below “saturation” Cx flux values
have a large scatter. The scatter is produced by changes in seeing (or auto-guiding
quality). This will be described later.
Figure E.03 plots
star flux versus exposure time for both stars. The brighter star shows
evidence of “falling below” the fitted line for exposure times 40 and 50
seconds. The fainter star agrees with its fit for all exposures. The reasons
for this will become apparent shortly.
The ratio of the
two star fluxes is plotted in Fig. E.04.
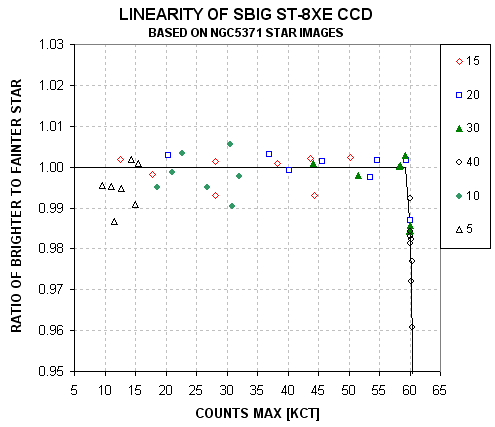
Figure E.04. Ratio
of star fluxes (bright divided by faint) versus Cx. The ratio is normalized
so that the average unsaturated value is 1.00. The legend shows the association
of plotted symbols with exposure time.
When Cx for the
bright star exceeds ~59 kct it becomes fainter than would be expected from
images having lower Cx values. This suggests that photoelectrons may be
“lost” when a pixel accumulates more electrons than a saturation value corresponding
to 59 kct for this CCD. This result is what we’re after:
The
CCD is linear for stars having Cx < 59 kct!
This conclusion
is based on star ratios. Let’s see if we can come to the same conclusion
using fluxes from just one star. Figure E.05 plots flux rate versus Cs;
“flux rate” is defined as flux divided by exposure time.
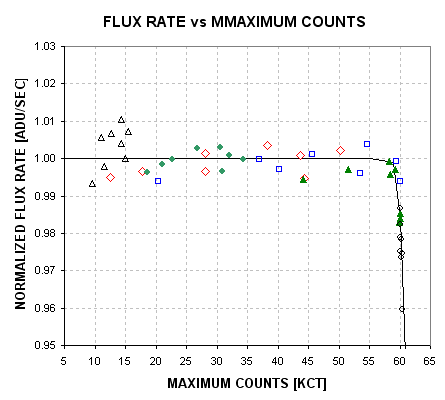
Figure E.05. Flux
rate (normalized to 1.00 for unsaturated values) versus Cx, using the brighter
star.
As before, “flux
rate” versus Cx suggests that the CCD is linear for Cx < 59 kct. The
RMS scatter for most of the unsaturated data is ~1/3 %.
Figure E.03 suggests
that the faint star is never “saturated” for the images under consideration.
Therefore, the FWHM ratio for all images should reveal anomalous behavior
for just the bright star. Figure E.06 is a plot of FWHM for the bright
star divided by FWHM for the faint star.
When the bright
star saturates its FWHM increases. This is what would be expected if the
Gaussian shaped point-spread-function becomes “flat topped” when saturation
occurs. Another way of showing this is to plot FWHM for the bright star
versus FWHM for the faint star, which is shown as Fig. E.07. When both stars
are unsaturated the two FWHM values are within the “box” area. Within this
box both FWHM variations are correlated, suggesting that either “seeing”
or autoguiding varied and affected both stars in a similar way.
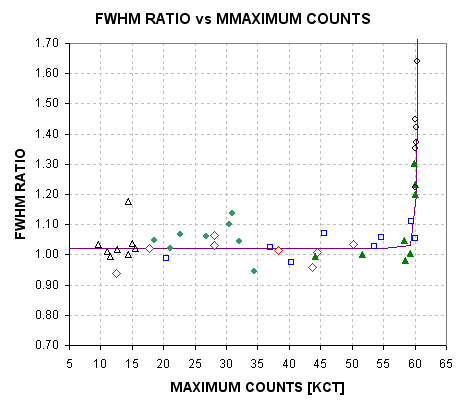
Figure E.06. FWHM
for bright star divided by FWHM for faint star, versus Cx for the bright
star.
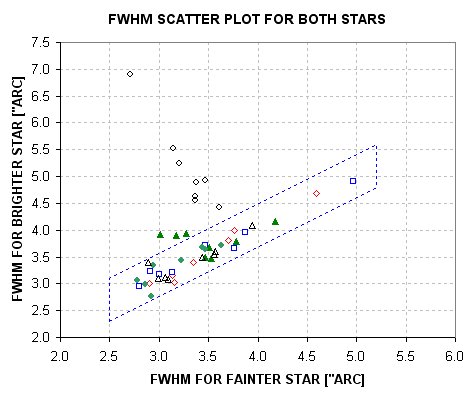
Figure E.07. FWHM
for bright star versus FWHM for faint star. The box identifies the situation
of unsaturated stars.
Whenever a star is unsaturated, established here by the condition Cx <
59 kct, the following simple relationship should exist: Cx = const / FWHM2. As FWHM decreases
Cx will increase in order for flux to remain the same. The next figure
shows agreement with this theoretical relation; it also shows how Cx saturates
when FWHM decreases below a specific value (different for each exposure
time).
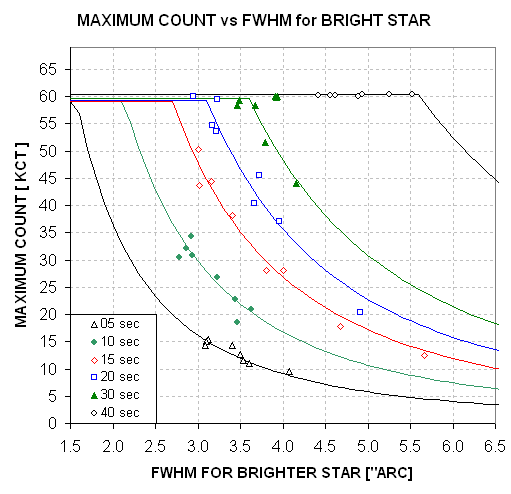
Figure E.08. Cx
versus FWHM for the bright star for a selection of exposure times (color
coded with exposure times given by the legend). Model fits are explained
in the text.
This plot demonstrates
that the brightest pixel for a star will increase until the pixel’s “well
is full.” For this CCD “fullness” occurs when 159,300 electrons have accumulated
(59,000 × 2.7 electrons per ADU, where 2.7 electrons per ADU is the
“gain” I measured from the same images). But what happens to photoelectrons
that are added after the pixel’s well is full? In theory these additional
electrons could simply migrate to nearby pixels and still be counted when
the photometry measurement is made. To investigate this we need to see how
flux ratio varies with exposure time.
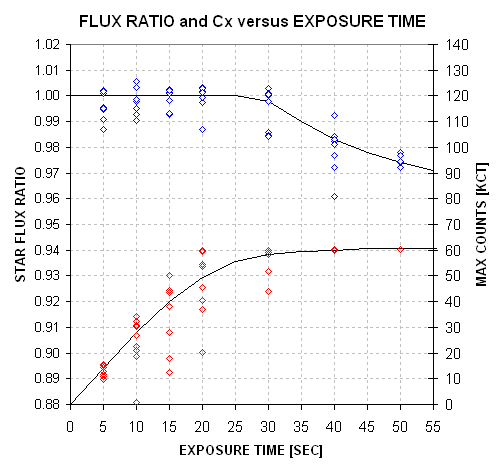
Figure E.09. Star
flux ratio (blue) and bright star’s Cx (red) versus exposure time.
When exposure time
is 50 seconds the bright star is “saturated” in every image; nevertheless,
the ratio of fluxes is affected only slightly! This means that after a
pixel’s well fills additional electrons migrate to nearby pixels, and only
a small percentage are “lost.” If linearity is defined as <2% departure
from linear then this CCD is linear even for conditions associated with
the longest exposure images of this analysis. Figure E.10 is a point-spread-function
cross-section of the bright star that is saturated in a 50-second exposure.
Even this star’s image produces a flux that is low by only 2%.
The statement that
the CCD is linear whenever Cx <59 kct is conservative, since saturation
above this value may depart from linear by only a small amount.
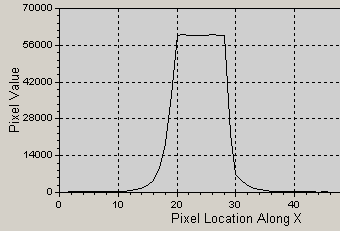
Figure E.10. PSF
of a saturated star (the bright star) with Cx = 60.3 in a 50-second exposure.
The flux of this star is only ~2% low compared with an extrapolation of
what it should be based on measurements with the CCD in the linear region.
Conclusion
I conclude that
flux measurements with this CCD are “linear” to ~1/3 % for all Cx up to
59,000 counts. For a CCD gain of 2.7 electrons/ADU, the 59,000 counts corresponds
to ~159,000 electrons. The measurements reported here therefore show that
my CCD has a “linear full well capacity” of ~159,000 electrons. This is
more than the “full well capacity” of 100,000 electrons listed in the manual,
which shows that SBIG was being conservative in describing this CCD model.
The various methods
for assessing non-linearity can be summarized:
1. Flat field method
safe to 62 kct
2. Two Star
flux ratio vs Cx
safe to 59 kct
3. Star flux rate vs Cx
safe to 59 kct
In no instance
is there evidence to support the “common wisdom” that to avoid non-linearity
effects it is necessary to keep Cx < 35 kct.
Each observer will
want to measure their CCD linearity in ways that reveal safe Cx limits.
The payoffs are significant. By adopting higher Cx limits longer exposures
are permissible, and this reduces scintillation per image, it reduces Poisson
noise per image, it reduces the importance of read noise and it improves
“information rate” (due to smaller losses to image download time).
APPENDIX F – Measuring
CCD Gain
Steve Howell’s
book Handbook of CCD Astronomy (2000) presents a way to measure
CCD gain using only bias frames and flat frames. I’ll embellish his description
in ways that could be helpful for typical amateur hardware.
I suggest making
3 pairs of bias frames, and 3 pairs of flat frames in quick succession.
(Only one pair of each is needed to get one gain measurement, but 3 pairs
allows for a way to estimate the accuracy of the result.) Crop all of them
the same way to preserve the flattest part of the flat field. Cropping may
also be influenced by the desire to avoid known bad pixels.
Sum and difference
each pair, calling the sums Bs and Fs and calling the differences Bd and
Fd (where B denotes bias frames and F denotes flat field frames). In performing
a difference be sure to specify that the image processing program adds
a fixed amount of counts to all pixels (such as 100 counts); if you don’t
do this about half the pixels will be zero and this will ruin the SE calculation.
In performing a difference between flats subtract the lower value flat
from the higher value flat (to assure that all pixel values are above zero).
Check the “minimum” value to be sure it’s not zero; if it is, then repeat
the image subtraction with the specification that a fixed level be added
to all pixels. Read the standard deviation of the difference images and
call them SEb and SEf. With this nomenclature, each pair can be used to
calculate CCD gain according to the following formula:
G
= ( Fs – Bs ) / ( SEf 2–
SEb 2 )
Where (repeating)
Fs is the average level of the sum of two flat fields, Bs is the average
level of the sum of two bias frames, SEf is the SE of the difference between
the same two flat fields and SEb is the SE of the difference between two
bias frames.
As a bonus “read
noise” can be calculated from:
Read Noise = G
× SEb / sqrt(2)
Maybe you’d like
some values to compare with. When I did this for my 5-year old SBIG ST-8XE,
using cropped versions of the middle ~50% area, I get the following:
Fs avg = 85328, 89173, 95628
Bs avg = 213, 209, 213
Fd SE = 177.43, 181.35, 185.49
Bd SE = 9.80, 9.79, 9.77
The first group
gives G = (85328 – 213) / (177.432 – 9.802) = 2.71
electrons/ADU. Groups 2 and 3 give G = 2.71 and 2.78 electrons/ADU. The
average of these 3 determinations is 2.73 ± 0.03 electron/ADU, which
is the best estimate of gain with this simple pairing. For greater accuracy
other pair combinations can be used, and other flat field and bias field
images can be added to the analysis.
Calculating read
noise:
Read Noise = 2.73 × 9.80 / sqrt(2) = 18.9 electrons for the
first group.
The other two groups
give 18.8 and 19.2, for a best estimate Read Noise = 18.9 ± 0.2
electrons. The SBIG manual states that read noise is approximately 15 electrons.
It’s possible my CCD has “aged.” But read noise is usually not an important
contributor to total error so the 19 electrons versus 15 electrons read
noise won’t matter. This accuracy is more than adequate for error budget
calculations.
APPENDIX G – Plotting
Light Curve Data
This appendix has
two parts. The first part is about combining noisy data and a warning about
plotting “running averages.” The second part is a “rant” about error bars.
Combining Noisy
Data
When you have a
data set of, let's say 45 images, and they have noise greater than the
signal you're looking for, it is perfectly good practice to divide the
individual measurements into groups for either averaging or median combining
(MC) for larger symbol over-plotting. For example, with 45 measurements
you could group them into 5 groups, consisting of 9 individual data values
in each group, and perform the average (or MC) on each of these groups.
The new set of data is an alternative representation of the original group
of noisy data, provided the only signal present is not under-sampled by
use of the group data version (i.e., provided the signal changes slowly
compared with the group sampled data). Each of the 5 new data points is
independent of the others, in the sense that an individual datum from the
original 45 contributes to only one of the 5 new data points. The new data
will exhibit an RMS that is 1/3 of the original 45-data RMS. In terms of
"information theory" this is equivalent to a hypothetical observation in
which the exposure time for each observation was 9 times longer (during
the same observing interval only 5 of these longer exposures are acquired).
Now, consider a running average representation of the same 45 data points.
This is usually accomplished by averaging an odd number of original data
values at each data location. For example, Doing this would produce as many
as 45 new data points in which each new data is an average of the original
data value at the location of interest. If a 9-point group average were
used for each of the 45 running average points then it can also be stated
that the new data will exhibit an RMS that is 1/3 of the original 45-data
RMS. However, the new set of 45 points is not equivalent to 45 measurements
with 9-times longer exposure, since each of the original measurements contributes
to 9 of the new group average data. Information theory states that there
is no additional "information" in this more densely plotted representation
of averages compared to the non-overlapping group averages of the previous
paragraph. The "eye" perceives the two group average representations differently.
The running average representation gives a false impression of good precision
since each data point is close to its neighbor. Too much credibility is
given to variations that have their origin in a single noisy datum. Plotting
a running average with symbols is therefore misleading. For these reasons
the only correct way to plot a running average is with a trace - either a
solid line trace or a dotted or dashed line trace. This removes the false
impression of good precision that is not present. Only the non-overlapping
group averages chould be plotted with symbols.
GLOSSARY
2MASS: Two
Micron All-Sky Survey; a catalog of point sources (stars) and extended
sources (galaxies) covering the entire sky using filters J, H and K. Of
the 2.1 billion sources, more than 500 million are stars. J and K magnitudes
can be converted to B, V, Rc and Ic magnitudes for most sources. Therefore,
J-K star colors can be converted to B-V and V-R star colors, which is useful
since all stars that amateurs will want to use for reference are in the
2MASS catalog.
air mass: Ratio of number
of molecules of air intercepted by a unit column traversing the atmosphere
at a specified elevation angle compared with a zenith traverse. An approximate
formula for air mass is secant (zenith angle), or 1 / sine (elevation angle).
Because of the Earth’s “curvature” the maximum air mass for dry air is ~29
(tabulations are available). To the extent that dust and water vapor contribute
to line-of-sight extinction the above formulae are a better approximation
than air mass tables, since the scale height for dust and water vapor is
much smaller in relation to the Earth’s radius than the scale height for
dry air.
all-sky photometry: Use of a telescope
system for transferring standard star magnitudes (such as Landolt stars)
to stars in another region of the sky with allowance for differences in
atmospheric extinction. c.f. photometry
ADU: Analog-to-digital
unit, also called a “data number” and “count,” is a number read from each
pixel of a CCD camera (using an analog-to-digital converter) that is proportional
to the number of electrons freed by photons (photoelectrons) at that pixel
location. The ADU count is the number of photoelectrons divided by a constant
of the CCD called “gain” (which is inversely proportional to an amplifier’s
gain).
artificial star: Replacement of
a pixel box (upper-left corner) with values that appear to be a star that
has a specific peak count (65,535) and Gaussian FWHM (such as 4.77 pixels).
The artificial star can be used with a set of images to monitor changes
in cloud losses, dew accumulation losses, as well as unwanted photometry
losses produced by image quality degradation.
aspect ratio: Ratio of a PSF’s
widest dimension to its narrowest, usually expressed as a percentage. Anything
below 10% is good (i.e, close to circular).
atmospheric seeing: Apparent width
(FWHM) of a star recorded on a CCD exposure using a telescope with good
optics and collimation and short exposures (0.1 to 1 second). “Seeing” (as
it is often referred to) will depend on exposure time and elevation angle.
Seeing FWHM increases approximately as a constant plus sqrt(g), where g
is exposure time. Seeing FWHM also increases with air mass as approximately
airmass1/3. Amateurs using CCDs usually say the seeing is good
when FWHM <3.0 ”arc. Professionals would say the seeing is good when
FWHM <1.0 ”arc. Seeing degradation is due mostly to ground-level temperature
inhomogeneities caused by wind-driven turbulence. The scale height for this
component of seeing degradation is ~7 meters. Other components of seeing
are at the top of the “planetary boundary layer” (~5000 feet), and tropopause
(25,000 to 55,000 feet).
binning: Combining of groups
of pixels, either 2x2 or 3x3, during the readout phase of collecting electrons
from pixels to an output register for the purpose of achieving faster image
downloads that have less readout noise, used when the loss of spatial resolution
is acceptable.
blackbody spectrum:
Plot of power (energy
per unit time) radiated by a 100% emissive material (such as an opaque gas)
per unit wavelength, versus wavelength. A version also exists using “power
per unit frequency.” A star’s atmosphere is 100% emissive (no reflections)
and radiates with an approximate blackbody spectrum. Narrow absorption
lines are produced by atoms and molecules at higher altitudes and cooler
temperatures; they absorb and re-emit at their cooler temperatures (in
accordance with a blackbody spectrum determined by their cooler temperature).
c.f. Fig. 14.05.
blue-blocking filter: A filter that
passes photons with wavelengths longer than ~490 nm. A BB-filter passes ~90%
of a typical star’s light and during moonlight it blocks most of the sky
background light coming from Rayleigh scattered moon light.
CFW: Color filter wheel.
check star: Another star in
the same set of images as the target star which is processed using the
same reference stars (reference stars are sometimes called “comparison”
stars for out-of-date reasons). Precision exoplanet photometry usually
does not make use of check stars because at the mmag level of precision
every star will have a unique dependence on air mass due to its color difference
with the reference stars. A check star can provide a false sense of security
that systematic errors are not present, or a false sense of alarm that systematics
are present. The use of check stars is left-over from variable star work,
where mmag systematics are unimportant.
clear filter: A filter that
passes most of the light within the wavelength region where CCD chips are
sensitive. A clear filter is used instead of no filter (unfiltered) in order
to achieve “parfocality” with the other filters (two filters are parfocal
when they require the same focus setting).
confusion: A technical term
referring to the presence of a background of faint stars (or radio sources)
that alter the measured brightness of an object. The only way to reduce
confusion is to improve spatial resolution. Wide-field exoplanet survey cameras
have a high level of confusion, leading to the need for amateurs to detect
EB blending situations.
CSV-file: Comma-separated-variable
file, in ASCII (text) format.
dark frame: CCD exposure taken
with the shutter closed. A “master dark frame” is a median combine of several
dark frames made with the same exposure and same temperature. (Master darks
taken at different temperatures and exposure times can be used for pretty
picture and variable star work.)
differential photometry:
Comparison of flux
of a target star to the flux of another star, called reference star, expressed
as a magnitude. “Ensemble differential photometry” is when more than one
reference star is used (either averaged, or median combined, or flux summed).
dust donut: Shadow pattern
of a speck of dust on either the CCD chip’s cover plate (small dust donuts)
or a filter surface (larger annular shadows). Flat frames correct for the
loss of sensitivity at dust donut locations at fixed locations on the CCD
pixel field.
eclipsing binary,
EB, EB blend: EB means eclipsing binary. EB blend is when an EB is close to a brighter
star that is mistaken by a wide-field survey camera for undergoing a possible
exoplanet transit because the fade amount is a much smaller fraction of
the light from the blend of stars in the survey camera’s aperture.
egress: Transit interval
when the smaller object is moving off the star and only part of the smaller
object’s projected solid angle is obscuring star light. Contact 3 to 4.
ensemble photometry: Use of 2 or more
reference stars in an image for determining a target star’s magnitude
exoplanet: Planet orbiting
another star. Also referred to as an extra-solar planet.
extinction, zenith
extinction, atmospheric extinction: Loss of light
due to the sum of Rayleigh and Mie scattering plus narrow line absorption;
usually expressed in terms of “magnitude per air mass.” An extinction curve
is a plot of the logarithm of measured star fluxes versus air mass (usually
magnitude, a base-10 logarithm times 2.5, versus air mass). A straight line
fit to these data has a slope corresponding to zenith extinction.
extra losses: Reductions of
a star’s flux level that are not accounted for by atmospheric extinction.
The most common origins for “extra losses” are clouds, dew accumulation on
the corrector lens, wind-driven telescope vibrations (smearing the PSF for
the affected images) and loss of focus (causing the signal aperture to capture
a smaller percentage of the entire star’s flux in the poorly focused images).
filter bands: Wavelength interval
with associated response function for the following commonly-used standards:
B-band, V-band, Rc-band, Ic-band, BB-band, J-band, H-band and K-band. CV-magnitude
begins with observations using a clear filter but with corrections designed
to produce a V-band equivalent (usually with star color corrections). CR-magnitude
is like CV except the goal is an R-band magnitude. BBR-magnitude uses a
blue-blocking filter (BB-filter) and is adjusted to simulate R-band magnitude.
flat frame: CCD exposure made
of a spatially uniform light source, such as the
dawn or dusk sky, often with a diffuser covering the aperture. Flat frames
can be made of an illuminated white board, or made pointed at the inside
of a dome (“dome flat”). Several flat frame exposures are combined to produce
a “master flat.” A master flat is used to correct for vignetting, dust
donuts and small pixel-specific differences in bias and sensitivity (QE).
flux: Star flux is defined
to be the sum of all counts that can be attributed to a star based on differences
with a sky background level that is calculated from the counts in a sky
reference annulus.
FOV: Field-of-view
FWHM: Full-width at half-maximum,
describing the angular size of the distribution of light on a CCD produced
by a point source, i.e., star. c.f. aspect ratio.
gain: For a CCD the term
“gain” is the number of photoelectrons required to produce a change of one
ADU. Gain can be measured by noting RMS for a subframe of two flat fields
subtracted (similar levels) and RMS for the same subframe of two bias frames
subtracted. Gain = (Sum of median counts for the flats – sum of median
counts for the bias frames) / (RMS for flats ^2 + RMS for bias ^2). c.f.
Appendix F.
information rate: Reciprocal of
the time it takes to achieve a specified SNR for a specified target star.
Alternative observing strategies, as well as alternative telescope configurations
(or different telescopes), can be judged using “information rate” as a figure
of merit.
ingress: Transit interval
when the smaller object appears to move onto the star and only part of
the smaller object’s projected solid angle is obscuring star light. Contact
1 to 2.
image rotation: Rotation of the
star field with respect to the pixel field during a single observing session;
caused by an error in the mount’s polar alignment. The “center” for image
rotation will be the star used for autoguiding.
image stabilizer: Mirror assembly
that tips and tilts under motor control at a fast rate (typically 5 to
10 Hz) using an autoguide star. It is used to minimize atmospheric seeing
movements of a star field. When the star field drifts close to the mirror
motion limit a command is issued to the telescope mount motors to nudge
the star field back to within the mirror’s range. SBIG makes a good image
stabilizer, the AO-7 for regular size CCD chips and the AO-L for large
format CCD chips.
impact parameter:
“Distance from
star center to the transit chord” divided by the star’s radius. An impact
parameter of zero is a central transit.
JD and HJD: Julian Date and
Heliocentric Julian Date. JD is the time of an event as recorded at the
Earth (center). HJD is the time of an event if it were recorded at the center
of the solar system. The two vary throughout the year depending on RA/Dec
and time of year, but the difference is always < 8.4 minutes.
length of transit: Interval between
contact 1 and contact 4. Survey camera lengths may resemble something intermediate
between this and the time between contact 2 and 3, due to insufficient SNR.
light curve: Plot of brightness
of a star versus time during a single observing session. Abbreviated LC,
it is usually representing brightness in terms of magnitude, with increasing
magnitude plotted in a downward direction. LCs may be embellished with marks
for predicted ingress and egress, or model fits meant to guide the eye
to what the observer believes the measurements should convey.
limb darkening: Stellar brightness
distribution for a specific wavelength (filter band) expressed as 1.00 at
the star center and decreasing toward the edge (caused by star light close
to the limb being emitted from higher and cooler altitudes of the stellar
atmosphere). An alternative representation is to normalize to the disk average
brightness. Two or three constants are sufficient to represent these shapes.
Limb darkening functions vary with spectral type.
linearity: The property of
a CCD’s readout (ADU counts) being proportional to the accumulated number
of photoelectrons in a pixel. A CCD may be linear for readings from zero
to ~90% of the maximum reading possible (i.e., ~0.90 × 65,535 = ~59,000
counts). Linearity and saturation have different meanings but are commonly
used interchangeably.
magnitude: Ratio of star
fluxes converted to a logarithm. Magnitude differences are calculated using
the formula: dM = 2.5 × LOG10 (Si / So ), where Si is the
flux of star “i” and So is the flux of star “o”. Flux ratio can be calculated
from magnitude differences using the following: Si / So = 2.512 dM
. A mmag = milli-magnitude = magnitude / 1000.
median combine: Finding the middle
value in a set of values arranged by value. The median combine process is
relatively unaffected by an occasional outlier value whereas averaging is
vulnerable to outlier corruption. The standard error uncertainty of a median
combine is ~15% greater than the SE of an average, provided all data are
belong to a Gaussian distribution (i.e., outliers are not present). A median
combine can be performed on a group of images as well as single set of values,
since a group of images is just a set of values for each pixel location.
MDL: MaxIm DL, Diffraction
Limited’s program for control of telescope, CCD, image stabilizer, focuser,
and also image processing with photometry analysis.
Mie scattering: Aerosols (airborne
dust) with a circumference greater than the wavelength of light produces
Mie scattering. Mie scattering theory actually encompasses all wavelength
to circumference ratios, but in common parlance Mie scattering refers to
the situation where the wavelength is slightly longer than the circumference.
Much longer wavelengths are trivial to treat as mere blocking of light.
Rayleigh scattering is a subset of Mie scattering theory reserved for the
case of wavelength much smaller than aerosol (or molecule) circumference.
non-linearity: The property of
a CCD’s readouts (ADU counts) failing to be proportional to the accumulated
number of photoelectrons within a pixel when the number of photoelectrons
exceeds a “linear full well capacity.” See also “linearity.”
occultation: Orbital motion
of a larger object in front of a smaller one, possibly obscuring some of
the light from the smaller object. c.f. transit.
OOT: Out-of-transit
portions of a light curve. OOT data can used to assess the presence and
magnitude of systematic errors produced by image rotation and color differences
between the target star and reference stars.
photoelectron: Electron released
from a CCD’s silicon crystal by absorption of a photon. One photon releases
exactly one electron.
photometric sky: Weather conditions
that are cloudless and calm (no more than a very light breeze), and no
discernible haze due to dust.
photometry: Art of measuring
the brightness of one star in relation to either another one or a standard
set of stars (photometric standards, such as the Landolt stars). Brightness
is often loosely defined, but in this case it can be thought of as meaning
the rate of energy flow through a unit surface, normal to the direction
to the star, caused by a flow of photons incident upon a telescope aperture.
c.f. all-sky photometry.
photometry aperture
and circles: A circular “signal
aperture” within which a star to be measured is placed, specified by a
radius [pixels], surrounded by a gap with a specified pixel width, surrounded
by a sky background annulus. An aperture configuration is specified by
3 numbers (the 3 radii). Some photometry programs do not have a gap capability.
plate scale: Also referred
to as “image scale,” is the conversion constant for pixels to ”arc on the
sky. PS [”arc/pixel] = 206.265 × pixel width [nm] / EFL [mm]
point-spread-function,
PSF: Shape of light
intensity versus projected location on sky (or location on the CCD chip)
by a point source (star), with widths described by FWHM and aspect ratio.
Poisson noise: Subset of stochastic
noise pertaining to the case in which a discrete number of “random” events
occur during a specified time originating from a “source” that is assumed
to be at a constant level of activity during the measurement interval.
The “Poisson process” is a mathematical treatment whose most relevant statement
for photometry is that when a large number of events are measured, n, the
SE uncertainty on the measured number is sqrt(n). cf. stochastic noise
precision: The internal consistency
among measurements in an observing session. All such measurements may share
systematic errors, which are unimportant for the task of detecting transit
features. Precision is affected almost entirely by stochastic processes.
Accuracy is different from precision; accuracy is the orthogonal sum of
precision and estimated systematic errors.
Rayleigh scattering: Atmospheric molecular
interactions with light waves that bend the path of the wave front and therefore
change the direction of travel of the associated “photon.” This is what
makes the sky blue. c.f. Mie scattering
read noise: The RMS noise
produced by the process of reading a pixel’s accumulation of photoelectrons
at completion of an exposure. Read noise [counts] = RMS’ / sqrt(2), where
RMS’ is the counts “standard deviation” for an image produced by subtracting
two bias frames. Read noise for modern CCDs is so small that it can usually
be neglected when assessing error budgets. c.f. Appendix F.
reference star: A star in the
same image as the target star and check stars whose flux is used to form
ratios with the target and check stars for determining magnitude differences.
The purpose can be detection of image to image changes or simply an average
difference between a calibrated star and an uncalibrated or variable star.
This is called differential photometry when the reference star is another
star. When several reference stars are used it is called “ensemble photometry.”
When the reference star is an artificial star it is a special case of differential
photometry (without a name, as far as I know). The term “comparison star(s)”
is sometimes confused with reference star(s); this is a term left over from
the days when visual observers of variable stars used stars of similar magnitude
to “compare” with the target star.
residual image: When photoelectrons
remain in the silicon CCD elements after a read-out they may be included
in the next exposure’s read-out and can produce a faint residual “ghost
image” from the earlier image. This is more likely to occur after a long
exposure when bright stars are present that saturate some CCD elements,
causing photoelectrons to become more firmly attached to silicon impurities
than other electrons. The problem is most noticeable when the following
image is a dark frame; the problem is worse when the CCD is very cold.
saturation: Saturation can
refer to a pixel’s output exceeding it’s “linear full well capacity” with
an associated loss of proportionality between incident flux and CCD counts.
The ADU counts where this proportionality is lost is the linearity limit
(typically ~40,000 to 60,000 counts). Saturation can also refer to the accumulation
of so many photoelectrons that the analog-to-digital converter (A/D converter)
exceeds its capacity for representing an output value. For a 16-bit A/D
converter this version of saturation produces an ADU count of 65,535.
SBIG: Santa Barbara Instruments
Group, located in Goleta, CA (west of Santa Barbara; formerly located in
up-scale Montecito, east of Santa Barbara; and never located in Santa Barbara).
scintillation: Intensity fluctuations
of stars observed from the ground (caused by atmospheric temperature inhomogeneities
at the tropopause). Scintillation can vary by large amounts on minute time
scales (doubling), but time-average fluctuation levels are fairly predictable
using dependencies on air mass, site altitude, telescope aperture, wavelength
and exposure time.
sky background
level: Average counts
within the sky background annulus. Dark current is one contributor to background
level, and it increases with CCD temperature, doubling every ~4 degrees
Centigrade. Sky brightness is another contributor. A full moon will raise
sky brightness from ~21 magnitude per square ”arc to 17 or 18 magnitude square
”arc. The increase is more than 3 or 4 magnitudes in B-band, which is the
motivation for using a BB-filter when moon light is present.
SNR: signal-to-noise
ratio, the ratio of measured “flux” to SE uncertainty of that flux. For
bright stars SNR is affected by Poisson noise and scintillation, whereas
for faint ones the dominant components are thermal noise generated by the
CCD silicon crystals (“dark current”), electronic readout noise and sky
background brightness. SNR [mmag] = 1086 * SNR.
star color: Difference in
magnitude between a wavelength band and a longer one, such as B-V, V-R, or
J-K. They are correlated with each other for most stars.
stochastic error: Uncertainty due
to the measurement of something that is the result of physical events that
are too numerous and impractical to calculate (thermal noise) or beyond
present knowledge too understand because the physics of it hasn’t been discovered
(radioactive emissions), which nevertheless obey mathematical laws describing
the distribution of events per unit time. These mathematical laws allow
for the calculation of noise levels, or uncertainty for a specific measurement.
c.f. Poisson noise. Stochastic errors are different from systematic errors
in that stochastic SE can be reduced by taking more measurements with the
expectation that after N measurements SE = SEi / sqrt (N) (where SEi is
the SE of an individual measurement). Systematic errors are unaffected by
more measurements.
stray light: Light that does
not follow the designed (desired) optical path, as happens with reflection
of light from nearby bright stars (or moonlight) off internal structures,
which is registered by the CCD. Light that leaks through a housing joint
(CCD, or CFW, or AO-7, etc) and is reflected onto the CCD is stray light.
sub-frame: Rectangular area
of CCD, specified by the user, that is downloaded when fast downloads of
a smaller FOV are desired.
TheSky/Six: A good sky map
program (also referred to as a “planetarium program”) showing star locations
for any site location, any date and time, and any orientation (zenith up,
north up, etc). J, H and K magnitudes are shown for virtually every star
shown (plus V-magnitude estimates). Limiting magnitude is ~16 (V-mag). User
objects and telescope FOVs can be added to the catalog.
transit: Orbital motion
of a smaller object in front of a star that is larger, obscuring some of
the light from the star. c.f. occultation.
transit depth:
Magnitude difference
between the measured value at mid-transit and a model-predicted value at
the same time. In the absence of systematic errors affecting the shape
of the light curve (which often have a component of curvature correlated
with air mass and a trend correlated with time) the transit depth is simply
the difference between the average of the out-of-transit magnitudes and
the mid-transit value, which is what most observers do even when systematic
effects are present (unfortunately).
transit timing
analysis: Search for patterns
in a plot of mid-transit time minus predicted transit time versus date
using a fixed period (interval between transits). Anomalies that persist
for months before changing sign, with sign reversal periods of many months,
are predicted to occur if an Earth-mass exoplanet is present in an orbit
whose period is in a simple resonance with the transiting exoplanet’s period
(such as 2:1).
REFERENCES
Algol E, Steffen
J, Sari R et al (2005) MNRAS, 359, p 567.
Barnes JW and Fortney
JJ (2004) “Transit Detectability of Ring Systems around Extrasolr Giant
Planets” Astrophys. J., 616, 1193-1203.
Bissiner RB (2004)
“Detection of Possible Anomalies in the Transit Lightcurves of Exoplanet
TrES-1b Using a Distributed Observer Network”
Caldwell JAR, Cousins
AWJ, Ahlers CC et al (1993) “Statistical Relationships Between the Photometric
Colours of Common Types of Stars in the UBVRcIc, JHK and uvby Systems,”
South African Astronomical Observatory Circular #15.
Charbonneau D,
Brown T, Latham D et al (2000) “Detection of Planetary Transits Across a
Sun-like Star,” Astrophys. J., 529, pp L45-48.
Charbonneau D (2004) “Hubble’s View of Transiting Planets” eprint arXiv:astro-ph/0410674
Cox A, Editor (2000)
Allen’s Astrophysical Quantities, Fourth Edition, Springer-Verlag, New York.
Dravins D, Lennart
L, Mezey E et al (1998) “Atmospheric Intensity Scintillation of Stars.
III. Effects for Different Telescope Apertures,” PASP, 110, pp 610-633.
Gillion M, Pont
F, Demory B, et al (2007) “Detection of transits of the nearby hot Neptune
GJ 436 b”, arXiv:0705.2219v2
Holman MJ, and
Murray NW (2005) Science, 307, p 1288.
Howell SB (2000)
Handbook of CCD Astronomy, Cambridge University Press, Cambridge, UK.
Howell S (2002)
The Planetary Report, XXII, Nr. 4, July/August.
Kaye T, Vanaverbeke
S and Innis J, “High-prescision radial-velocity measurements with a small
telescope: Detection of the Tau Bootis exoplanet” (2006), J. Br. Astron.
Assoc., 116, 2.
Landolt AU (1992)
Astronom. J., 104, p 340.
Mandushev G, Guillermo
T, Latham D et al (2005) “The Challenge of Wide-Field Transit Surveys:
The Case of GSC 01944-02289,” Astroph. J., 621, pp 1061-1071.
McCullough PR,
Stys JE, Valenti JA et al (2006) "A Transiting Planet of a Sun-like Star",
Astrophys. J., 648, 2, pp 1228-1238.
Steffen J (2006)
“Detecting New Planets in Transiting Systems,” Doctoral Thesis, University of Washington.
Steffen JH asnd
Agol E, (2005) “An Analysis of the Transit Times of TrES-1b,” MNRAS, 364, L96.
Toon B and Pollack
J (1976) J. Appl. Met,.15.
Warner B and Harris
A (2007) “Asteroid Light Curve Work at The Palmer Divide Observatory,”
Minor Planet Bulletin, 34-4.
EXOPLANET OBSERVING FOR AMATEURS
As the number of known “bright transiting exoplanets” undergoes dramatic growth
so will the need for amateurs capable of measuring exoplanet transit light
curves. This book is meant to help the amateur with CCD experience produce
high precision light curves. It is conceivable that an amateur could discover
the presence of an Earth-like exoplanet in the same solar system as the
known transiting exoplanet. This could be done either by searching for small
anomalies in mid-transit times or by noting small brightness fades occurring
between the known transits.
The observing demands for
these searches are great, with precisions ~20 times better than for typical
variable star observing. However, with a telescope aperture of 10 inches
or more, a CCD, and lots of patience while learning observing and image analysis
skills, it’s possible for amateurs to make significant contributions to exoplanet
studies and possibly make that big discovery of an Earth-like exoplanet.
It’s ironic that amateur telescopes
are close to optimum for the task of measuring exoplanet light curves.
Large telescopes have field-of-view problems for being so small that too
few bright stars (with the right color) are available to serve as reference
stars. Although the optimum size telescope for exoplanet observing may have
an aperture between 20 and 40 inches, most exoplanets can be observed adequately
with apertures between 10 and 14 inches.
Every increment of improvement
requires a disproportionate amount of effort. This is especially true for
any user of amateur hardware. After all, professionals don’t have to worry about such
things as telescope tubes shrinking as the night cools, requiring frequent
focus adjustments, or image rotation due to imperfect polar alignment.
These hardware limitations, plus many others, mean that another amateur
is in the best position to help other amateurs.
This book gleans hard-earned
lessons from 5 years of floundering with exoplanet observing using several
amateur telescopes and many observing and analysis techniques. It promises
to smooth the transition to exoplanet observing for any amateur devoted
to the journey.
Reductionist Publications bgary1@cis-broadband.com
ISBN 978-0-9798446-3-8
2009.07.01