Bruce L. Gary, Hereford Arizona Observatory
Introduction
If every user of a Meade RCX400 telescope became as frustrated as I
did seeking guidance from the Meade RCX400 Instruction Manual, due
mostly to omissions, then this "User Tips" web page might reduce some
of the frustration. It is written by an amateur with no connection to
Meade, and it endeavors to provide a temporary solution to the need for
an updated, good quality Instruction Manual.
I assume that most owners of an RCX telescope are serious amateurs,
not the "eyepiece-using Wow!" kind. Therefore I assume that anyone
reading this web page has a CCD camera attached to their RCX. I will
further assume for some of the entries that the advanced user wants to
control the telescope and camera with their favorite software, which in
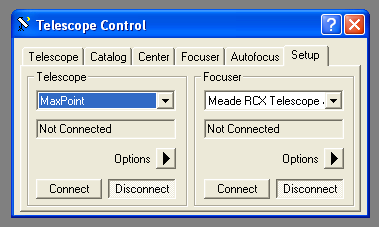
my case is MaxIm DL. This means they'll be using Ajai Sehgal's ACSOM
telescope driver, which is now available as a beta version 4.2.6. Ajai has
agreed to review those parts of my web page pertaining to the use of
his driver.
Some of the tips that follow are RCX telescope specific and will be
helpful to all users, while some are specific to the control of an RCX
with MaxIm DL. I'll even include a few items of possible general
interest for users of any good quality telescope. I'm open to requests
for the coverage of other
material.
Links internal to this web page
Point to a star near the meridian and celestial equator. Determine
whether it drifts in Dec to the north or south. If the star drifts
north your axis is west of true north and should be moved eastward
(turn the east knob clockwise).
Point to the east, about 20 degrees above the horizon, and again
determine if stars drift north or south. If the drift north then the
axis is pointed above the true celestial pole, so you have to lower it
(???). As an alternative you can look west and reverse the response to
drift direction.
Using an eyepiece can yield accuracies of ~0.5 degree. Using a CCD
camera can lead to 0.1 degree accuracy or better. CCD images can
readily be converted to quantitative drift rate measurements; this
assumes you know the CCD's "plate scale" ["arc/pixel]. For example,
looking east with a drift rate of +15 "arc/minute means you have a 1
degree error in axis tilt to correct. I use a digital inclinometer to
make the appropriate adjustment, which removes some of the trial and
error tedium of the process.
Assuming, again, that you have a wedge or super-wedge, the easiest
way to achieve a star alignment is to perform what the Meade manual
calls a "Polar Align" (described in an appendix, as if most owners of
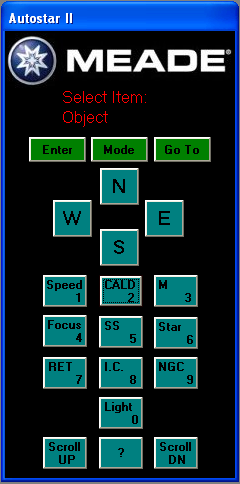
the RCX will be alt-az users; this baffles me). Using the hand
controller manually slew to the meridian, then slew north to
approximately the north celestial pole. Navigate the menu structure to Setup/Align/OneStar and press Enter. Wait for the silly searching for Polaris and when it asks you to adjust the mount ignore that instruction and simply press Enter.
We're "humoring" the Autostar program because we know better; we know
that our mount has been adjusted to within 0.1 degree and their silly
idea about adjusting the mount at this stage would ruin our polar
alignment work. After we've pretended to adjust the mount and pressed
Enter the Autostar will slew to a star and ask us to center it using
the finder and eyepiece. It's optional to actually do this, but there's
no harm done if you do. This actually achieves a small improvement but
if you're planning on refining pointing using either T-Point or
MaxPoint it really doesn't matter.
In theory this is the last time you'll have to do a star alignment. From now on you'll use Park Scope at shut down, and this will preserve the star alignment information for the next observing session.
If you're going to use an image stabilizer, like SBIG's AO-7, or use
an autoguider chip for nudging the telescope, then PEC training is
optional. I spent a half hour doing a crude training and I don't think
I improved anything. If you're going to work without an image
stabilizer, or autoguider, then read the Meade manual and follow
directions for RA PEC training. You can neglect Dec PEC training.
After a good polar alignment, and a successful star alignment, you
can save yourself from ever having to do another alignment for the rest of your life (a slight exaggeration) by
"parking" the telescope before you turn off power. Ignore everyting in
the Meade Instruction Manual about this subject; it's not only
confusing, it's also wrong. Here's what you do.
Setting a Park Position
When you're done for the night, manually slew to what we'll call a
"park position" (see the alternative park procedure usng Ajai's RCX
driver, after this paragraph). Your park position doesn't have to be
the same every night, but you'll
probably settle on a favorite approximate position. Mine is pointing at
the south horizon, because that allows me to move the sliding roof
without decapitating the telescope. After slewing to a park position
use the hand controller to Utilities/ParkScope. Depress Enter,
and note the message "Turn power off now." If it "complains" about
being below the horizon, or something similar, ignore the message. OK,
turn the Meade power switch to off.
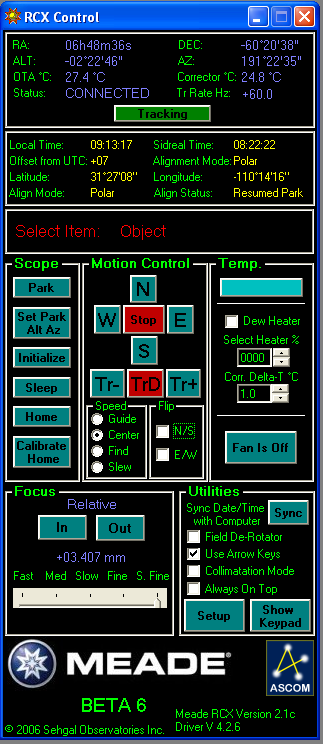
As an alternative to the park procedure described in the previous
paragraph, you may use the park command feature of Ajai's RCX driver.
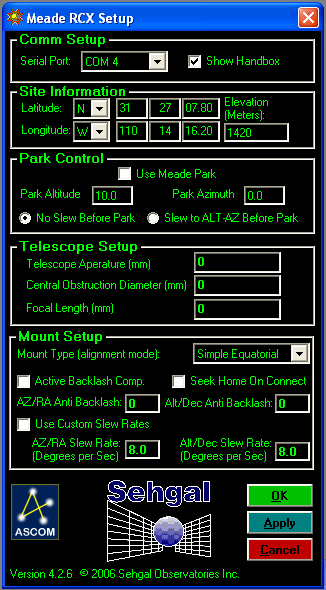
To use this feature you need to setup a desired park position. This can
be done in two ways: 1) Manually slew to a desired park position (stow
position), then on the "RCX Control" window click the "Park Alt Az"
button, click Apply, 2) open the Setup window from the "RCX Control"
window and enter values for "Park Altitude" and "Park Azimuth" (don't
worry about the fact that the "Mount Setup" section has you configured
as "Simple Equatorial," Ajai takes that into account when you specify
park azimuth and altitude).Click OK. This setuip only has to be done
once. From then on, at the end of an observing session, you can command
the telescope to slew to the designated park position using the "RCX
Control" window's "Park" button.
Unparking
When you start the next observing session simply turn on the Meade
power switch and wait. The scope will spend about a minute moving
slowly westaward in hour angle doing what it calls "Initializing...
Smart Drive." Then it does a "GPS Fix." Finally, the controls are
given to you with "Select Item/Object" mode. You should have exactly
the same star pointing coefficients as were in use when you parked at
the end of the previous observing session. You're now ready to point to
zenith for taking those flat fields before it gets dark.
[Note1: When you use RCX Control's "Set Park Alt Az" you're
not done; you have to go to the Setup window and check the box for
"Slew to ALT-AZ Before Park." Otherwise, on the RCX Control window when
you click "Park" it will use the current Alt-Az for a park position.I need to verify this. ]
[Note2: If you control the RCX telescope through MaxPoint,
whenever you update the MaxPoint calibration I think the Park command
saves those updated MaxPOint calibrations. I need to verify that.]
Here's my suggestion. Ignore the MDL Telescope Control's Focus
connection and just go about your business until you're near the ROI
(region of interest) and to verify or adjust focus. When you want to
adjust the focus, note the present setting on Ajai's driver window.
For
exampl,e it may show +3.407. Set the focus rate to "S.Fine" and click
on either "In" or "Out" for about a second. When going "In" the focus
readings will go in the postive direction (seems opposite to me, but
that's what happens). For my RCX there's a little hysteresis, so it may
take 2 or 3 brief adjustments before the focus readings move in the
expected direction. Focus reading changes of 0.010 matter.
Here's a consideration for focusing that applies to all telescopes:
The atmosphere changes, so take several readings at a given setting and
record (or at least note) the best one. Change the focus and repeat. I
sometimes make a graph of these numbers versus focus setting reading
(on the observing log). Good focus leads to good FWHM, which means
"deeper" images (greater limiting magnitude).
This may be the reason you bought the RCX. It's easy! And it's
important to always be in good collimation. Only with good collimation
can you get sharp images, with good FWHM - and that translates to going
deeper (i.e., a better limiting magnitude). With the Celestron telescopes
it's difficult to collimate with just one person, but with the RCX one
person can adjust collimation without even being close to the
telescope. When I collimate I do it from the comfort of my home office,
through buried cable communications.
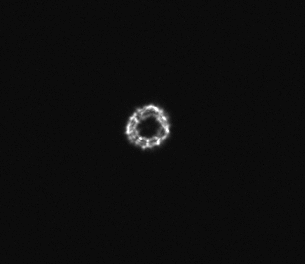
The first step for collimating is to defocus enough that a CCD image
of a star (near the center of the image) appears as a donut. If the
donut is symmetrical, with no bright spot around the donut annulus,
then you're in good collimation, as in this image.
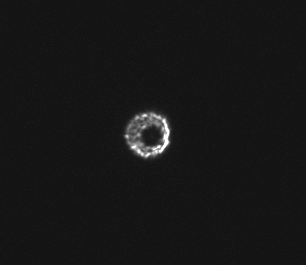
But when collimation is bad the "hole"
is offset from the center and the bright "donut" annulus is narrower at
one clock angle. Suppose the narrowest part is at the 3 o'clock
position. This will produce a bright spot at the 3 o'clock position, shown here.
The collimation adjustment that we want does two things: it moves the
location of the star away from the bright spot clock position (i.e, in
the 9 o'clock direction), and it reduces the intensity of the bright
spot (because the width of the donut annulus become more uniform). To
make an adjustment bring up Ajai's driver window and check the
"Collimation Mode" check box. ALso check the "Always On Top" check box.
In the "Motion Control" section click and hold for maybe 4 seconds the
"E" button. Note whether the star moves in the desired direction. If it
doesn't try the "W" button. If the star gets close to the edge then
nudge the pointing in the desired direction (see the "nudging"
paragraph in this item, below). Continue these adjustments until the
donut is symmetrical and no bright spotsd are preswnt. If the
"atmospheric seeing" is bad you may need to take several CCD exposures
to be sure of the donut's appearance. When you're satisfied, uncheck
the "Collimate Mode" check box.
When the air is humid you can prevent dew accumulation on the
corrector plate by going to Ajai's driver window and checking the "Dew
Heater" box. You have to also set a heating level to something greater
than zero, such as 20 %. The "Corr. Delta-T degC" value should be set
to +2 C. This is how much warmer the corrector plate will be kept above
ambient (hopefully ambient is measured well). The color status bar
indicates the temperatre of the corrector plate in relation to ambient:
grenn when they're the same, blue when the corrector plate is colder
(dangerous when it's humid), and red/orange when the corrector plate is
warmer than ambient. When you're concerned about corrector plate
fogging up keep the color bar red/orange.
Other Features of General Usefulness
Not everyone needs a tip/tilt image stabilizer, like SBIG's AO-7, or
their new model AO-L for the large format CCD chips (the STL series).
But I do, because my observatory is located next to mountain canyons
that are the source of troublesome down slope winds. These winds begin
about an hour after sunset and when they pass over my site they cause
the star field to oscillate back and forth in one direction with
amplitudes that are typically 10 to 20 "arc, sometimes 1' arc, and with
periods that are typically less than a second. This lasts for ~20
minutes, and appear about once per hour. Fortunately, they subside in
severity at about midnight. Because of this problem I need a
fast-reacting tip/tilt image stabilizer, and the SBIG AO-7 is the
perfect solution.
Whenever I physically rotate the AO-7/CFW/CCD assembly (in order to
have a bright star available for the autoguider for the night's target)
the image flip and rotate settings have to be changed, and the AO-7
drive motors have to be recalibrated. Also, after such a rotation I
have to use a different "cheat sheet" posted next to my monitor that
shows a map of which move commands are needed for the 4 move directions
(e.g., -X = GoEast, etc). This extra work is worth it because on most
nights I can't observe without the AO-7.
I really like having the ability of nudging the telescope in very
small increments. This is needed when I want to position the star field
to within a few pixels of some preferred location (which is important
for precision light curve observations). You can try doing this with
the MDL "TelescopeControl/Telescope" window by specifying a few seconds
of arc motion in the desired direction, but sometimes funny things
happen when you do this (related, I think, to MaxPoint's use of a
flawed set of pointing coefficients). The procedure I'll suggest is
robust - it always works in the expected manner.
MDL's CCD control window, called "Maxim CCD," has a "Guide" tab.
Click it, then click "Options," then click "Move." This opens a window
where you can specify the duration of a move command and direction
assignments (consult the MDL manual for more information about this).
While observing I leave the left part of this window conveniently open,
positioned on the right edge of the MDL work area. When I'm trying to
place a specific guide star in a certain location on the autoguider
chip (such as one corner) the move commands in this Move window are
just what's needed. Also, if I'm using the AO-7 image stabilizer and
thin clouds appear during an exposure and decrease the brightness of
the autoguide star so that I can see that the star is drifting close to
an edge of the AO-7 image window, I can use the Move window move
commands to center the star.
Lst year a nearby lightning strike damaged components at each end of
the 100-foot cables that connect the telescope to my home office
computer. I surmize that during the lightning strike a large voltage
was presnet that caused electrons to rush to one end of the cables, and
as they piled up they heated the components (a USB extender unit and a
Celestron hand controller). Then the sign of the lightning's voltage
changes, and electrons rushed to the other end of the cables, again
over-heating the components at that end (the other USB extender unit
and a serial I/O card). This happened even though nothing was turned
on. My mistake was to leave the cables connected. I now have the
practice (during the monsoon season, yes, we have monsoions in Southern
Arizona) of disconnecting both cables control cables, at both ends.
Then there's the issue of lightning striking the telescope. Mine is
in a sliding roof observatory, with only a canvas between the telescope
and the sky. Lightning rods? People living in the mid-west know about
them, but you can't find anyone who's ever heard of "lightning rod" in
Arizona. I'm wary of inviting lightning to my neighborhood, by
installing tall pipes nearby. That probably is safe, since at Flagstaff
the Naval Observatory uses two such poles at the north end of a
roll-off roof. If you have a dome, then it will protect your telescope
from lightning (but not the cables).
The RCX has good baffling. That's not what this section is about.
I'm baffled by the neglectful way manuals are produced. Not just
Meade, but also Celestron and just about any company in business today.
It didn't used to be this way. In the "good old day" Hewlett-Packard
produced good manuals. Even Microsoft used to produce good manuals. A
software company president once told me that the the major cost of his
product was not development, it was customer support. Now, if Meade and
Celestron want to reduce their customer support costs they could
produce good manuals. Let me rephrase that: If Meade and Celestron want
to avoid the cost of upgrading CS, which is sorely needed (especially
for the RCX), then they could invest in a good manual. A good manual
should make good business sense: you'd have happier customers, word of
mouth new sales, and a reduced CSbudget - win, win, win!
If Meade wants to use any of the material on this web page, please
do! No charge! I've prepared it out of sympathy for people like me who
spent good money buying a good telescope but left floundering on how to
use it to best advantage. It just baffled me that Meade would design
one of the best-ever telescopes, aimed at advanced observers, then
neglect to describe how to use all its features.
I'm beginning to conclude the following:
RCX users, we're on our own!
You can help by sharing your ideas for improving this alternative manual by e-mailing: B L G A R Y @ u m i c h . e d u
____________________________________________________________________
This site opened: September 12, 2006. Last Update: September 13, 2006